
STM32嵌入式开发之——IAR新建STM32F10x工程模板
配置成这样样子即可,至此IAR的工程新建就完成了,接下来还需要对其进行环境配置C/C++Compiler->Preprocessor配置头文件目录(为了在每个程序文件中使用#include时不用再加上绝对路径)、定义全局宏。可以选择自动匹配为相对路径对应工程添加这些项,接下来添加宏定义USE_STDPERIPH_DRIVER:STM32初始文件中用于选择不同的初始程序,如现在使用的标准库,后期可能
前言
- 网上很多MDK的教程,包括我在学校学习时也是使用MDK,但是工作后,很多时候都会使用IAR,两者的差异不大,基本上会了一次新建工程模板后就能很快的从MDK转到IAR,于是通过此文记录一下过程的同时方便大家参考。
- 内容大多来自互联网,我只是进行自己实践并整理,有问题欢迎讨论提出修改。
- 本文建议在有MDK基础参考,有些详细步骤(如什么是MDK……),也可以细节部分再去检索一下,我也是花了一些时间、踩了一些坑……
新建IAR工程
1.创建工程目录
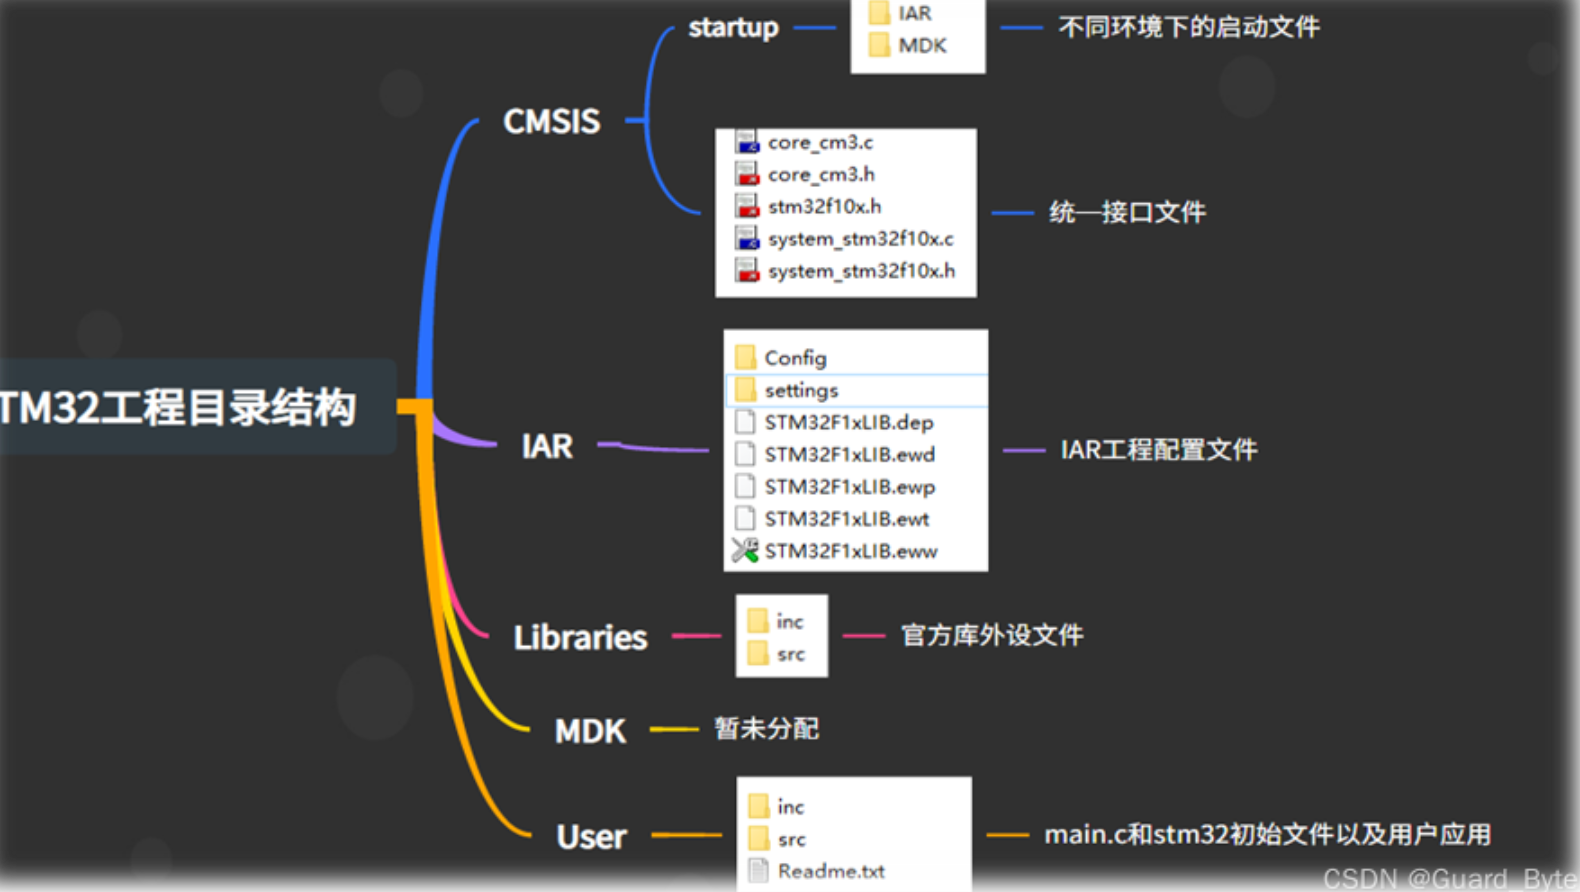
CMSIS
-
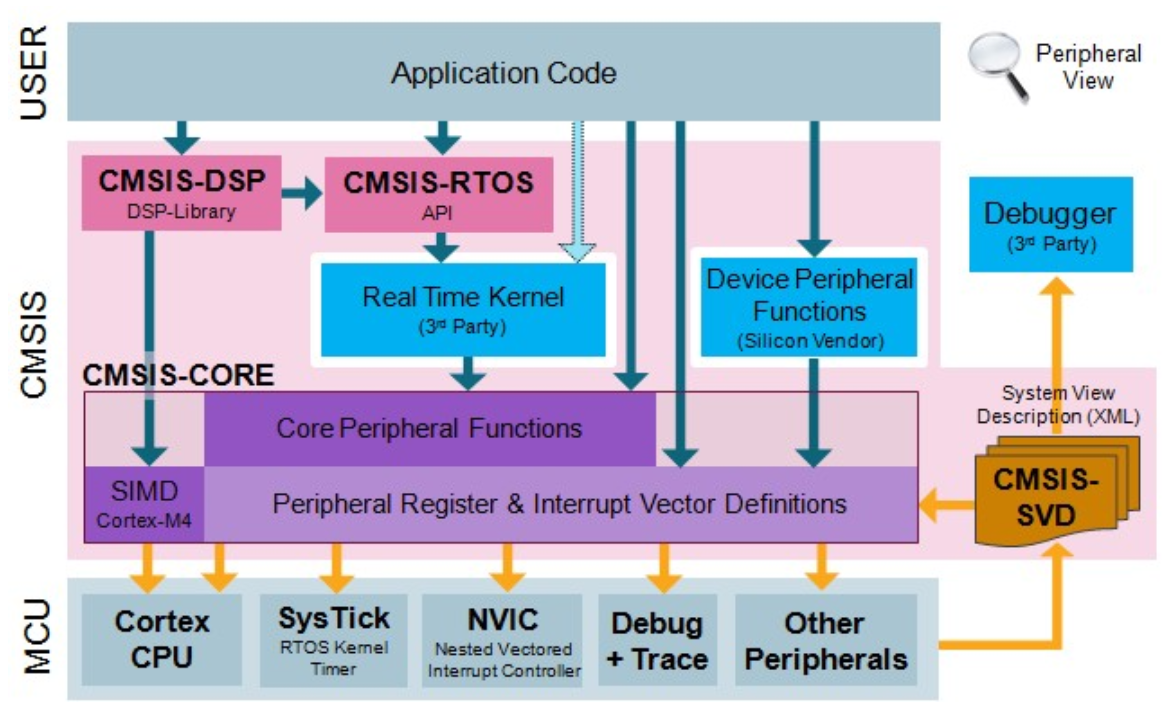
CMSIS (Cortex Microcontroller Software Interface Standard)是一种为ARM Cortex-M处理器系列提供的与供应商无关的硬件抽象层。定义了通用的工具接口,旨在简化微控制器的软件复用,CMSIS是由ARM公司与多家芯片和软件供应商合作定义的,提供了内核与外设、实时操作系统和中间设备之间的通用接口。
-
CMSIS可以分为多个软件层级,ARM公司提供的部分包括:
-
CMSIS-DSP:包含以定点和单精度浮点实现的60多种DSP库函数。
-
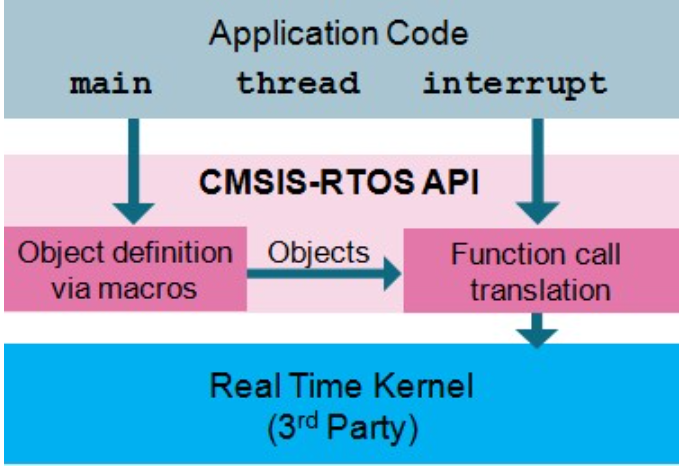
CMSIS-RTOS API:为实时操作系统提供标准化的编程接口,用于线程控制、资源和时间管理。
-
-
CMSIS-SVD:包含完整的微控制系统的程序员视角XML描述文件。
-
CMSIS的使用步骤
- 从ST官网下载标准外设库
- 新建工程时,建立响应的文件目录,不要加入默认的启动文件
- 根据芯片,将
Liberaries\CMSIS\CM3\DeviceSupport\ST\STM32F10x\startup\arm中的启动代码加入到工程中 - 选择合适的启动代码,主要由处理器的Flash容量大小来选择
- 决定是否启用标准外设库,通过编辑
stm32f10x.h来进行设置 - 确定处理器的频率,在
system_stm32f10x.c中设置
2.从标准外设库中复制必要的库
下载标准外设库
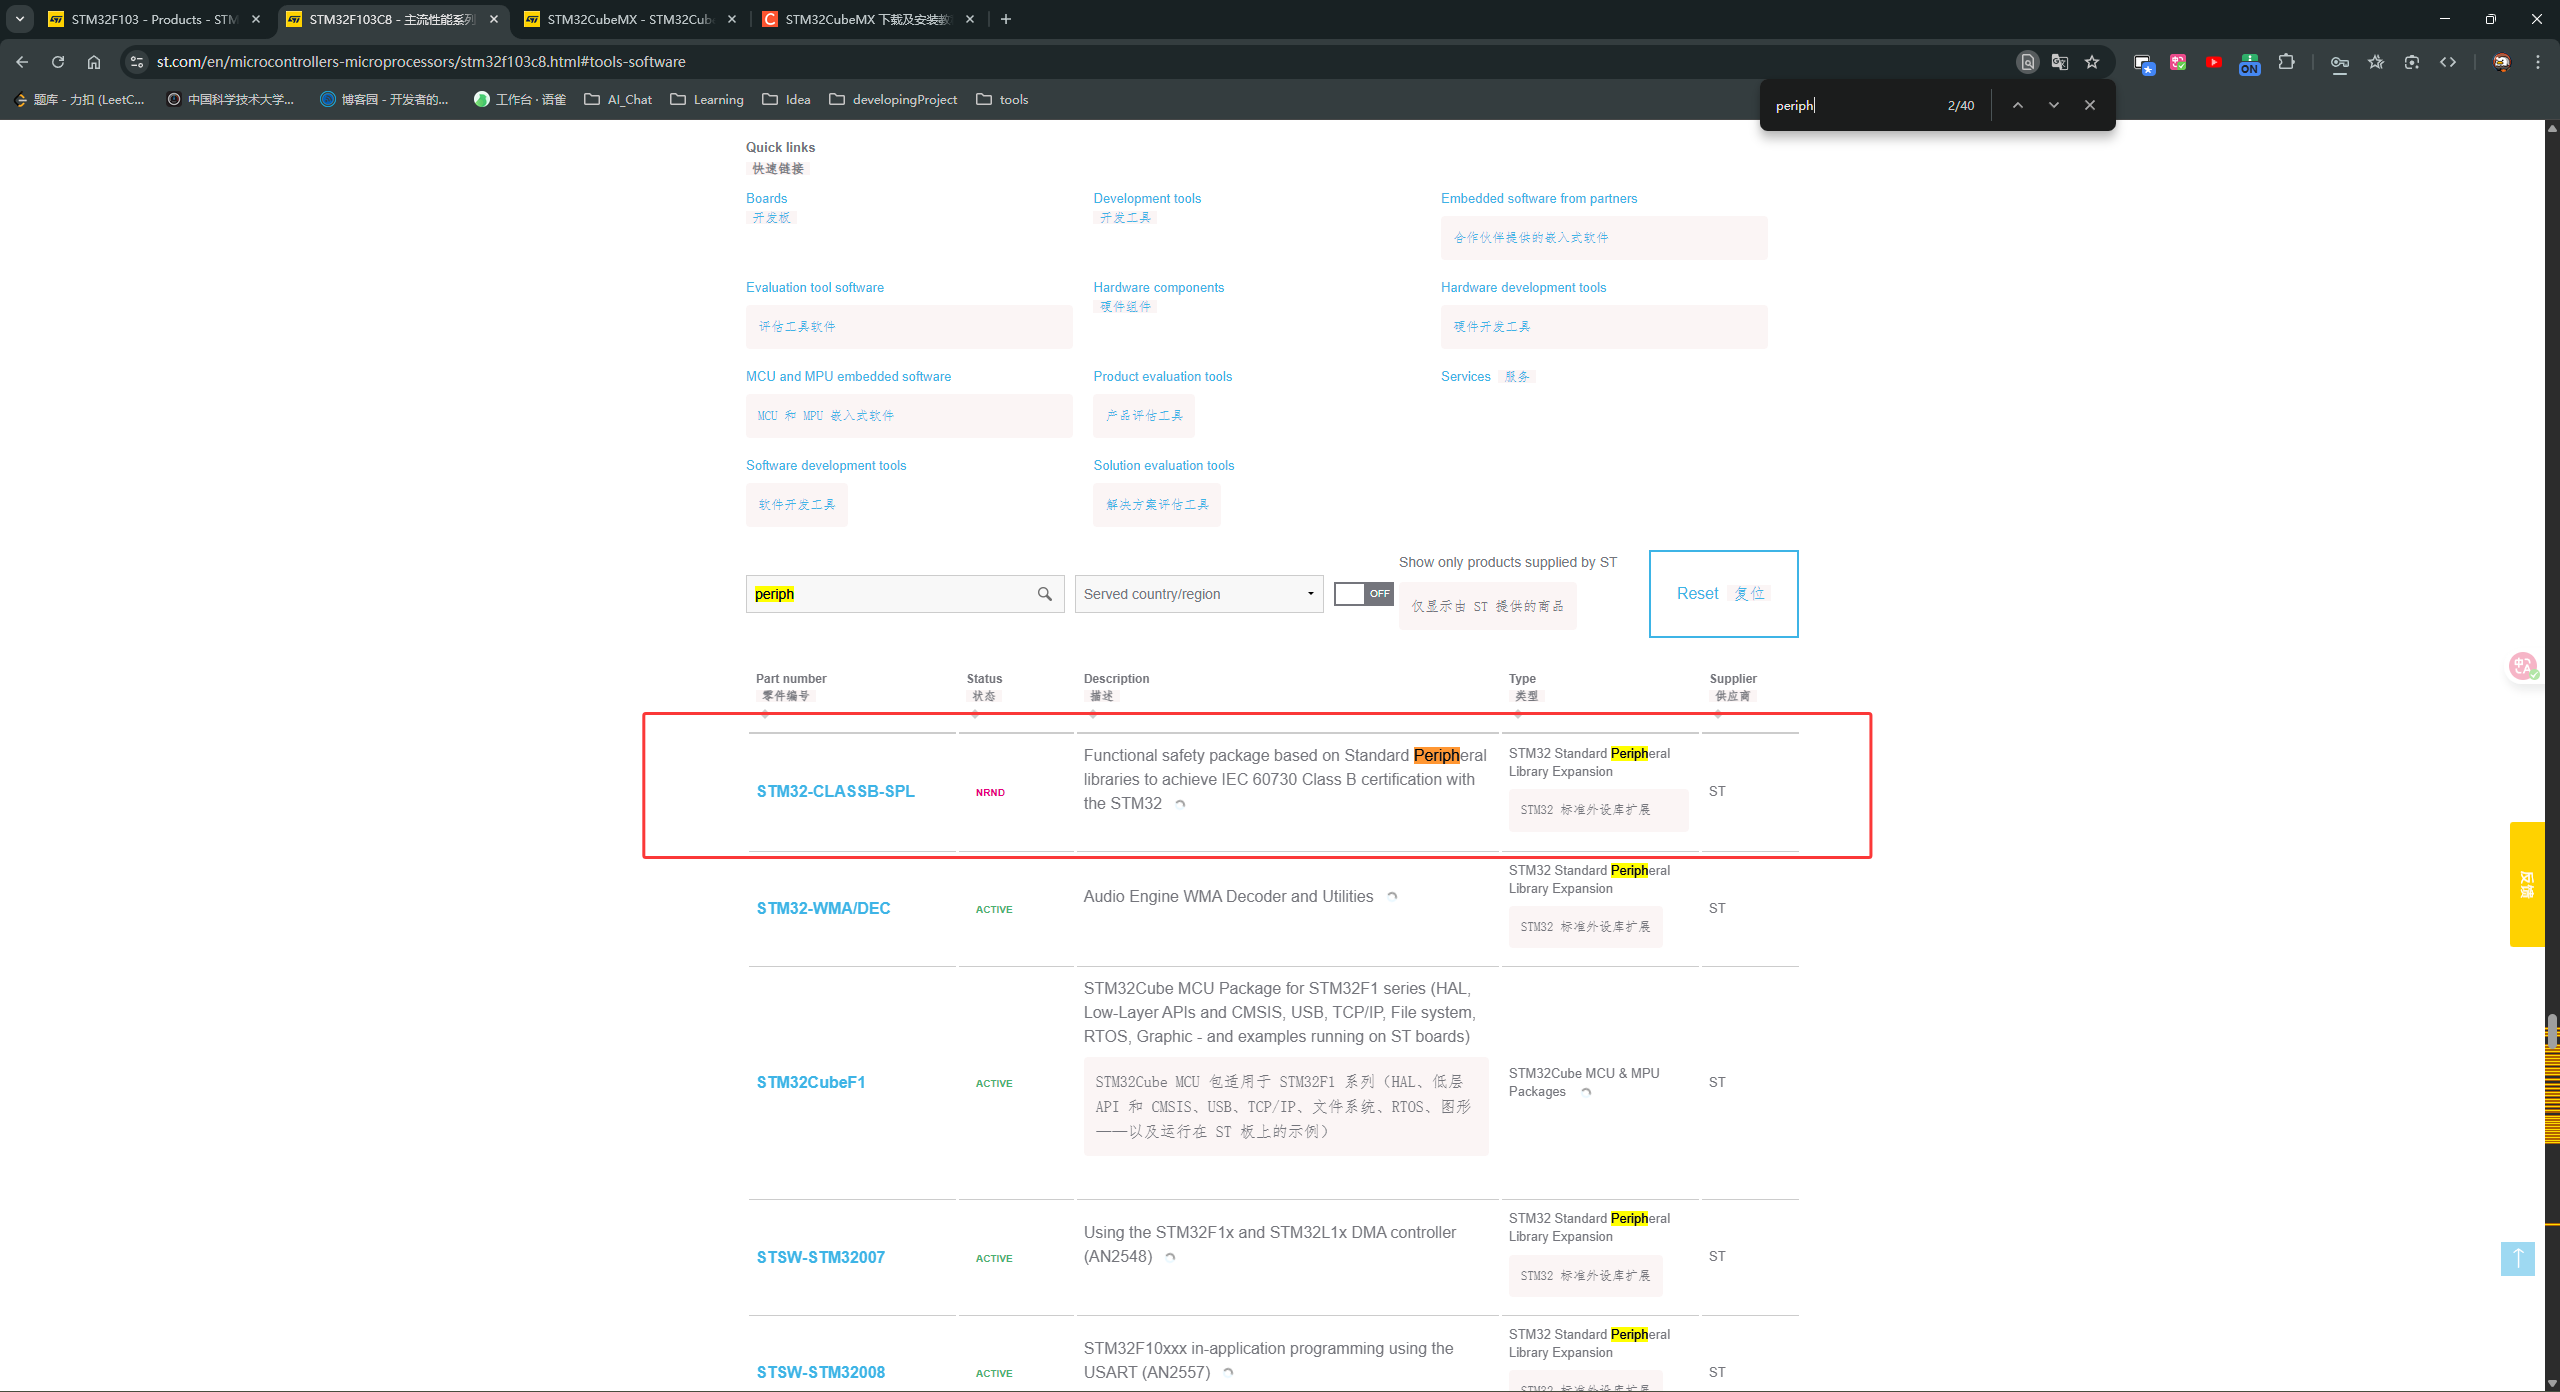
指定安装目录并安装标准外设库
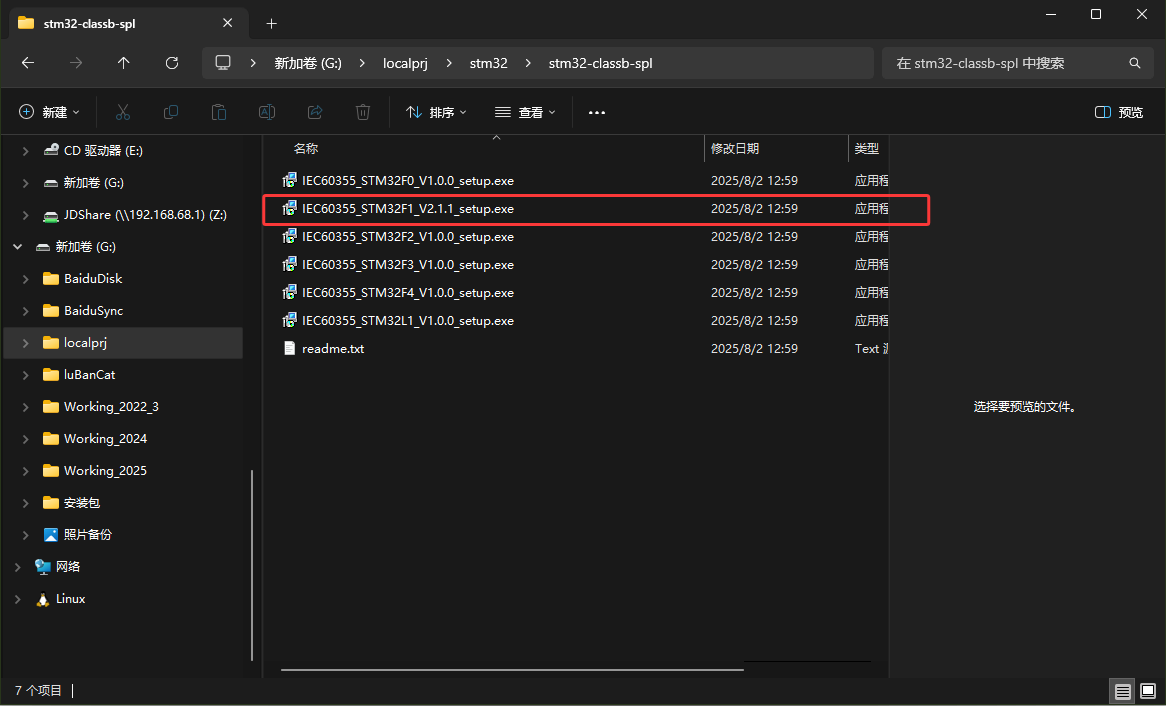
这样就得到了标准外设驱动库了
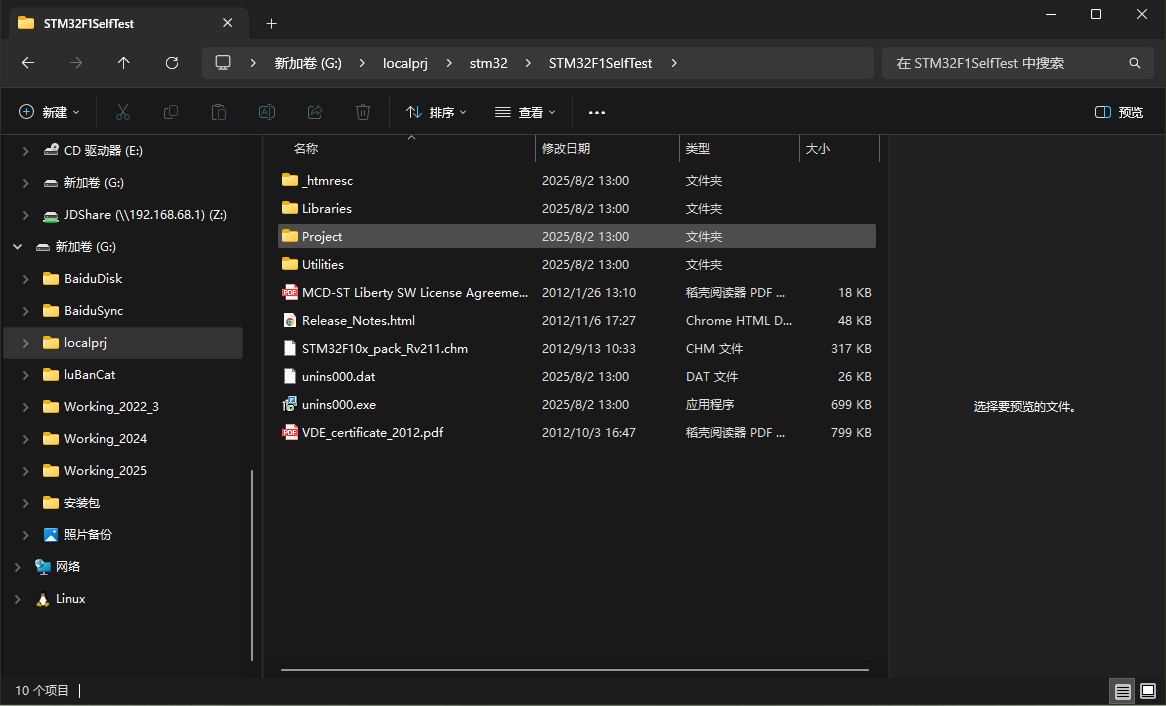
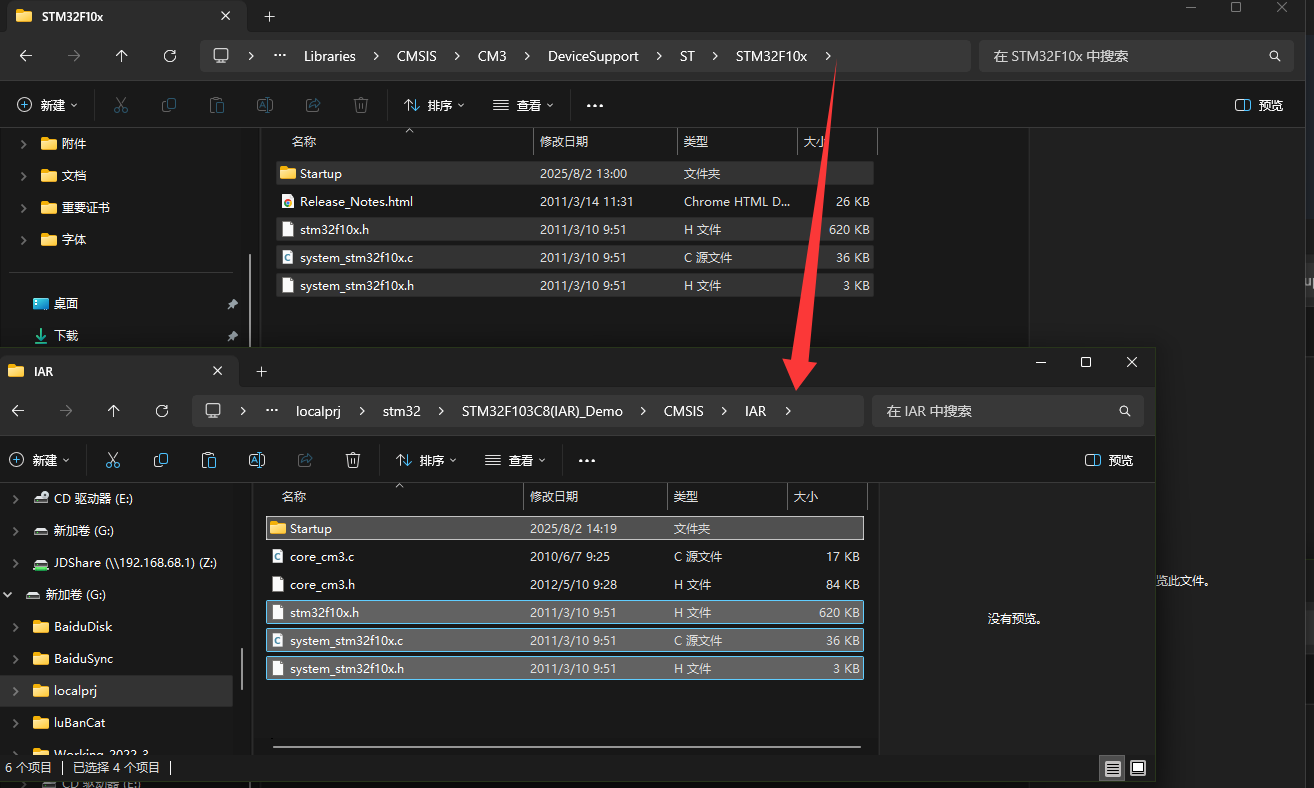
1、将标准外设驱动库中的程序例程下的.icf文件复制到Config文件夹中
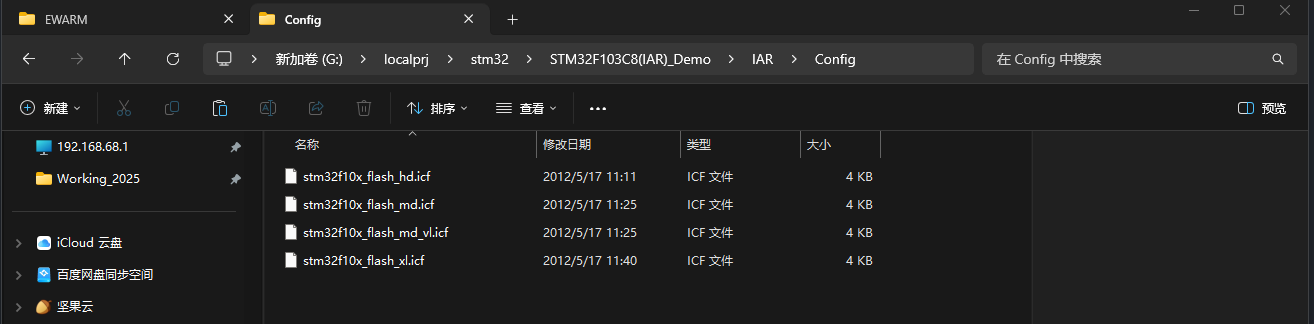
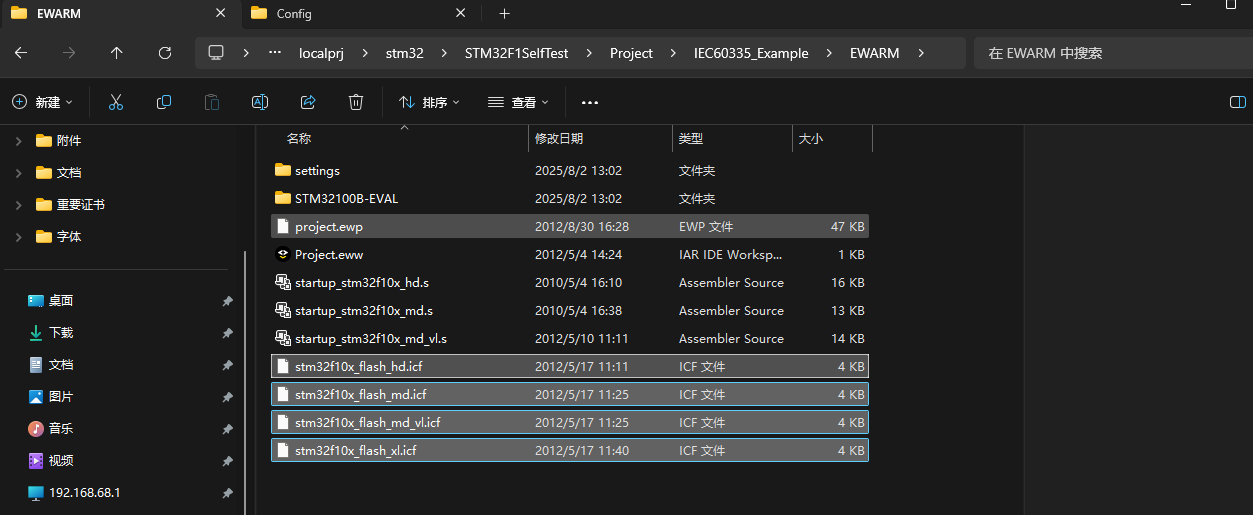
2、将标准外设驱动库的驱动文件复制到自建的Liberaries文件夹下
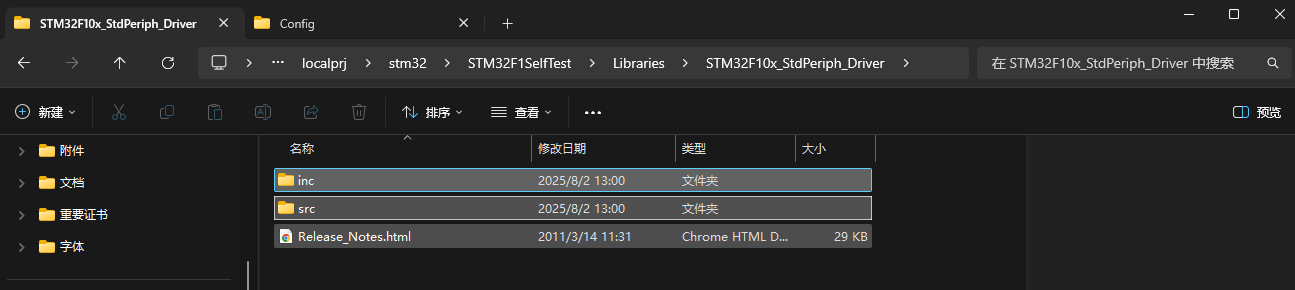

3、将标准外设驱动库中的程序例程下的.c .hdemo也可以放入新建User目录下,就不用再自己写了
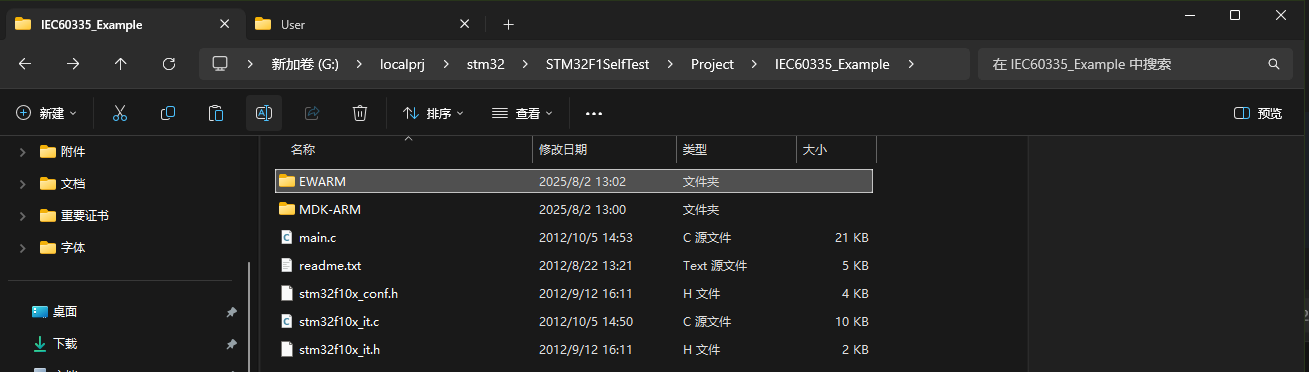
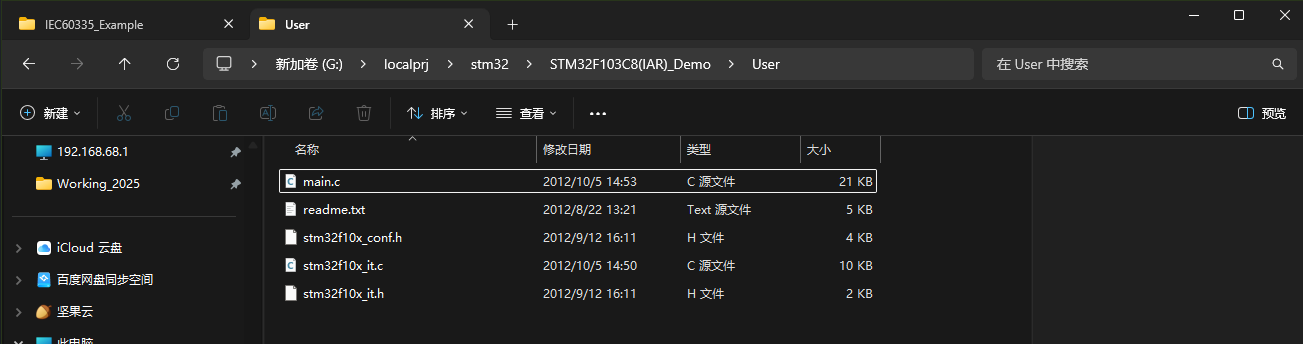
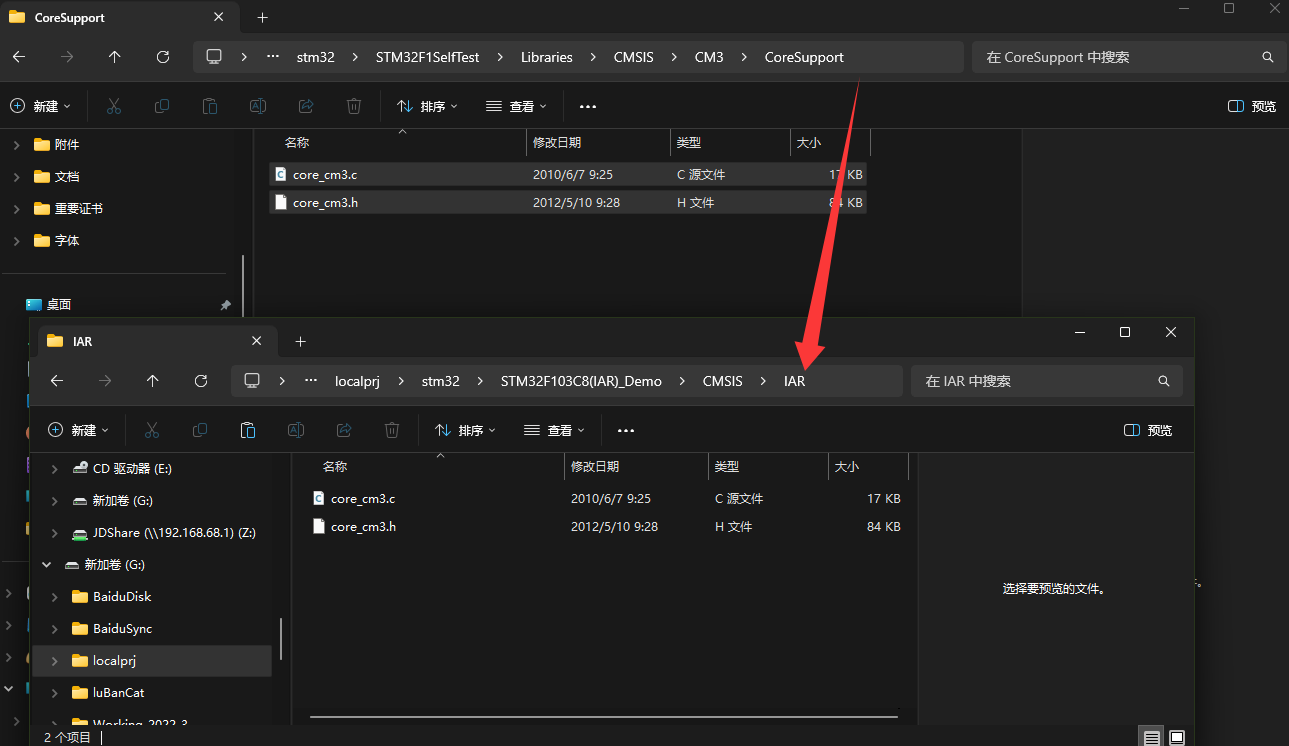
4、最后将标准外设驱动库中的CMSIS文件夹里的文件分别复制到新建的指定目录下
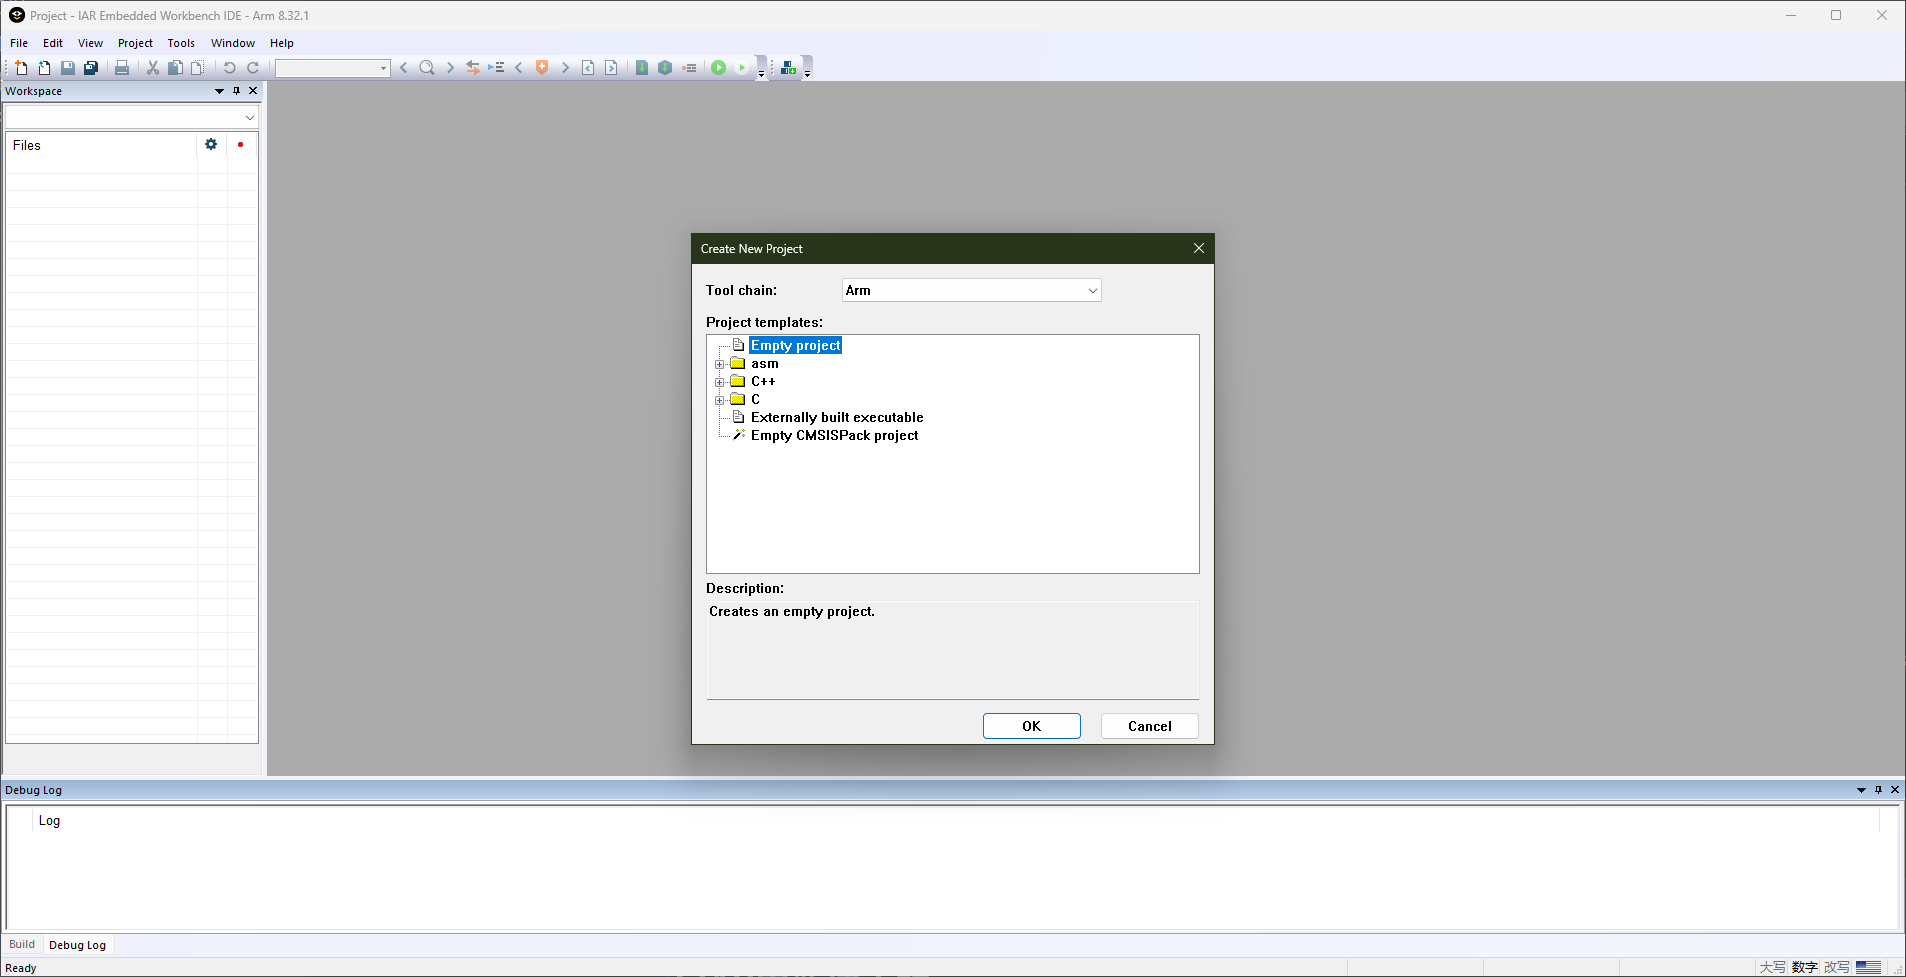
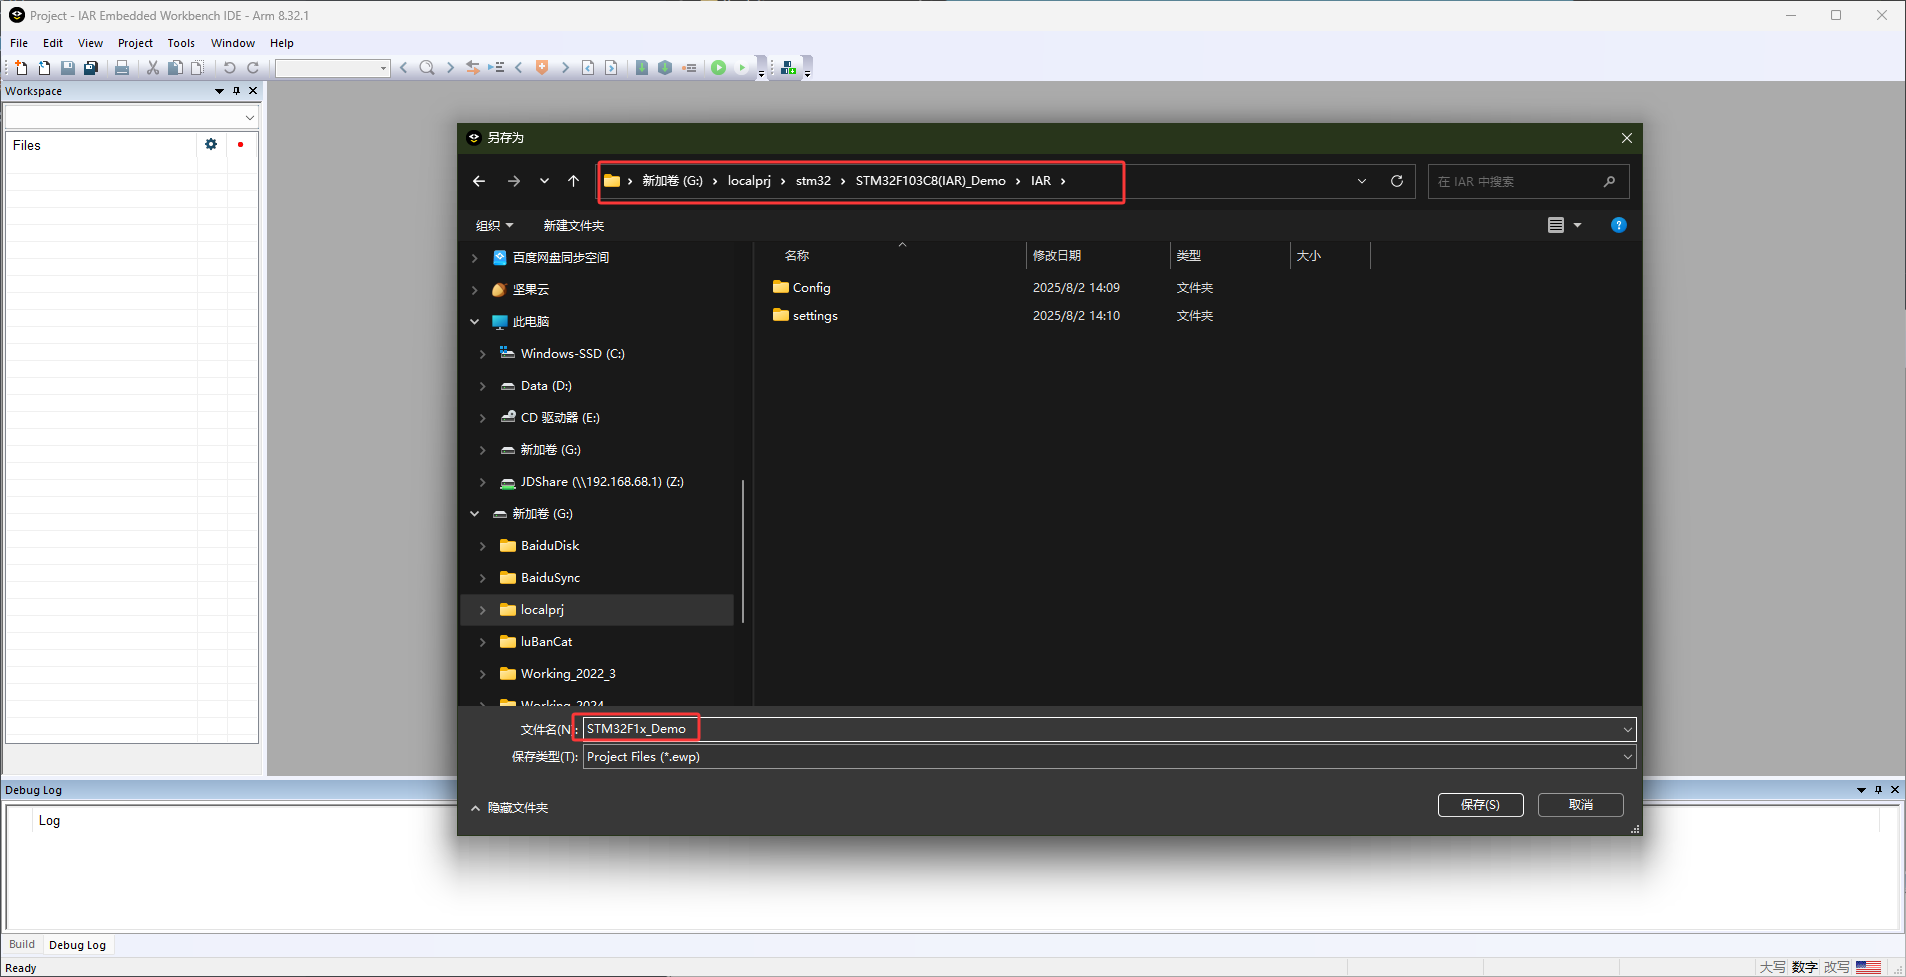
3.IAR中新建工程
4.添加标准外设库文件到工程中
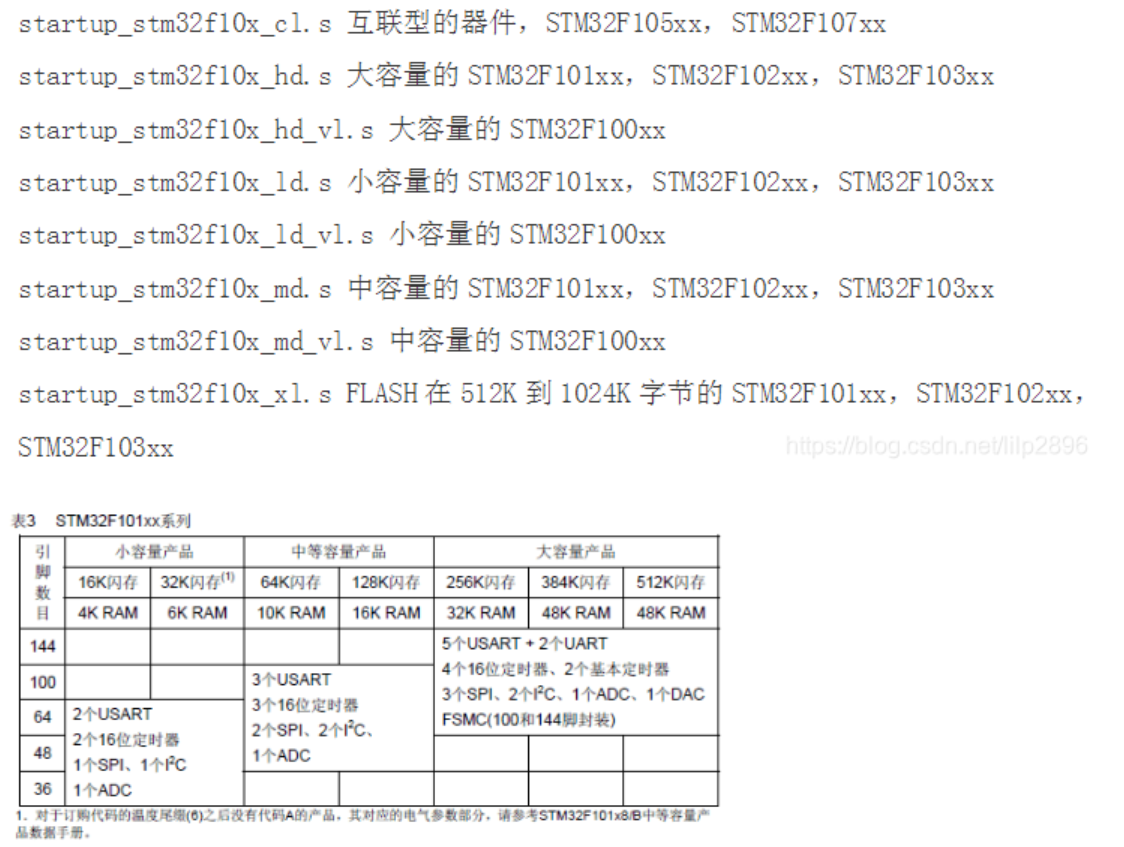
这里注意查询自己的开发板需要那种的启动文件,主要由开发板的闪存来决定,比如我的开发板是f103c8t6,就选择md.s结尾的启动文件即可,如果不对应的话可能会导致系统无法正常启动噢!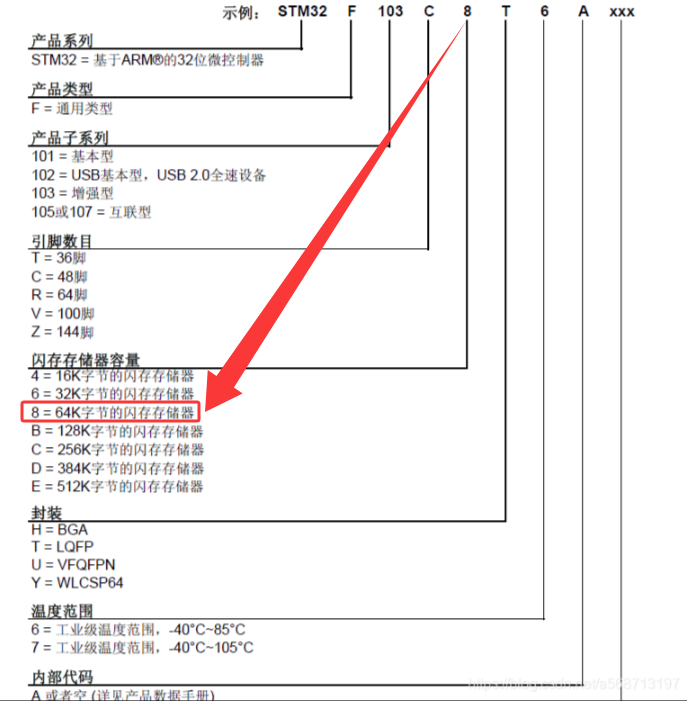
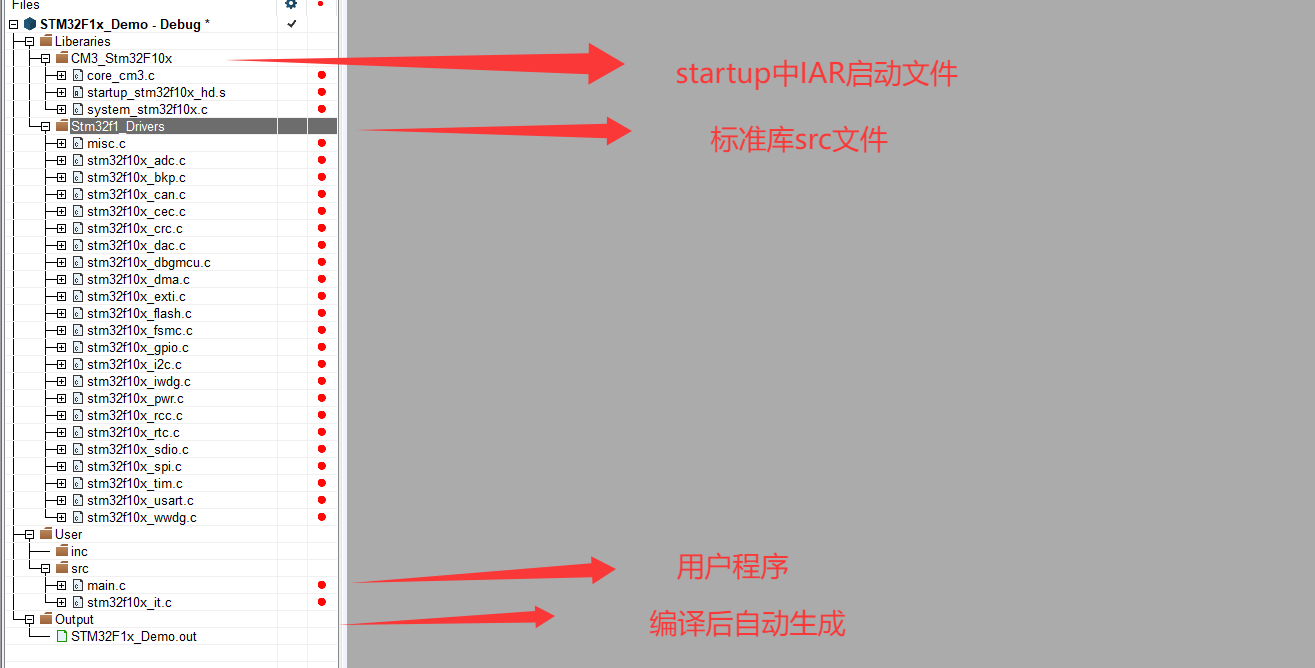
配置成这样样子即可,至此IAR的工程新建就完成了,接下来还需要对其进行环境配置
IAR工程环境配置
1.选择单片机型号
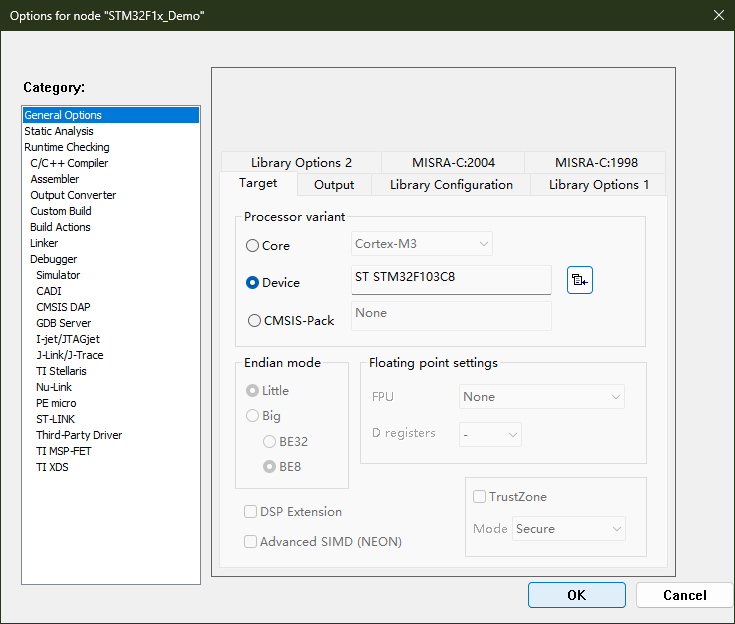
2.添加库文件和路径以及宏定义
C/C++Compiler->Preprocessor配置头文件目录(为了在每个程序文件中使用#include时不用再加上绝对路径)、定义全局宏。
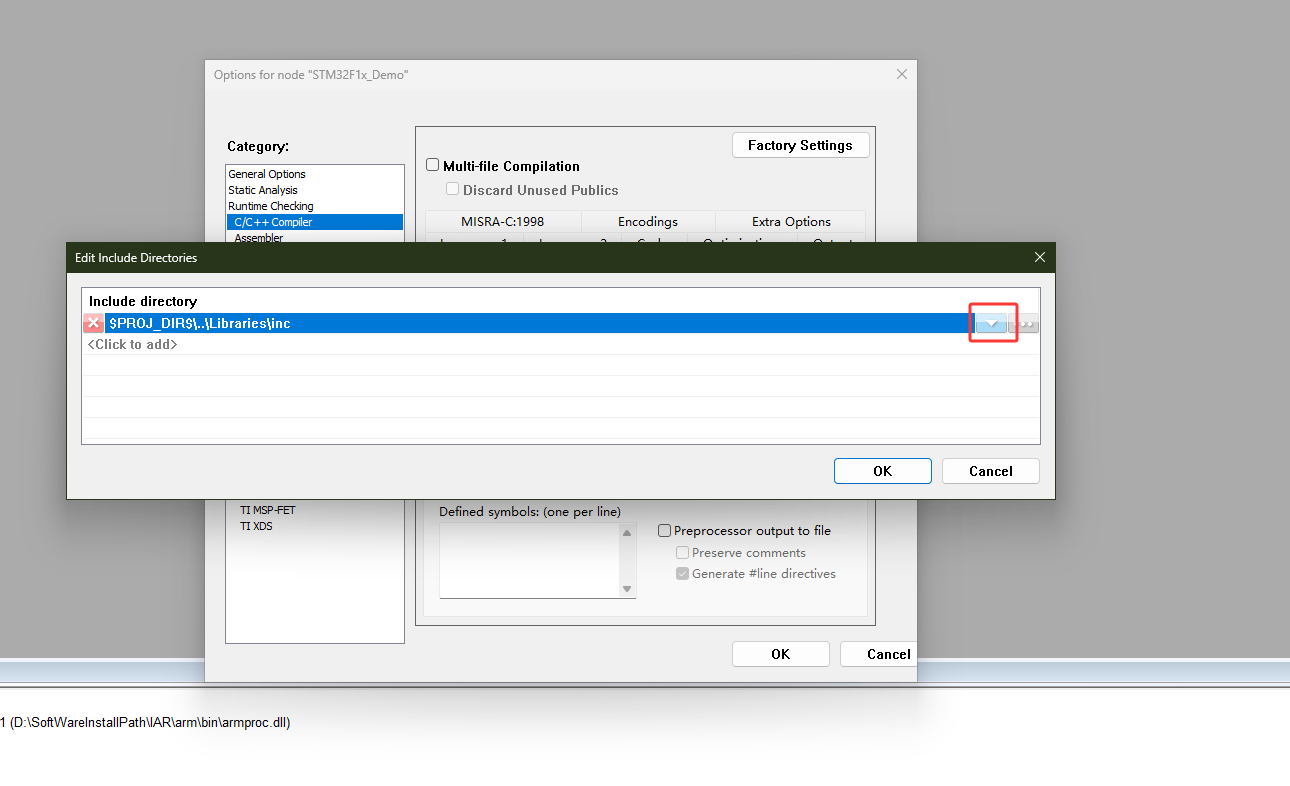
可以选择自动匹配为相对路径
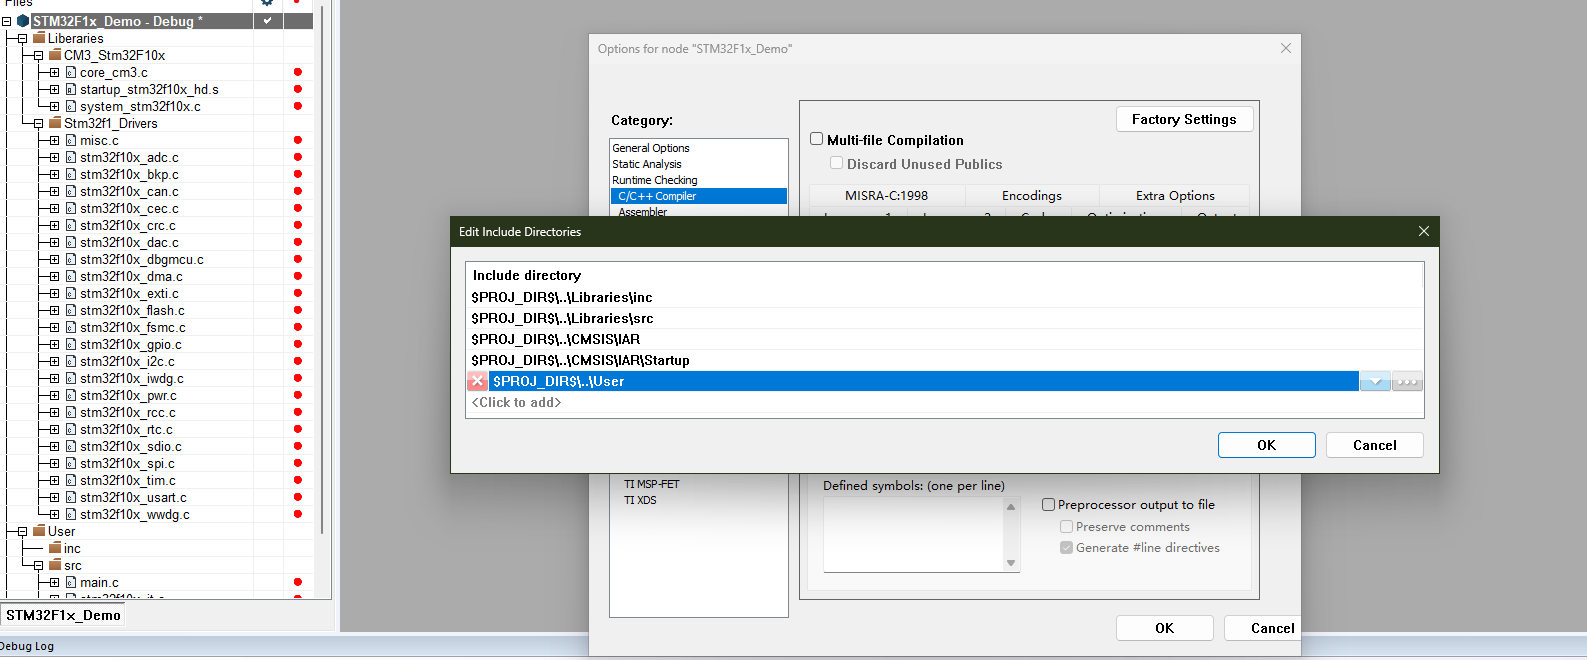
对应工程添加这些项,接下来添加宏定义
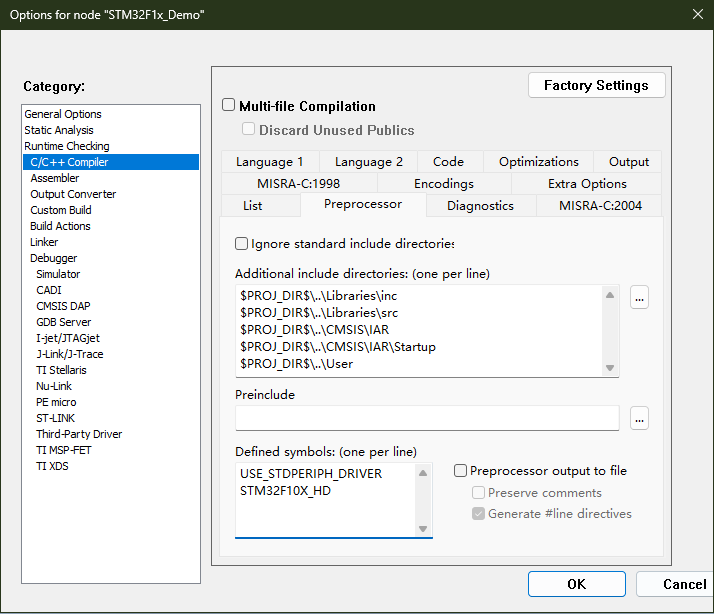
- USE_STDPERIPH_DRIVER:STM32初始文件中用于选择不同的初始程序,如现在使用的标准库,后期可能会选择HAL库
- STM32F10X_HD :告诉stm32初始文件,编译程序目标型号对应FLSH大小,以便确定程序代码起止空间地址等,对应我们刚才选择启动文件的类型。
3.编译器相关设置
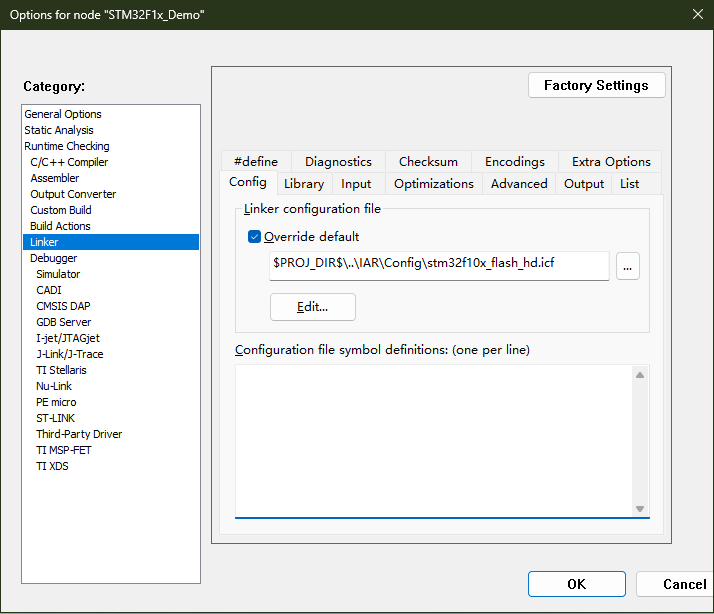
选择链接配置文件的路径
icf是链接配置文件(Linker configuration file)后缀名- 定义了芯片存储空间的大小。
- 定义ROM的大小和起始、结束地址。
- 定义RAM的大小和起始、结束地址。
- 链接时是否保存位块与符号
- 设置你的启动过程
- 设置你的堆与栈的大小和对齐方式
- 修改编译器默认的初始化过程。
- 关于默认库的处理等。。。
选择我们刚才保存的icf文件,可以手动修改为绝对路径
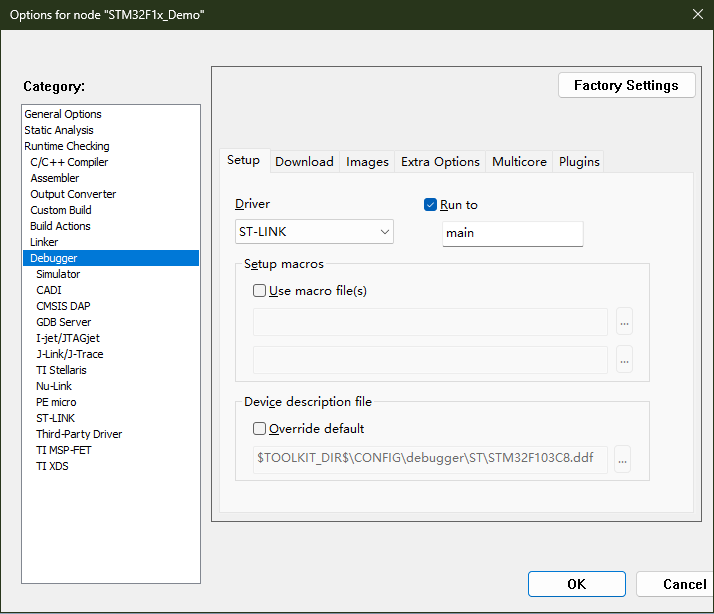
配置下载器或调试器
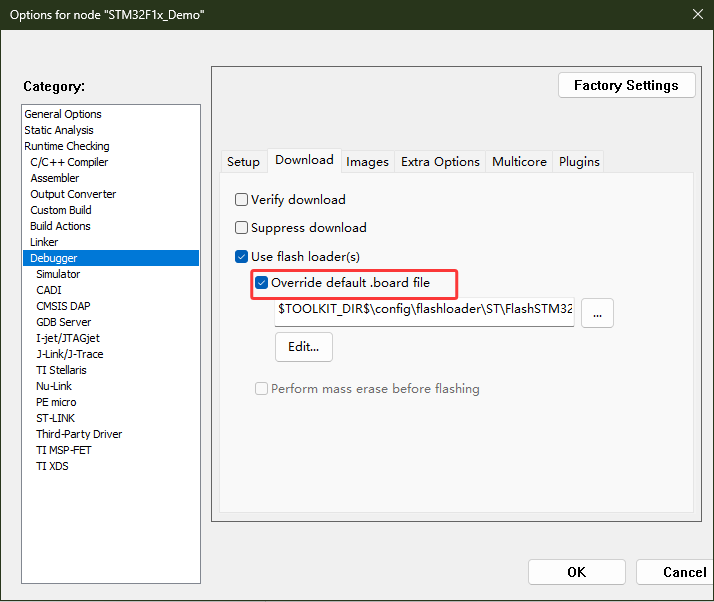
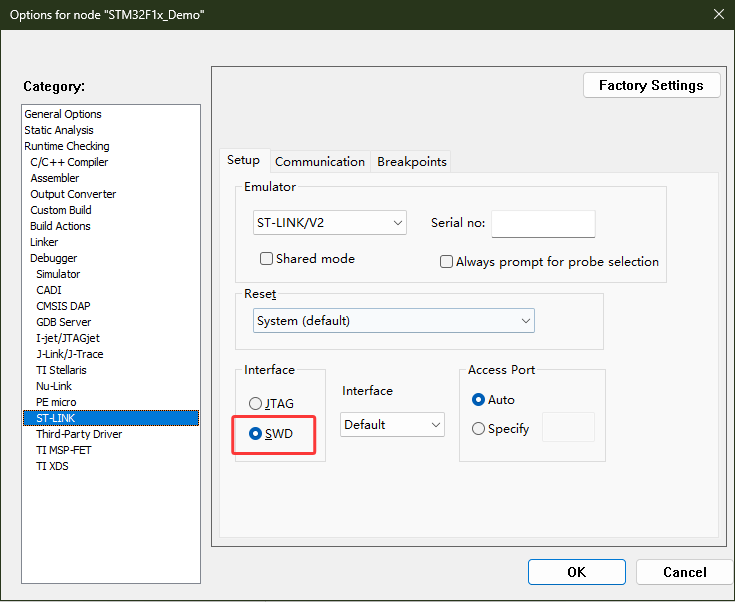
程序编译调试测试
复制以下代码,替换main.c
#include "stm32f10x.h"
static void LED_GPIO_Init(void)
{
    GPIO_InitTypeDef  GPIO_InitStruct = {0};
    RCC_APB2PeriphClockCmd(RCC_APB2Periph_GPIOC,ENABLE); //使能GPIOC所在时钟
    GPIO_InitStruct.GPIO_Pin   = GPIO_Pin_8|GPIO_Pin_13; //引脚选择8和13
    GPIO_InitStruct.GPIO_Mode  = GPIO_Mode_Out_PP;  	 //设置推挽输出
    GPIO_InitStruct.GPIO_Speed = GPIO_Speed_50MHz;  	 //电平翻转速度
    GPIO_Init(GPIOC, &GPIO_InitStruct);
}

//毫秒级的延时
static void delay_ms(int ms)     //写一个简单的软件延时函数
{
   int i=0;
   while(ms--)
   {
      i=12000;  //自己定义
      while(i--) ;
   }
}

int main(void) //主函数
{
    LED_GPIO_Init();  //调用上面定义的初始化函数对GPIO进行初始化
    while(1)
{
		GPIO_SetBits(GPIOA,GPIO_Pin_8);   //PA8 输出高电平
        GPIO_SetBits(GPIOC,GPIO_Pin_13);  //PC13 输出高电平
        delay_ms(300);      			  // 延时
        GPIO_ResetBits(GPIOA,GPIO_Pin_8); //PA8 输出低电平
        GPIO_ResetBits(GPIOC,GPIO_Pin_13);
        delay_ms(300);
    }
}
编译问题及解决方法
问题一
Fatal Error[Pe1696]: cannot open source file "stm32f10x_STLlib.h" G:\localprj\stm32\STM32F103C8(IAR)_Demo\User\stm32f10x_it.c 31
Fatal Error[Pe1696]: cannot open source file "stm32f10x_STLclassBvar.h" G:\localprj\stm32\STM32F103C8(IAR)_Demo\User\stm32f10x_it.c 32
打开 stm32f10x_it.c,找到:
#include "stm32f10x_STLlib.h"
#include "stm32f10x_STLclassBvar.h"
注释掉或删除这两行。
问题二
Error[Pe020]: identifier "TickCounter" is undefined G:\localprj\stm32\STM32F103C8(IAR)_Demo\User\stm32f10x_it.c 205
Error[Pe020]: identifier "TickCounterInv" is undefined G:\localprj\stm32\STM32F103C8(IAR)_Demo\User\stm32f10x_it.c 205
Error[Pe020]: identifier "SYSTICK_20ms_TB" is undefined G:\localprj\stm32\STM32F103C8(IAR)_Demo\User\stm32f10x_it.c 210
Error[Pe020]: identifier "TimeBaseFlag" is undefined G:\localprj\stm32\STM32F103C8(IAR)_Demo\User\stm32f10x_it.c 217
Error[Pe020]: identifier "TimeBaseFlagInv" is undefined G:\localprj\stm32\STM32F103C8(IAR)_Demo\User\stm32f10x_it.c 218
Error[Pe020]: identifier "CurrentHSEPeriod" is undefined G:\localprj\stm32\STM32F103C8(IAR)_Demo\User\stm32f10x_it.c 220
Error[Pe020]: identifier "CurrentHSEPeriodInv" is undefined G:\localprj\stm32\STM32F103C8(IAR)_Demo\User\stm32f10x_it.c 220
Error[Pe020]: identifier "ISRCtrlFlowCnt" is undefined G:\localprj\stm32\STM32F103C8(IAR)_Demo\User\stm32f10x_it.c 222
Error[Pe020]: identifier "MEASPERIOD_ISR_CALLER" is undefined G:\localprj\stm32\STM32F103C8(IAR)_Demo\User\stm32f10x_it.c 222
Warning[Pe223]: function "STL_MeasurePeriod" declared implicitly G:\localprj\stm32\STM32F103C8(IAR)_Demo\User\stm32f10x_it.c 223
Error[Pe020]: identifier "ISRCtrlFlowCntInv" is undefined G:\localprj\stm32\STM32F103C8(IAR)_Demo\User\stm32f10x_it.c 225
Error[Pe020]: identifier "ISRCtrlFlowCnt" is undefined G:\localprj\stm32\STM32F103C8(IAR)_Demo\User\stm32f10x_it.c 234
Error[Pe020]: identifier "RAM_MARCHC_ISR_CALLER" is undefined G:\localprj\stm32\STM32F103C8(IAR)_Demo\User\stm32f10x_it.c 234
Warning[Pe223]: function "STL_TranspMarchC" declared implicitly G:\localprj\stm32\STM32F103C8(IAR)_Demo\User\stm32f10x_it.c 235
Error[Pe020]: identifier "ISRCtrlFlowCntInv" is undefined G:\localprj\stm32\STM32F103C8(IAR)_Demo\User\stm32f10x_it.c 236
Error[Pe020]: identifier "TEST_RUNNING" is undefined G:\localprj\stm32\STM32F103C8(IAR)_Demo\User\stm32f10x_it.c 245
Error[Pe020]: identifier "TEST_OK" is undefined G:\localprj\stm32\STM32F103C8(IAR)_Demo\User\stm32f10x_it.c 247
Error[Pe020]: identifier "TEST_FAILURE" is undefined G:\localprj\stm32\STM32F103C8(IAR)_Demo\User\stm32f10x_it.c 255
Error[Pe020]: identifier "CLASS_B_DATA_FAIL" is undefined G:\localprj\stm32\STM32F103C8(IAR)_Demo\User\stm32f10x_it.c 256
Warning[Pe223]: function "FailSafePOR" declared implicitly G:\localprj\stm32\STM32F103C8(IAR)_Demo\User\stm32f10x_it.c 261
Error[Pe020]: identifier "TEST_OK" is undefined G:\localprj\stm32\STM32F103C8(IAR)_Demo\User\stm32f10x_it.c 269
Error[Pe020]: identifier "RAM_TEST_COMPLETED" is undefined G:\localprj\stm32\STM32F103C8(IAR)_Demo\User\stm32f10x_it.c 276
Warning[Pe223]: function "FailSafePOR" declared implicitly G:\localprj\stm32\STM32F103C8(IAR)_Demo\User\stm32f10x_it.c 285
Warning[Pe223]: function "FailSafePOR" declared implicitly G:\localprj\stm32\STM32F103C8(IAR)_Demo\User\stm32f10x_it.c 299
Warning[Pe223]: function "FailSafePOR" declared implicitly G:\localprj\stm32\STM32F103C8(IAR)_Demo\User\stm32f10x_it.c 308
Error while running C/C++ Compiler
大致意思:你正在使用一个依赖 ST 官方 Class B STL 安全自检库 的工程模板,但你没有导入该库的相关头文件、变量定义、源文件。
我们不需要这些,删除对应内容即可
// 删除stm32f10x.c的206行 -- 311行
   /* Verify TickCounter integrity */
  if ((TickCounter ^ TickCounterInv) == 0xFFFFFFFFuL)
  {
    TickCounter++;
    TickCounterInv = ~TickCounter;

    if (TickCounter >= SYSTICK_20ms_TB)
    {
      /* Reset timebase counter */
      TickCounter = 0u;
      TickCounterInv = 0xFFFFFFFF;

      /* Set Flag read in main loop */
      TimeBaseFlag = 0xAAAAAAAAu;
      TimeBaseFlagInv = 0x55555555u;

      if ((CurrentHSEPeriod ^ CurrentHSEPeriodInv) == 0xFFFFFFFFuL)
      {
        ISRCtrlFlowCnt += MEASPERIOD_ISR_CALLER;
        CurrentHSEPeriod = STL_MeasurePeriod();
        CurrentHSEPeriodInv = ~CurrentHSEPeriod;
        ISRCtrlFlowCntInv -= MEASPERIOD_ISR_CALLER;
      }
      else  /* Class B Error on CurrentHSEPeriod */
      {
      #ifdef STL_VERBOSE
        printf("\n\r Class B Error on CurrentHSEPeriod \n\r");
      #endif  /* STL_VERBOSE */
      }
      #ifndef USE_MARCHX_RAM_TEST
        ISRCtrlFlowCnt += RAM_MARCHC_ISR_CALLER;
        RamTestResult = STL_TranspMarchC();
        ISRCtrlFlowCntInv -= RAM_MARCHC_ISR_CALLER;
      #else
        ISRCtrlFlowCnt += RAM_MARCHX_ISR_CALLER;
        RamTestResult = STL_TranspMarchX();
        ISRCtrlFlowCntInv -= RAM_MARCHX_ISR_CALLER;
      #endif /* USE_MARCHX_RAM_TEST */

      switch ( RamTestResult )
      {
        case TEST_RUNNING:
          break;
        case TEST_OK:
          #ifdef STL_VERBOSE
            putchar((int)'#');
          #endif  /* STL_VERBOSE */
           #if defined STL_EVAL_MODE
            STM_EVAL_LEDToggle(LED2);
          #endif  /* STL_EVAL_MODE */
          break;
        case TEST_FAILURE:
        case CLASS_B_DATA_FAIL:
        default:
          #ifdef STL_VERBOSE
            printf("\n\r >>>>>>>>>>>>>>>>>>>  RAM Error (March C- Run-time check)\n\r");
          #endif  /* STL_VERBOSE */
          FailSafePOR();
          break;
      } /* End of the switch */

      /* Do we reached the end of RAM test? */
      /* Verify 1st ISRCtrlFlowCnt integrity */
      if ((ISRCtrlFlowCnt ^ ISRCtrlFlowCntInv) == 0xFFFFFFFFuL)
      {
        if (RamTestResult == TEST_OK)
        {
 	#ifdef __IAR_SYSTEMS_ICC__  /* IAR Compiler */
  /* ==============================================================================*/
  /* MISRA violation of rule 17.4 - pointer arithmetic is used to check RAM test control flow */
		#pragma diag_suppress=Pm088
	#endif   /* IAR Compiler */
          if (ISRCtrlFlowCnt != RAM_TEST_COMPLETED)
 	#ifdef __IAR_SYSTEMS_ICC__  /* IAR Compiler */
		#pragma diag_default=Pm088
  /* ==============================================================================*/
	#endif   /* IAR Compiler */
          {
          #ifdef STL_VERBOSE
            printf("\n\r Control Flow error (RAM test) \n\r");
          #endif  /* STL_VERBOSE */
          FailSafePOR();
          }
          else  /* Full RAM was scanned */
          {
            ISRCtrlFlowCnt = 0u;
            ISRCtrlFlowCntInv = 0xFFFFFFFF;
          }
        } /* End of RAM completed if*/
      } /* End of control flow monitoring */
      else
      {
      #ifdef STL_VERBOSE
        printf("\n\r Control Flow error in ISR \n\r");
      #endif  /* STL_VERBOSE */
      FailSafePOR();
      }
    } /* End of the 20 ms timebase interrupt */
  }
  else  /* Class error on TickCounter */
  {
  #ifdef STL_VERBOSE
    printf("\n\r Class B Error on TickCounter\n\r");
  #endif  /* STL_VERBOSE */
  FailSafePOR();
  }
问题三
Error[Li005]: no definition for "assert_failed" [referenced from G:\localprj\stm32\STM32F103C8(IAR)_Demo\IAR\Debug\Obj\stm32f10x_gpio.o]
表示编译链接时,stm32f10x_gpio.c 调用了 assert_failed() 函数,但你没有提供它的定义,导致链接失败。
方法一:提供 assert_failed 的实现(推荐)
如果你想保留参数断言机制(调试用),请你自己定义这个函数:
➤ 在 main.c 或专门的 utils.c 文件中添加:
#include <stdio.h>
#include "stm32f10x.h"

void assert_failed(uint8_t* file, uint32_t line)
{
    // 用户可以添加自己的调试处理,例如串口输出,LED 报错等
    // 示例:用串口输出报错位置(前提你有串口打印)
    printf("Assertion failed in file %s at line %lu\n", file, line);

    // 死循环等待调试
    while (1);
}
方法二:关闭所有 assert_param 断言(适合正式发布)
如果你不需要断言检查(比如要减小代码体积),可以禁用 USE_FULL_ASSERT 宏:
➤ 方法 1:在 stm32f10x_conf.h 文件中注释掉这一行:
//#define USE_FULL_ASSERT // 注释掉这行
➤ 方法 2:在 IAR 设置里移除 USE_FULL_ASSERT 宏定义:
打开:
Project > Options > C/C++ Compiler > Preprocessor
找到 Defined symbols 中的 USE_FULL_ASSERT
把它删掉
📌 补充说明:assert_param 的作用
assert_param(x);
是 STM32 标准外设库的一个调试辅助机制,用于在开发时捕捉非法参数。比如:
GPIO_InitStructure.GPIO_Mode = 0x88;  // 非法值
GPIO_Init(GPIOA, &GPIO_InitStructure); // 内部可能触发 assert_param 失败
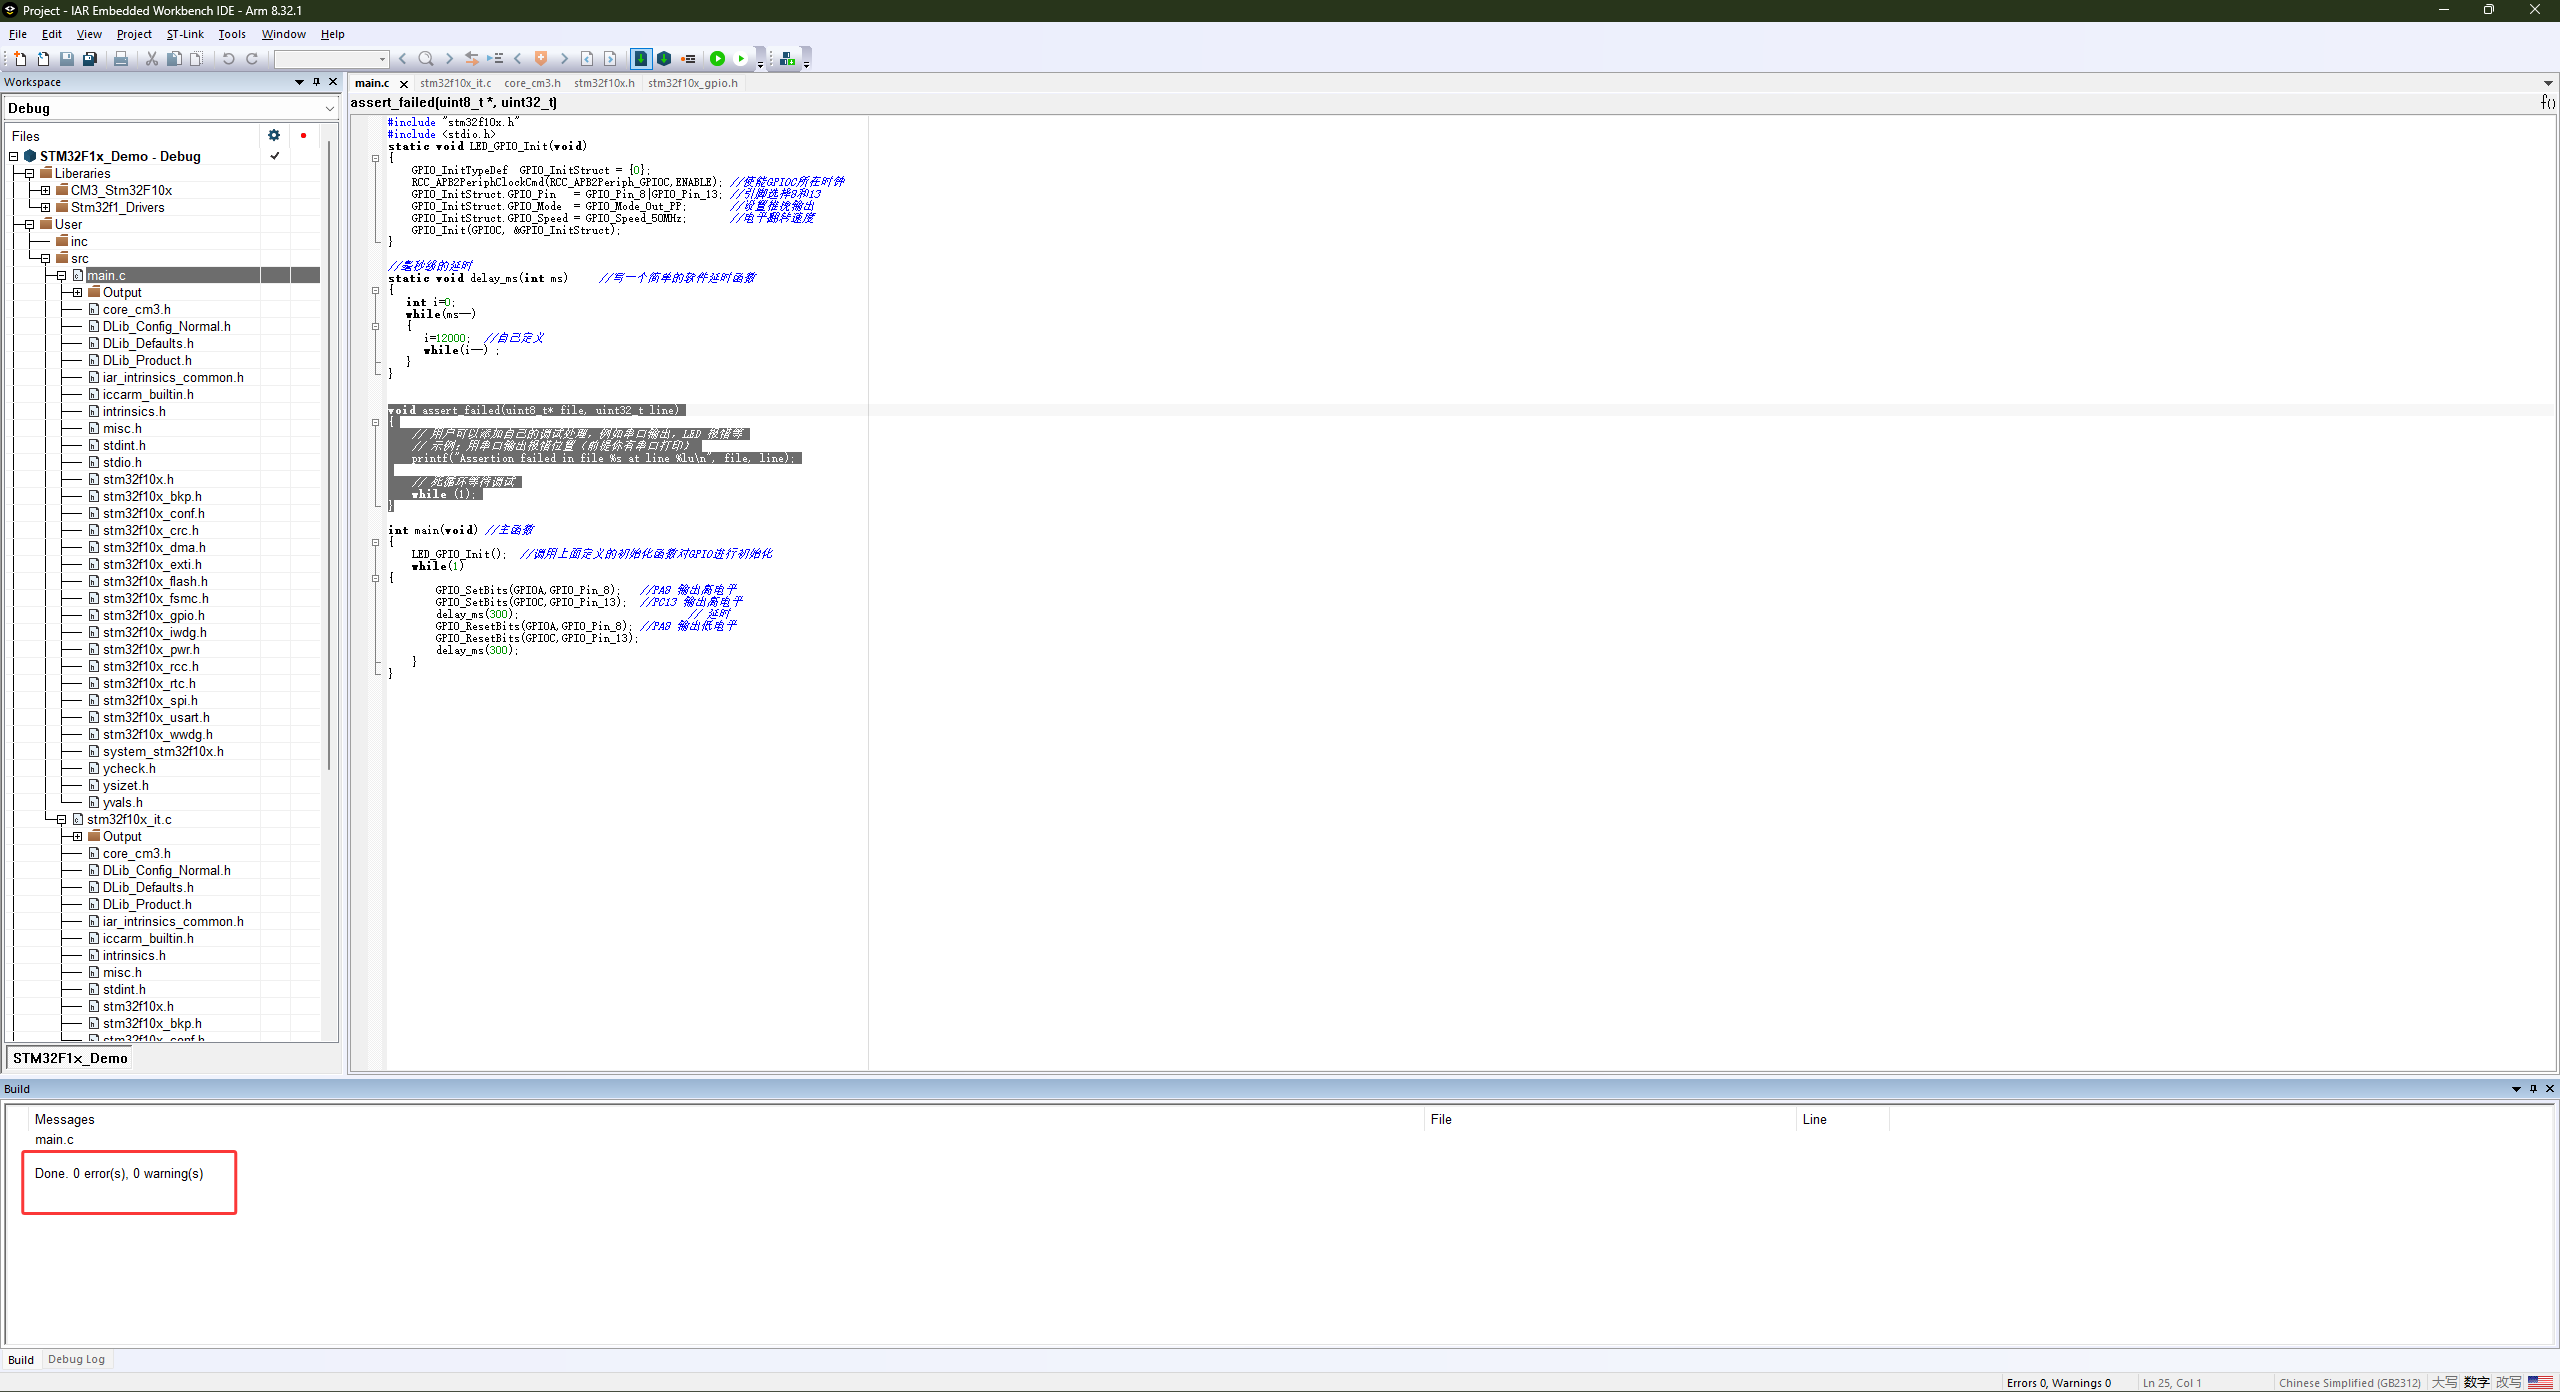
通过编译!
以上基本上算是完成了一个基本IAR工程的新建,如有补充欢迎提出。
参考文档
IAR开发环境的安装、配置和新建STM32工程模板-CSDN博客
STM32 stm32fxxx_flash.icf文件的作用详解 - yeshenmeng - 博客园

openvela 操作系统专为 AIoT 领域量身定制,以轻量化、标准兼容、安全性和高度可扩展性为核心特点。openvela 以其卓越的技术优势,已成为众多物联网设备和 AI 硬件的技术首选,涵盖了智能手表、运动手环、智能音箱、耳机、智能家居设备以及机器人等多个领域。
更多推荐

 12
12 0
0- 0


 已为社区贡献4条内容

所有评论(0)