
嵌入式Linux相机项目
通过video_manager.c文件,使用注册好的链表中的设备来管理V4L2等设备,需要通过这个文件的函数接口来实现注册,初始化,查找,退出等一系列操作。VideoDevice里面规定了具体数据的格式,大小等要求,以及一些操作函数。通过一些ioctl命令来操作摄像头。
(一).整体框架
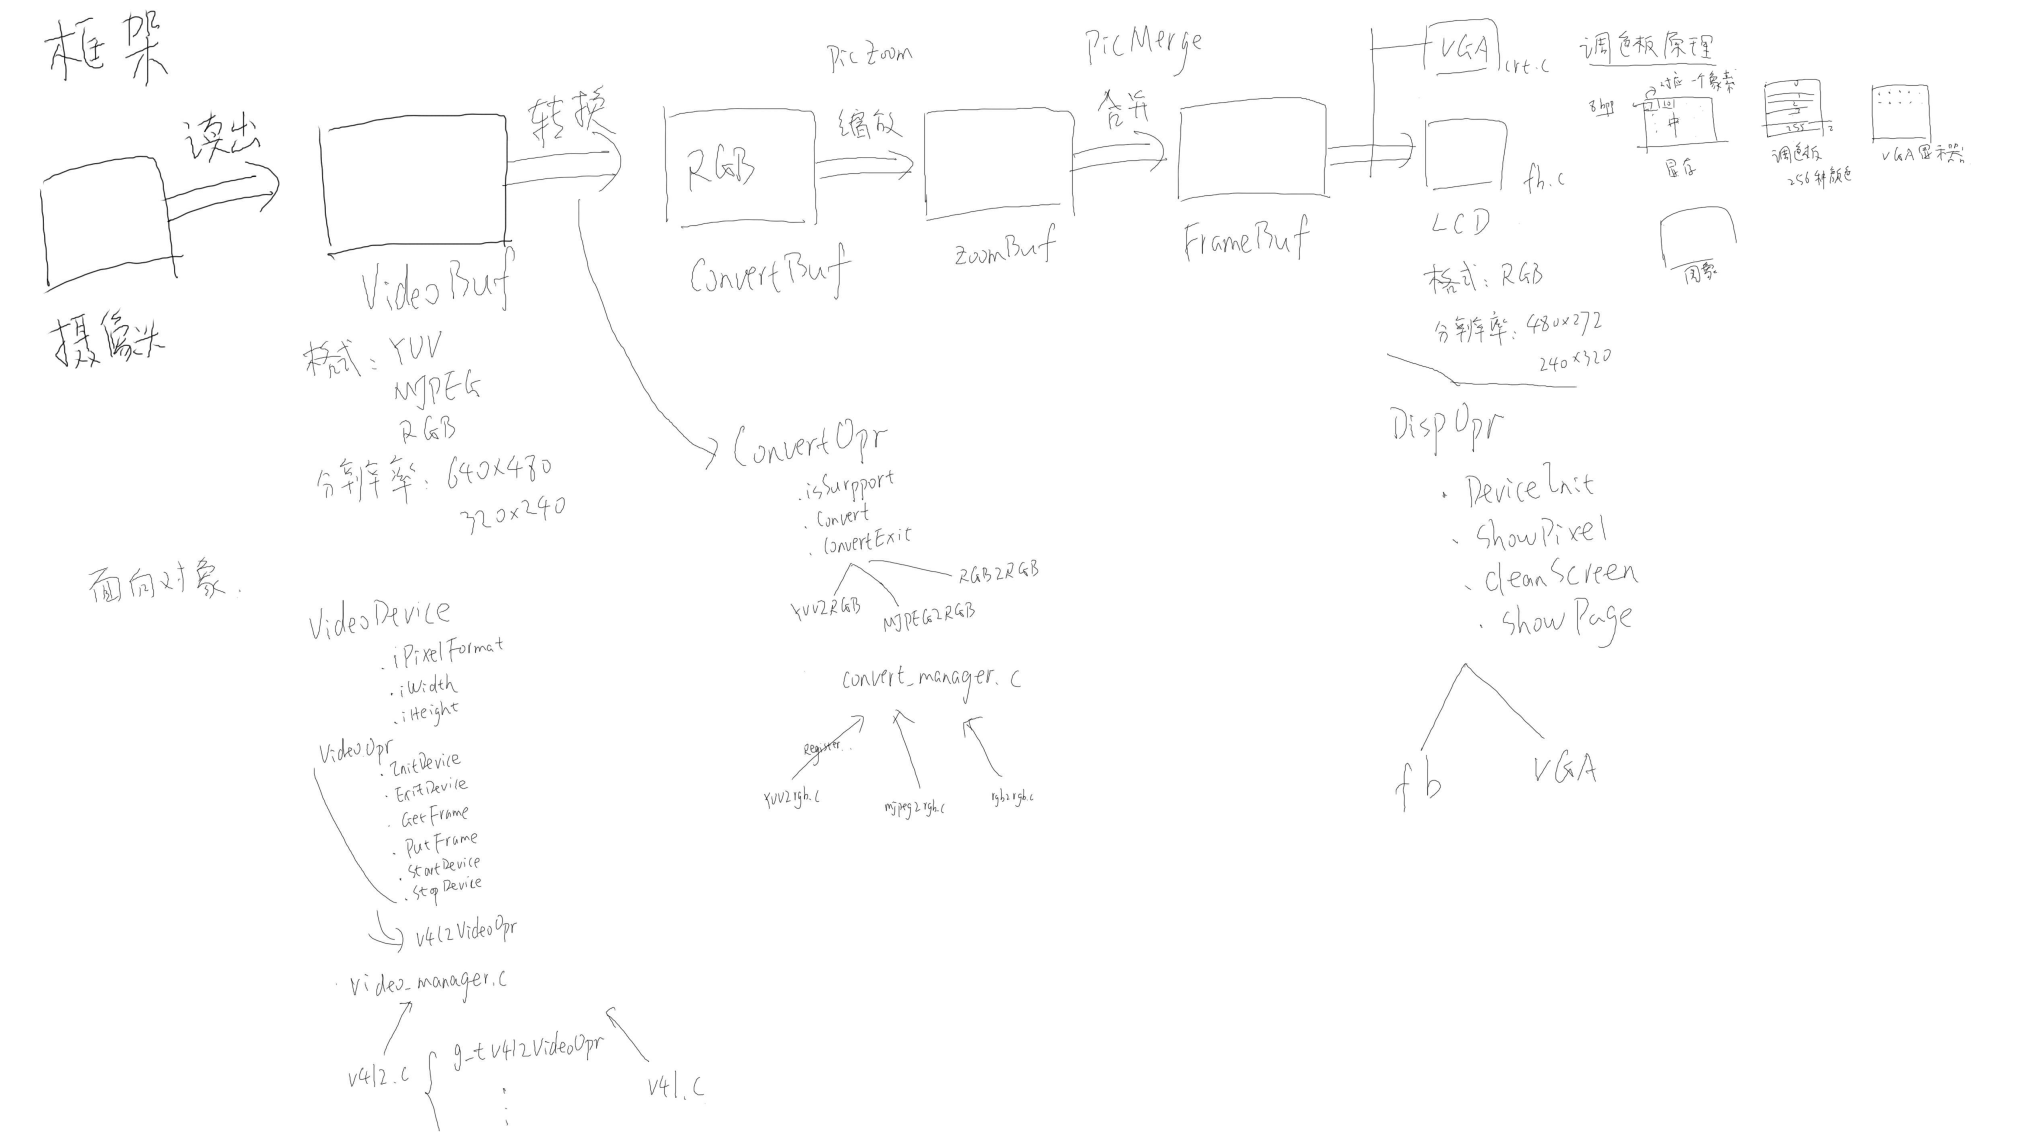
(二).读取数据阶段
一.创建结构体
1.表示设备的结构体
VideoDevice里面规定了具体数据的格式,大小等要求,以及一些操作函数
#define NB_BUFFER 4
struct VideoDevice;
struct VideoOpr;
typedef struct VideoDevice T_VideoDevice, *PT_VideoDevice;
typedef struct VideoOpr T_VideoOpr, *PT_VideoOpr;

struct VideoDevice {
    int iFd;           // 设备文件描述符
    int iPixelFormat;  // 设备要求的数据格式 (YUYV/MJPEG/RGB565)
    int iWidth;        // 设备要求的数据宽度
    int iHeight;       // 设备要求的数据高度
    int iVideoBufCnt;  // 设备需要的缓冲区数量
    int iVideoBufMaxLen; // 设备允许的最大数据长度
    int iVideoBufCurIndex;//当前缓冲区有数据
    unsigned char *pucVideBuf[NB_BUFFER];

    // 操作接口
    PT_VideoOpr ptOPr;
};

struct VideoOpr {
    char *name;
    int (*InitDevice)(char *strDevName, PT_VideoDevice ptVideoDevice);
    int (*ExitDevice)(PT_VideoDevice ptVideoDevice);
    int (*GetFrame)(PT_VideoDevice ptVideoDevice, PT_VideoBuf ptVideoBuf);
    int (*GetFormat)(PT_VideoDevice ptVideoDevice);
    int (*PutFrame)(PT_VideoDevice ptVideoDevice, PT_VideoBuf ptVideoBuf);
    int (*StartDevice)(PT_VideoDevice ptVideoDevice);
    int (*StopDevice)(PT_VideoDevice ptVideoDevice);
    struct VideoOpr *ptNext;
};
2.表示数据的结构体
typedef struct VideoBuf {
    T_PixelDatas tPixelDatas;
    int iPixelFormat;
}T_VideoBuf, *PT_VideoBuf;

/* 图片的像素数据 */
typedef struct PixelDatas {
	int iWidth;   /* 宽度: 一行有多少个像素 */
	int iHeight;  /* 高度: 一列有多少个像素 */
	int iBpp;     /* 一个像素用多少位来表示 */
	int iLineBytes;  /* 一行数据有多少字节 */
	int iTotalBytes; /* 所有字节数 */
	unsigned char *aucPixelDatas;  /* 像素数据存储的地方 */
}T_PixelDatas, *PT_PixelDatas;
二.实现video_manager.c
通过video_manager.c文件,使用注册好的链表中的设备来管理V4L2等设备,需要通过这个文件的函数接口来实现注册,初始化,查找,退出等一系列操作
如
1.注册函数(VideoInit):
//创建一个全局变量表示在链表中的第一个设备,方便后续不断查找
static PT_VideoOpr g_ptVideoOprHead = NULL;

int VideoInit(void)
{
	int iError;

    iError = V4l2Init();

	return iError;
}

int V4l2Init(void)
{
    return RegisterVideoOpr(&g_tV4l2VideoOpr);
}

int RegisterVideoOpr(PT_VideoOpr ptVideoOpr)
{
	PT_VideoOpr ptTmp;

	if (!g_ptVideoOprHead)
	{
		g_ptVideoOprHead   = ptVideoOpr;
		ptVideoOpr->ptNext = NULL;
	}
	else
	{
		ptTmp = g_ptVideoOprHead;
		while (ptTmp->ptNext)
		{
			ptTmp = ptTmp->ptNext;
		}
		ptTmp->ptNext     = ptVideoOpr;
		ptVideoOpr->ptNext = NULL;
	}

	return 0;
}
2.初始化函数(VideoDeviceInit):
int VideoDeviceInit(char *strDevName, PT_VideoDevice ptVideoDevice)
{
    int iError;
	PT_VideoOpr ptTmp = g_ptVideoOprHead;

	while (ptTmp)
	{
        iError = ptTmp->InitDevice(strDevName, ptVideoDevice);
        if (!iError)
        {
            return 0;
        }
		ptTmp = ptTmp->ptNext;
	}
    return -1;
}
//假设我需要初始化V4L2摄像头,文件是/dev/video0,当传入/dev/video0参数时,系统会从链表中第一个
//设备中调用初始化函数,假设我注册了FBDEV->V4L2->DirectFB,系统会首先调用FBDEV的初始化函数,
//然后,初始化函数内部发现这个设备不是FBDEV设备,就会退出,指向V4L2设备,V4L2设备的初始化函数
//会打开并检测这个设备的功能,发现是V4L2设备,然后就不用退出,后续的也不会继续执行了
3.查找函数(GetVideoOpr):
PT_VideoOpr GetVideoOpr(char *pcName)
{
	PT_VideoOpr ptTmp = g_ptVideoOprHead;

	while (ptTmp)
	{
		if (strcmp(ptTmp->name, pcName) == 0)
		{
			return ptTmp;
		}
		ptTmp = ptTmp->ptNext;
	}
	return NULL;
}
4.列出链表中设备的函数(ShowVideoOpr):
void ShowVideoOpr(void)
{
	int i = 0;
	PT_VideoOpr ptTmp = g_ptVideoOprHead;

	while (ptTmp)
	{
		printf("%02d %s\n", i++, ptTmp->name);
		ptTmp = ptTmp->ptNext;
	}
}
三.创建具体设备
1.创建一个表示V4L2的设备:
/* 构造一个VideoOpr结构体 */
static T_VideoOpr g_tV4l2VideoOpr = {
    .name        = "v4l2",
    .InitDevice  = V4l2InitDevice,
    .ExitDevice  = V4l2ExitDevice,
    .GetFormat   = V4l2GetFormat,
    .GetFrame    = V4l2GetFrameForStreaming,
    .PutFrame    = V4l2PutFrameForStreaming,
    .StartDevice = V4l2StartDevice,
    .StopDevice  = V4l2StopDevice,
};
2.实现设备中的函数
1.初始化函数(V4l2InitDevice)
通过一些ioctl命令来操作摄像头
步骤:
/* open
 * VIDIOC_QUERYCAP 确定它是否视频捕捉设备,支持哪种接口(streaming/read,write)
 * VIDIOC_ENUM_FMT 查询支持哪种格式
 * VIDIOC_S_FMT    设置摄像头使用哪种格式
 * VIDIOC_REQBUFS  申请buffer
 对于 streaming:
 * VIDIOC_QUERYBUF 确定每一个buffer的信息 并且 mmap
 * VIDIOC_QBUF     放入队列
 * VIDIOC_STREAMON 启动设备
 * poll            等待有数据
 * VIDIOC_DQBUF    从队列中取出
 * 处理....
 * VIDIOC_QBUF     放入队列
 * ....
 对于read,write:
    read
    处理....
    read
 * VIDIOC_STREAMOFF 停止设备
 *
 */
//函数内会对这些格式的数据进行处理
static int g_aiSupportedFormats[] = {V4L2_PIX_FMT_YUYV, V4L2_PIX_FMT_MJPEG, V4L2_PIX_FMT_RGB565};
//V4L2的一些操作函数,注册的时候添加到链表,初始化的时候将设备的函数指向V4L2的函数
static T_VideoOpr g_tV4l2VideoOpr;
//检测摄像头传入的数据的格式是否在函数中支持
static int isSupportThisFormat(int iPixelFormat)
{
    int i;
    for (i = 0; i < sizeof(g_aiSupportedFormats)/sizeof(g_aiSupportedFormats[0]); i++)
    {
        if (g_aiSupportedFormats[i] == iPixelFormat)
            return 1;
    }
    return 0;
}
//对ptVideoDevice进行初始化,写入设备的视频规格,格式,大小和操作函数
static int V4l2InitDevice(char *strDevName, PT_VideoDevice ptVideoDevice)
{
    int i;
    int iFd;
    int iError;
    struct v4l2_capability tV4l2Cap;
	struct v4l2_fmtdesc tFmtDesc;
    struct v4l2_format  tV4l2Fmt;
    struct v4l2_requestbuffers tV4l2ReqBuffs;
    struct v4l2_buffer tV4l2Buf;

    int iLcdWidth;
    int iLcdHeigt;
    int iLcdBpp;

    iFd = open(strDevName, O_RDWR);
    if (iFd < 0)
    {
        DBG_PRINTF("can not open %s\n", strDevName);
        return -1;
    }
//写入第一个参数
    ptVideoDevice->iFd = iFd;
//查询设备功能,并将查询到的设备功能存储到tV4l2Cap中,后续可以通过tV4l2Cap来执行操作
    iError = ioctl(iFd, VIDIOC_QUERYCAP, &tV4l2Cap);
    memset(&tV4l2Cap, 0, sizeof(struct v4l2_capability));
    iError = ioctl(iFd, VIDIOC_QUERYCAP, &tV4l2Cap);
    if (iError) {
    	DBG_PRINTF("Error opening device %s: unable to query device.\n", strDevName);
    	goto err_exit;
    }
//检测查询到的功能
//检测是否是捕获设备
    if (!(tV4l2Cap.capabilities & V4L2_CAP_VIDEO_CAPTURE))
    {
    	DBG_PRINTF("%s is not a video capture device\n", strDevName);
        goto err_exit;
    }
//检测支持哪种采集图像的方式,一种是mmap内存映射方式(stream),另一种是read/write方式
	if (tV4l2Cap.capabilities & V4L2_CAP_STREAMING) {
	    DBG_PRINTF("%s supports streaming i/o\n", strDevName);
	}

	if (tV4l2Cap.capabilities & V4L2_CAP_READWRITE) {
	    DBG_PRINTF("%s supports read i/o\n", strDevName);
	}

	memset(&tFmtDesc, 0, sizeof(tFmtDesc));
//列出摄像头支持的数据的格式
//使用tFmtDesc来存储,需要指定index和type,因为可能会有很多格式,需要index来指定需要的格式
//摄像头的数据来源也有视频捕获,视频输出,VBI捕获的,它们的格式也不相同,而我们只需要视频捕获的数据
	tFmtDesc.index = 0;
	tFmtDesc.type = V4L2_BUF_TYPE_VIDEO_CAPTURE;
	while ((iError = ioctl(iFd, VIDIOC_ENUM_FMT, &tFmtDesc)) == 0) {
        if (isSupportThisFormat(tFmtDesc.pixelformat))
        {
//写入第二个参数
            ptVideoDevice->iPixelFormat = tFmtDesc.pixelformat;
            break;
        }
		tFmtDesc.index++;
	}

    if (!ptVideoDevice->iPixelFormat)
    {
    	DBG_PRINTF("can not support the format of this device\n");
        goto err_exit;
    }


    /* set format in */
//获取显示设备的一些信息
    GetDispResolution(&iLcdWidth, &iLcdHeigt, &iLcdBpp);
    memset(&tV4l2Fmt, 0, sizeof(struct v4l2_format));

//设置图像数据来源是视频捕获
    tV4l2Fmt.type = V4L2_BUF_TYPE_VIDEO_CAPTURE;

//设置图像数据的格式,这样图像数据的大小就能够自动调整为合适的大小了
    tV4l2Fmt.fmt.pix.pixelformat = ptVideoDevice->iPixelFormat;

//调整分辨率和lcd显示屏一样,后期就不需要进行缩放图像了
    tV4l2Fmt.fmt.pix.width       = iLcdWidth;
    tV4l2Fmt.fmt.pix.height      = iLcdHeigt;
    tV4l2Fmt.fmt.pix.field       = V4L2_FIELD_ANY;

    /* 如果驱动程序发现无法某些参数(比如分辨率),
     * 它会调整这些参数, 并且返回给应用程序
     */
    iError = ioctl(iFd, VIDIOC_S_FMT, &tV4l2Fmt);
    if (iError)
    {
    	DBG_PRINTF("Unable to set format\n");
        goto err_exit;
    }
//写入第三,四个参数
    ptVideoDevice->iWidth  = tV4l2Fmt.fmt.pix.width;
    ptVideoDevice->iHeight = tV4l2Fmt.fmt.pix.height;

    /* request buffers */
    memset(&tV4l2ReqBuffs, 0, sizeof(struct v4l2_requestbuffers));
//申请NB_BUFFER个缓冲区
    tV4l2ReqBuffs.count = NB_BUFFER;
//设置缓冲区的用途是存放视频捕获的图像数据,这样当我进行入队时,系统会自动写入图像数据
    tV4l2ReqBuffs.type = V4L2_BUF_TYPE_VIDEO_CAPTURE;
//申请的缓冲区支持mmap内存映射,当然也可以不使用mmap,直接使用read/write读取缓冲区
    tV4l2ReqBuffs.memory = V4L2_MEMORY_MMAP;
//申请缓冲区,申请到的每一个缓冲区都会有一个index,这个index从0开始,依次和缓冲区绑定
    iError = ioctl(iFd, VIDIOC_REQBUFS, &tV4l2ReqBuffs);
    if (iError)
    {
    	DBG_PRINTF("Unable to allocate buffers.\n");
        goto err_exit;
    }
//写入第五个参数
    ptVideoDevice->iVideoBufCnt = tV4l2ReqBuffs.count;

//如果使用mmap方式采集数据
    if (tV4l2Cap.capabilities & V4L2_CAP_STREAMING)
    {
        /* map the buffers */
        for (i = 0; i < ptVideoDevice->iVideoBufCnt; i++)
        {
        	memset(&tV4l2Buf, 0, sizeof(struct v4l2_buffer));
//查询缓冲区,将每一个缓冲区暂时取出来,赋值给tV4l2Buf,方便mmap
        	tV4l2Buf.index = i;
        	tV4l2Buf.type   = V4L2_BUF_TYPE_VIDEO_CAPTURE;
        	tV4l2Buf.memory = V4L2_MEMORY_MMAP;
        	iError = ioctl(iFd, VIDIOC_QUERYBUF, &tV4l2Buf);
        	if (iError)
            {
        	    DBG_PRINTF("Unable to query buffer.\n");
        	    goto err_exit;
        	}
//写入第六个参数,设备允许的最大字节长度
            ptVideoDevice->iVideoBufMaxLen = tV4l2Buf.length;
//内存映射,将文件中的offset偏移量的位置的缓冲区映射到用户空间中
        	ptVideoDevice->pucVideBuf[i] = mmap(0 /* start anywhere */ ,
        			  tV4l2Buf.length, PROT_READ, MAP_SHARED, iFd,
        			  tV4l2Buf.m.offset);
        	if (ptVideoDevice->pucVideBuf[i] == MAP_FAILED)
            {
        	    DBG_PRINTF("Unable to map buffer\n");
        	    goto err_exit;
        	}
        }
//入队,将所有的空缓存区进行入队,方便系统自动写入数据
        /* Queue the buffers. */
        for (i = 0; i < ptVideoDevice->iVideoBufCnt; i++)
        {
        	memset(&tV4l2Buf, 0, sizeof(struct v4l2_buffer));
        	tV4l2Buf.index = i;
        	tV4l2Buf.type  = V4L2_BUF_TYPE_VIDEO_CAPTURE;
        	tV4l2Buf.memory = V4L2_MEMORY_MMAP;
        	iError = ioctl(iFd, VIDIOC_QBUF, &tV4l2Buf);
        	if (iError)
            {
        	    DBG_PRINTF("Unable to queue buffer.\n");
        	    goto err_exit;
        	}
        }

    }

//使用read/write方式采集图像
    else if (tV4l2Cap.capabilities & V4L2_CAP_READWRITE)
    {

//如果采用read/write方式则更改读取数据的方法
        g_tV4l2VideoOpr.GetFrame = V4l2GetFrameForReadWrite;
        g_tV4l2VideoOpr.PutFrame = V4l2PutFrameForReadWrite;

        /* read(fd, buf, size) */
//只需要一个随机缓冲区即可
        ptVideoDevice->iVideoBufCnt  = 1;
        /* 在这个程序所能支持的格式里, 一个象素最多只需要4字节 */
//获取这张图像的最大字节数参数
        ptVideoDevice->iVideoBufMaxLen = ptVideoDevice->iWidth * ptVideoDevice->iHeight * 4;
//分配缓冲区
        ptVideoDevice->pucVideBuf[0] = malloc(ptVideoDevice->iVideoBufMaxLen);
    }
//写入操作函数的参数
    ptVideoDevice->ptOPr = &g_tV4l2VideoOpr;
    return 0;

err_exit:
    close(iFd);
    return -1;
}
2.退出函数(V4l2ExitDevice)
static int V4l2ExitDevice(PT_VideoDevice ptVideoDevice)
{
    int i;
    for (i = 0; i < ptVideoDevice->iVideoBufCnt; i++)
    {
        if (ptVideoDevice->pucVideBuf[i])
        {
            munmap(ptVideoDevice->pucVideBuf[i], ptVideoDevice->iVideoBufMaxLen);
            ptVideoDevice->pucVideBuf[i] = NULL;
        }
    }

    close(ptVideoDevice->iFd);
    return 0;
}
3.开始采集函数(V4l2StartDevice):
static int V4l2StartDevice(PT_VideoDevice ptVideoDevice)
{
//需要指定数据流的类型,我需要的是视频捕获的数据流自动填充到缓冲区,所以选择V4L2_BUF_TYPE_VIDEO_CAPTURE
    int iType = V4L2_BUF_TYPE_VIDEO_CAPTURE;
    int iError;

    iError = ioctl(ptVideoDevice->iFd, VIDIOC_STREAMON, &iType);
    if (iError)
    {
    	DBG_PRINTF("Unable to start capture.\n");
    	return -1;
    }
    return 0;
}
4.停止采集函数(V4l2StopDevice):
static int V4l2StopDevice(PT_VideoDevice ptVideoDevice)
{
    int iType = V4L2_BUF_TYPE_VIDEO_CAPTURE;
    int iError;

    iError = ioctl(ptVideoDevice->iFd, VIDIOC_STREAMOFF, &iType);
    if (iError)
    {
    	DBG_PRINTF("Unable to stop capture.\n");
    	return -1;
    }
    return 0;
}
5.流模式下采集缓冲区数据函数(V4l2GetFrameForStreaming):
static int V4l2GetFrameForStreaming(PT_VideoDevice ptVideoDevice, PT_VideoBuf ptVideoBuf)
{
    struct pollfd tFds[1];
    int iRet;
    struct v4l2_buffer tV4l2Buf;

    /* poll */
//这里使用io多路复用最好将poll的初始化写到前面的初始化函数中,同时,也可以采用epoll方法
//监测对象是设备文件,事件是可读事件,当缓冲区有数据时,即会设置为可读
    tFds[0].fd     = ptVideoDevice->iFd;
    tFds[0].events = POLLIN;
//开始监测,监测时间为-1,监测tFds数组中的前一项,表示永久监测
    iRet = poll(tFds, 1, -1);
    if (iRet <= 0)
    {
        DBG_PRINTF("poll error!\n");
        return -1;
    }

    /* VIDIOC_DQBUF */
    memset(&tV4l2Buf, 0, sizeof(struct v4l2_buffer));
    tV4l2Buf.type = V4L2_BUF_TYPE_VIDEO_CAPTURE;
    tV4l2Buf.memory = V4L2_MEMORY_MMAP;
//取出准备好数据的缓冲区,并将index等参数写入到tV4l2Buf
    iRet = ioctl(ptVideoDevice->iFd, VIDIOC_DQBUF, &tV4l2Buf);
    if (iRet < 0)
    {
    	DBG_PRINTF("Unable to dequeue buffer.\n");
    	return -1;
    }
//写入第七个参数,表示当前准备好数据的缓冲区
    ptVideoDevice->iVideoBufCurIndex = tV4l2Buf.index;
//将设备的一些图像设置和具体数据传给真正的图像数据
    ptVideoBuf->iPixelFormat        = ptVideoDevice->iPixelFormat;
    ptVideoBuf->tPixelDatas.iWidth  = ptVideoDevice->iWidth;
    ptVideoBuf->tPixelDatas.iHeight = ptVideoDevice->iHeight;


//YUYV类型的图像一个像素占16位,MJPEG类型是可变的,设为0,RGB565类型也占16位
    ptVideoBuf->tPixelDatas.iBpp    = (ptVideoDevice->iPixelFormat == V4L2_PIX_FMT_YUYV) ? 16 : \
                                        (ptVideoDevice->iPixelFormat == V4L2_PIX_FMT_MJPEG) ? 0 :  \
                                        (ptVideoDevice->iPixelFormat == V4L2_PIX_FMT_RGB565) ? 16 :  \
                                        0;
    ptVideoBuf->tPixelDatas.iLineBytes    = ptVideoDevice->iWidth * ptVideoBuf->tPixelDatas.iBpp / 8;

//图像的总字节数可以通过tV4l2Buf获得,因为此时这一帧图像数据已经采集完了
    ptVideoBuf->tPixelDatas.iTotalBytes   = tV4l2Buf.bytesused;
    ptVideoBuf->tPixelDatas.aucPixelDatas = ptVideoDevice->pucVideBuf[tV4l2Buf.index];
    return 0;
}
6.流模式下放回缓冲区数据函数(V4l2PutFrameForStreaming):
static int V4l2PutFrameForStreaming(PT_VideoDevice ptVideoDevice, PT_VideoBuf ptVideoBuf)
{
    /* VIDIOC_QBUF */
    struct v4l2_buffer tV4l2Buf;
    int iError;

	memset(&tV4l2Buf, 0, sizeof(struct v4l2_buffer));
	tV4l2Buf.index  = ptVideoDevice->iVideoBufCurIndex;
	tV4l2Buf.type   = V4L2_BUF_TYPE_VIDEO_CAPTURE;
	tV4l2Buf.memory = V4L2_MEMORY_MMAP;
	iError = ioctl(ptVideoDevice->iFd, VIDIOC_QBUF, &tV4l2Buf);
	if (iError)
    {
	    DBG_PRINTF("Unable to queue buffer.\n");
	    return -1;
	}
    return 0;
}
7.读写模式下采集缓冲区数据函数(V4l2GetFrameForReadWrite):
static int V4l2GetFrameForReadWrite(PT_VideoDevice ptVideoDevice, PT_VideoBuf ptVideoBuf)
{
    int iRet;
//按照最大的长度来读,因为读写模式下是堵塞的,会一直读完缓冲区的数据,iret表示已经读取的数据长度
    iRet = read(ptVideoDevice->iFd, ptVideoDevice->pucVideBuf[0], ptVideoDevice->iVideoBufMaxLen);
    if (iRet <= 0)
    {
        return -1;
    }

    ptVideoBuf->iPixelFormat        = ptVideoDevice->iPixelFormat;
    ptVideoBuf->tPixelDatas.iWidth  = ptVideoDevice->iWidth;
    ptVideoBuf->tPixelDatas.iHeight = ptVideoDevice->iHeight;
    ptVideoBuf->tPixelDatas.iBpp    = (ptVideoDevice->iPixelFormat == V4L2_PIX_FMT_YUYV) ? 16 : \
                                        (ptVideoDevice->iPixelFormat == V4L2_PIX_FMT_MJPEG) ? 0 :  \
                                        (ptVideoDevice->iPixelFormat == V4L2_PIX_FMT_RGB565)? 16 : \
                                          0;
    ptVideoBuf->tPixelDatas.iLineBytes    = ptVideoDevice->iWidth * ptVideoBuf->tPixelDatas.iBpp / 8;
    ptVideoBuf->tPixelDatas.iTotalBytes   = iRet;
    ptVideoBuf->tPixelDatas.aucPixelDatas = ptVideoDevice->pucVideBuf[0];

    return 0;
}
8.读写模式下放回缓冲区数据函数(V4l2PutFrameForReadWrite):
//不用放回,每次读完之后,然后进行处理,处理完就可以继续读了
static int V4l2PutFrameForReadWrite(PT_VideoDevice ptVideoDevice, PT_VideoBuf ptVideoBuf)
{
    return 0;
}
(三).转换数据阶段
一.创建结构体
表示转换器的结构体
将从摄像头获得的图像数据存储到缓冲区后,图像数据可能是YUV,MJPEG和RGB格式(使用isSupportThisFormat函数来保证获取到的数据是这三种格式中的某一种格式),然后都可以使用VideoConvert结构体里的转换函数实现转换为RGB
typedef struct VideoConvert {
    char *name;
    int (*isSupport)(int iPixelFormatIn, int iPixelFormatOut);
    int (*Convert)(PT_VideoBuf ptVideoBufIn, PT_VideoBuf ptVideoBufOut);
    int (*ConvertExit)(PT_VideoBuf ptVideoBufOut);
    struct VideoConvert *ptNext;
}T_VideoConvert, *PT_VideoConvert;
每一个转换方法(YUV转换为RGB,MJPEG转换为RGB,RGB转换为RGB)都可以用VideoConvert来表示

二.YUV转换为RGB(565或者32)
步骤:
1.创建转换器
static T_VideoConvert g_tYuv2RgbConvert = {
    .name        = "yuv2rgb",
    .isSupport   = isSupportYuv2Rgb,
    .Convert     = Yuv2RgbConvert,
    .ConvertExit = Yuv2RgbConvertExit,
};
2.注册转换器到链表中,方便convert_manager.c管理
int Yuv2RgbInit(void)
{
    initLut();
    return RegisterVideoConvert(&g_tYuv2RgbConvert);
}

int RegisterVideoConvert(PT_VideoConvert ptVideoConvert)
{
	PT_VideoConvert ptTmp;

	if (!g_ptVideoConvertHead)
	{
		g_ptVideoConvertHead   = ptVideoConvert;
		ptVideoConvert->ptNext = NULL;
	}
	else
	{
		ptTmp = g_ptVideoConvertHead;
		while (ptTmp->ptNext)
		{
			ptTmp = ptTmp->ptNext;
		}
		ptTmp->ptNext     = ptVideoConvert;
		ptVideoConvert->ptNext = NULL;
	}

	return 0;
}
3.实现转换函数
YUYV格式:
![]()
![]()
因此转化函数中需要在每次循环中,将四个字节取出,Y0,U0和V0组成一个像素,Y1,U0和V0组成另一个像素
//传入需要转换的数据,再创建一个结构体来接受转换后的数据,创建的结构体需要预先进行处理,
//需要填入转换后的格式,其他数据都会在函数内进行填充
static int Yuv2RgbConvert(PT_VideoBuf ptVideoBufIn, PT_VideoBuf ptVideoBufOut)
{
    PT_PixelDatas ptPixelDatasIn  = &ptVideoBufIn->tPixelDatas;
    PT_PixelDatas ptPixelDatasOut = &ptVideoBufOut->tPixelDatas;

//写入分辨率参数
    ptPixelDatasOut->iWidth  = ptPixelDatasIn->iWidth;
    ptPixelDatasOut->iHeight = ptPixelDatasIn->iHeight;

//根据最后需要转换的格式来进行转换
//如果输出图像要求是RGB565格式
    if (ptVideoBufOut->iPixelFormat == V4L2_PIX_FMT_RGB565)
    {
//写入一个像素占据多少位的参数
        ptPixelDatasOut->iBpp = 16;
//写入一行像素占据的字节数和整个图像占据的字节数
        ptPixelDatasOut->iLineBytes  = ptPixelDatasOut->iWidth * ptPixelDatasOut->iBpp / 8;
        ptPixelDatasOut->iTotalBytes = ptPixelDatasOut->iLineBytes * ptPixelDatasOut->iHeight;

        if (!ptPixelDatasOut->aucPixelDatas)
        {
            ptPixelDatasOut->aucPixelDatas = malloc(ptPixelDatasOut->iTotalBytes);
        }
//转换函数
        Pyuv422torgb565(ptPixelDatasIn->aucPixelDatas, ptPixelDatasOut->aucPixelDatas, ptPixelDatasOut->iWidth, ptPixelDatasOut->iHeight);
        return 0;
    }

//如果输出图像要求是RGB32格式
    else if (ptVideoBufOut->iPixelFormat == V4L2_PIX_FMT_RGB32)
    {
        ptPixelDatasOut->iBpp = 32;
        ptPixelDatasOut->iLineBytes  = ptPixelDatasOut->iWidth * ptPixelDatasOut->iBpp / 8;
        ptPixelDatasOut->iTotalBytes = ptPixelDatasOut->iLineBytes * ptPixelDatasOut->iHeight;

        if (!ptPixelDatasOut->aucPixelDatas)
        {
            ptPixelDatasOut->aucPixelDatas = malloc(ptPixelDatasOut->iTotalBytes);
        }

        Pyuv422torgb32(ptPixelDatasIn->aucPixelDatas, ptPixelDatasOut->aucPixelDatas, ptPixelDatasOut->iWidth, ptPixelDatasOut->iHeight);
        return 0;
    }

    return -1;
}

//具体实现转换的函数
static unsigned int
Pyuv422torgb565(unsigned char * input_ptr, unsigned char * output_ptr, unsigned int image_width, unsigned int image_height)
{
	unsigned int i, size;
	unsigned char Y, Y1, U, V;
	unsigned char *buff = input_ptr;
	unsigned char *output_pt = output_ptr;

    unsigned int r, g, b;
    unsigned int color;

	size = image_width * image_height /2;
	for (i = size; i > 0; i--) {
		/* bgr instead rgb ?? */
		Y = buff[0] ;
		U = buff[1] ;
		Y1 = buff[2];
		V = buff[3];
		buff += 4;
//Y和V进行数学运算得到R
		r = R_FROMYV(Y,V);
//Y,U和V进行数学运算得到G
		g = G_FROMYUV(Y,U,V); //b
//Y和U进行数学运算得到B
		b = B_FROMYU(Y,U); //v

        /* 把r,g,b三色构造为rgb565的16位值 */
        r = r >> 3;
        g = g >> 2;
        b = b >> 3;
        color = (r << 11) | (g << 5) | b;

//output_pt是char类型,每个数据占据一个字节,而RGB565占据两个字节,所以将得到的color数据分开存储
        *output_pt++ = color & 0xff;
        *output_pt++ = (color >> 8) & 0xff;

		r = R_FROMYV(Y1,V);
		g = G_FROMYUV(Y1,U,V); //b
		b = B_FROMYU(Y1,U); //v

        /* 把r,g,b三色构造为rgb565的16位值 */
        r = r >> 3;
        g = g >> 2;
        b = b >> 3;
        color = (r << 11) | (g << 5) | b;
        *output_pt++ = color & 0xff;
        *output_pt++ = (color >> 8) & 0xff;
	}

	return 0;
}

static unsigned int
Pyuv422torgb32(unsigned char * input_ptr, unsigned char * output_ptr, unsigned int image_width, unsigned int image_height)
{
	unsigned int i, size;
	unsigned char Y, Y1, U, V;
	unsigned char *buff = input_ptr;
	unsigned int *output_pt = (unsigned int *)output_ptr;

    unsigned int r, g, b;
    unsigned int color;

	size = image_width * image_height /2;
	for (i = size; i > 0; i--) {
		/* bgr instead rgb ?? */
		Y = buff[0] ;
		U = buff[1] ;
		Y1 = buff[2];
		V = buff[3];
		buff += 4;

        r = R_FROMYV(Y,V);
		g = G_FROMYUV(Y,U,V); //b
		b = B_FROMYU(Y,U); //v
		/* rgb888 */
		color = (r << 16) | (g << 8) | b;
        *output_pt++ = color;

		r = R_FROMYV(Y1,V);
		g = G_FROMYUV(Y1,U,V); //b
		b = B_FROMYU(Y1,U); //v
		color = (r << 16) | (g << 8) | b;
        *output_pt++ = color;
	}

	return 0;
}

//在使用时,和其他转换器一起,看传入的输入和输出格式是否相符,然后返回选择的转换器
static int isSupportYuv2Rgb(int iPixelFormatIn, int iPixelFormatOut)
{
    if (iPixelFormatIn != V4L2_PIX_FMT_YUYV)
        return 0;
    if ((iPixelFormatOut != V4L2_PIX_FMT_RGB565) && (iPixelFormatOut != V4L2_PIX_FMT_RGB32))
    {
        return 0;
    }
    return 1;
}

static int Yuv2RgbConvertExit(PT_VideoBuf ptVideoBufOut)
{
    if (ptVideoBufOut->tPixelDatas.aucPixelDatas)
    {
//摧毁这块空间,但是ptVideoBufOut->tPixelDatas.aucPixelDatas可能就会指向其他地址了
        free(ptVideoBufOut->tPixelDatas.aucPixelDatas);
//使指向为空
        ptVideoBufOut->tPixelDatas.aucPixelDatas = NULL;
    }
    return 0;
}
三.MJPEG转换为RGB(565或者32)
步骤:
1.创建转换器
static T_VideoConvert g_tMjpeg2RgbConvert = {
    .name        = "mjpeg2rgb",
    .isSupport   = isSupportMjpeg2Rgb,
    .Convert     = Mjpeg2RgbConvert,
    .ConvertExit = Mjpeg2RgbConvertExit,
};
2.注册转换器
int Mjpeg2RgbInit(void)
{
    return RegisterVideoConvert(&g_tMjpeg2RgbConvert);
}

//g_ptVideoConvertHead是一个全局变量,用来记录链表中的最新转换器
int RegisterVideoConvert(PT_VideoConvert ptVideoConvert)
{
	PT_VideoConvert ptTmp;

	if (!g_ptVideoConvertHead)
	{
		g_ptVideoConvertHead   = ptVideoConvert;
		ptVideoConvert->ptNext = NULL;
	}
	else
	{
//尾插法
		ptTmp = g_ptVideoConvertHead;
		while (ptTmp->ptNext)
		{
			ptTmp = ptTmp->ptNext;
		}
		ptTmp->ptNext     = ptVideoConvert;
		ptVideoConvert->ptNext = NULL;
	}

	return 0;
}
3.实现转换函数(使用libjpeg库)
/**********************************************************************
 * 函数名称: GetPixelDatasFrmJPG
 * 功能描述: 把JPG文件中的图像数据,取出并转换为能在显示设备上使用的格式
 * 输入参数: ptFileMap    - 内含文件信息
 * 输出参数: ptPixelDatas - 内含象素数据
 *            ptPixelDatas->iBpp 是输入的参数, 它确定从JPG文件得到的数据要转换为该BPP
 * 返 回 值: 0 - 成功, 其他值 - 失败
 * 修改日期        版本号     修改人          修改内容
 * -----------------------------------------------
 * 2013/02/08        V1.0     韦东山          创建
 ***********************************************************************/
//static int GetPixelDatasFrmJPG(PT_FileMap ptFileMap, PT_PixelDatas ptPixelDatas)
/* 把内存里的JPEG图像转换为RGB图像 */
//需要填入接收的结构体ptVideoBufOut的ibpp参数,在CovertOneLine函数中会使用,里面会根据ibpp
//进行选择转换为RGB565还是RGB32
static int Mjpeg2RgbConvert(PT_VideoBuf ptVideoBufIn, PT_VideoBuf ptVideoBufOut)
{
	struct jpeg_decompress_struct tDInfo;
	//struct jpeg_error_mgr tJErr;
    int iRet;
    int iRowStride;
    unsigned char *aucLineBuffer = NULL;
    unsigned char *pucDest;
	T_MyErrorMgr tJerr;
    PT_PixelDatas ptPixelDatas = &ptVideoBufOut->tPixelDatas;

	// 分配和初始化一个decompression结构体
	//tDInfo.err = jpeg_std_error(&tJErr);

	tDInfo.err               = jpeg_std_error(&tJerr.pub);
	tJerr.pub.error_exit     = MyErrorExit;

	if(setjmp(tJerr.setjmp_buffer))
	{
		/* 如果程序能运行到这里, 表示JPEG解码出错 */
        jpeg_destroy_decompress(&tDInfo);
        if (aucLineBuffer)
        {
            free(aucLineBuffer);
        }
        if (ptPixelDatas->aucPixelDatas)
        {
            free(ptPixelDatas->aucPixelDatas);
        }
		return -1;
	}

	jpeg_create_decompress(&tDInfo);

	// 用jpeg_read_header获得jpg信息
	//jpeg_stdio_src(&tDInfo, ptFileMap->tFp);
	/* 把数据设为内存中的数据 */
    //数据源还可能是传入的图片参数,但是在这里,是将从缓冲区的数据读取出的数据进行转换
    jpeg_mem_src_tj (&tDInfo, ptVideoBufIn->tPixelDatas.aucPixelDatas, ptVideoBufIn->tPixelDatas.iTotalBytes);


    iRet = jpeg_read_header(&tDInfo, TRUE);

	// 设置解压参数,比如放大、缩小
    tDInfo.scale_num = tDInfo.scale_denom = 1;

	// 启动解压:jpeg_start_decompress
	jpeg_start_decompress(&tDInfo);

	// 一行的数据长度
	iRowStride = tDInfo.output_width * tDInfo.output_components;
	aucLineBuffer = malloc(iRowStride);

    if (NULL == aucLineBuffer)
    {
        return -1;
    }

	ptPixelDatas->iWidth  = tDInfo.output_width;
	ptPixelDatas->iHeight = tDInfo.output_height;
	//ptPixelDatas->iBpp    = iBpp;
	ptPixelDatas->iLineBytes    = ptPixelDatas->iWidth * ptPixelDatas->iBpp / 8;
    ptPixelDatas->iTotalBytes   = ptPixelDatas->iHeight * ptPixelDatas->iLineBytes;
	if (NULL == ptPixelDatas->aucPixelDatas)
	{
	    ptPixelDatas->aucPixelDatas = malloc(ptPixelDatas->iTotalBytes);
	}

    pucDest = ptPixelDatas->aucPixelDatas;

	// 循环调用jpeg_read_scanlines来一行一行地获得解压的数据
	while (tDInfo.output_scanline < tDInfo.output_height)
	{
        /* 得到一行数据,里面的颜色格式为0xRR, 0xGG, 0xBB */
		(void) jpeg_read_scanlines(&tDInfo, &aucLineBuffer, 1);

		// 转到ptPixelDatas去
		CovertOneLine(ptPixelDatas->iWidth, 24, ptPixelDatas->iBpp, aucLineBuffer, pucDest);
		pucDest += ptPixelDatas->iLineBytes;
	}

	free(aucLineBuffer);
	jpeg_finish_decompress(&tDInfo);
	jpeg_destroy_decompress(&tDInfo);

    return 0;
}


/**********************************************************************
 * 函数名称: CovertOneLine
 * 功能描述: 把已经从JPG文件取出的一行象素数据,转换为能在显示设备上使用的格式
 * 输入参数: iWidth      - 宽度,即多少个象素
 *            iSrcBpp     - 已经从JPG文件取出的一行象素数据里面,一个象素用多少位来表示
 *            iDstBpp     - 显示设备上一个象素用多少位来表示
 *            pudSrcDatas - 已经从JPG文件取出的一行象素数所存储的位置
 *            pudDstDatas - 转换所得数据存储的位置
 * 输出参数: 无
 * 返 回 值: 0 - 成功, 其他值 - 失败
 * 修改日期        版本号     修改人	      修改内容
 * -----------------------------------------------
 * 2013/02/08	     V1.0	  韦东山	      创建
 ***********************************************************************/
static int CovertOneLine(int iWidth, int iSrcBpp, int iDstBpp, unsigned char *pudSrcDatas, unsigned char *pudDstDatas)
{
	unsigned int dwRed;
	unsigned int dwGreen;
	unsigned int dwBlue;
	unsigned int dwColor;

	unsigned short *pwDstDatas16bpp = (unsigned short *)pudDstDatas;
	unsigned int   *pwDstDatas32bpp = (unsigned int *)pudDstDatas;

	int i;
	int pos = 0;

	if (iSrcBpp != 24)
	{
		return -1;
	}

	if (iDstBpp == 24)
	{
		memcpy(pudDstDatas, pudSrcDatas, iWidth*3);
	}
	else
	{
		for (i = 0; i < iWidth; i++)
		{
			dwRed   = pudSrcDatas[pos++];
			dwGreen = pudSrcDatas[pos++];
			dwBlue  = pudSrcDatas[pos++];
			if (iDstBpp == 32)
			{
				dwColor = (dwRed << 16) | (dwGreen << 8) | dwBlue;
				*pwDstDatas32bpp = dwColor;
				pwDstDatas32bpp++;
			}
			else if (iDstBpp == 16)
			{
				/* 565 */
				dwRed   = dwRed >> 3;
				dwGreen = dwGreen >> 2;
				dwBlue  = dwBlue >> 3;
				dwColor = (dwRed << 11) | (dwGreen << 5) | (dwBlue);
				*pwDstDatas16bpp = dwColor;
				pwDstDatas16bpp++;
			}
		}
	}
	return 0;
}


/**********************************************************************
 * 函数名称: MyErrorExit
 * 功能描述: 自定义的libjpeg库出错处理函数
 *            默认的错误处理函数是让程序退出,我们当然不会使用它
 *            参考libjpeg里的bmp.c编写了这个错误处理函数
 * 输入参数: ptCInfo - libjpeg库抽象出来的通用结构体
 * 输出参数: 无
 * 返 回 值: 无
 * 修改日期        版本号     修改人	      修改内容
 * -----------------------------------------------
 * 2013/02/08	     V1.0	  韦东山	      创建
 ***********************************************************************/
static void MyErrorExit(j_common_ptr ptCInfo)
{
    static char errStr[JMSG_LENGTH_MAX];

	PT_MyErrorMgr ptMyErr = (PT_MyErrorMgr)ptCInfo->err;

    /* Create the message */
    (*ptCInfo->err->format_message) (ptCInfo, errStr);
    DBG_PRINTF("%s\n", errStr);

	longjmp(ptMyErr->setjmp_buffer, 1);
}


static int isSupportMjpeg2Rgb(int iPixelFormatIn, int iPixelFormatOut)
{
    if (iPixelFormatIn != V4L2_PIX_FMT_MJPEG)
        return 0;
    if ((iPixelFormatOut != V4L2_PIX_FMT_RGB565) && (iPixelFormatOut != V4L2_PIX_FMT_RGB32))
    {
        return 0;
    }
    return 1;
}


static int Mjpeg2RgbConvertExit(PT_VideoBuf ptVideoBufOut)
{
    if (ptVideoBufOut->tPixelDatas.aucPixelDatas)
    {
        free(ptVideoBufOut->tPixelDatas.aucPixelDatas);
        ptVideoBufOut->tPixelDatas.aucPixelDatas = NULL;
    }
    return 0;
}
四.RGB(565或32)转换为RGB(565或者32)
1.创建转换器
static T_VideoConvert g_tRgb2RgbConvert = {
    .name        = "rgb2rgb",
    .isSupport   = isSupportRgb2Rgb,
    .Convert     = Rgb2RgbConvert,
    .ConvertExit = Rgb2RgbConvertExit,
};
2.注册转换器
int Rgb2RgbInit(void)
{
    return RegisterVideoConvert(&g_tRgb2RgbConvert);
}


int RegisterVideoConvert(PT_VideoConvert ptVideoConvert)
{
	PT_VideoConvert ptTmp;

	if (!g_ptVideoConvertHead)
	{
		g_ptVideoConvertHead   = ptVideoConvert;
		ptVideoConvert->ptNext = NULL;
	}
	else
	{
		ptTmp = g_ptVideoConvertHead;
		while (ptTmp->ptNext)
		{
			ptTmp = ptTmp->ptNext;
		}
		ptTmp->ptNext     = ptVideoConvert;
		ptVideoConvert->ptNext = NULL;
	}

	return 0;
}
3.实现转换函数
//需要设置接收数据的结构体ptVideoBufOut的iPixelFormat参数
static int Rgb2RgbConvert(PT_VideoBuf ptVideoBufIn, PT_VideoBuf ptVideoBufOut)
{
    PT_PixelDatas ptPixelDatasIn  = &ptVideoBufIn->tPixelDatas;
    PT_PixelDatas ptPixelDatasOut = &ptVideoBufOut->tPixelDatas;

    int x, y;
    int r, g, b;
    int color;
    unsigned short *pwSrc = (unsigned short *)ptPixelDatasIn->aucPixelDatas;
    unsigned int *pdwDest;

    if (ptVideoBufIn->iPixelFormat != V4L2_PIX_FMT_RGB565)
    {
        return -1;
    }

    if (ptVideoBufOut->iPixelFormat == V4L2_PIX_FMT_RGB565)
    {
        ptPixelDatasOut->iWidth  = ptPixelDatasIn->iWidth;
        ptPixelDatasOut->iHeight = ptPixelDatasIn->iHeight;
        ptPixelDatasOut->iBpp    = 16;
        ptPixelDatasOut->iLineBytes  = ptPixelDatasOut->iWidth * ptPixelDatasOut->iBpp / 8;
        ptPixelDatasOut->iTotalBytes = ptPixelDatasOut->iLineBytes * ptPixelDatasOut->iHeight;
        if (!ptPixelDatasOut->aucPixelDatas)
        {
            ptPixelDatasOut->aucPixelDatas = malloc(ptPixelDatasOut->iTotalBytes);
        }

        memcpy(ptPixelDatasOut->aucPixelDatas, ptPixelDatasIn->aucPixelDatas, ptPixelDatasOut->iTotalBytes);
        return 0;
    }
    else if (ptVideoBufOut->iPixelFormat == V4L2_PIX_FMT_RGB32)
    {
        ptPixelDatasOut->iWidth  = ptPixelDatasIn->iWidth;
        ptPixelDatasOut->iHeight = ptPixelDatasIn->iHeight;
        ptPixelDatasOut->iBpp    = 32;
        ptPixelDatasOut->iLineBytes  = ptPixelDatasOut->iWidth * ptPixelDatasOut->iBpp / 8;
        ptPixelDatasOut->iTotalBytes = ptPixelDatasOut->iLineBytes * ptPixelDatasOut->iHeight;
        if (!ptPixelDatasOut->aucPixelDatas)
        {
            ptPixelDatasOut->aucPixelDatas = malloc(ptPixelDatasOut->iTotalBytes);
        }

        pdwDest = (unsigned int *)ptPixelDatasOut->aucPixelDatas;

        for (y = 0; y < ptPixelDatasOut->iHeight; y++)
        {
            for (x = 0; x < ptPixelDatasOut->iWidth; x++)
            {
                color = *pwSrc++;
                /* 从RGB565格式的数据中提取出R,G,B */
                r = color >> 11;
                g = (color >> 5) & (0x3f);
                b = color & 0x1f;

                /* 把r,g,b转为0x00RRGGBB的32位数据 */
                color = ((r << 3) << 16) | ((g << 2) << 8) | (b << 3);

                *pdwDest = color;
                pdwDest++;
            }
        }
        return 0;
    }

    return -1;
}


static int Rgb2RgbConvertExit(PT_VideoBuf ptVideoBufOut)
{
    if (ptVideoBufOut->tPixelDatas.aucPixelDatas)
    {
        free(ptVideoBufOut->tPixelDatas.aucPixelDatas);
        ptVideoBufOut->tPixelDatas.aucPixelDatas = NULL;
    }
    return 0;
}


static int isSupportRgb2Rgb(int iPixelFormatIn, int iPixelFormatOut)
{
    if (iPixelFormatIn != V4L2_PIX_FMT_RGB565)
        return 0;
    if ((iPixelFormatOut != V4L2_PIX_FMT_RGB565) && (iPixelFormatOut != V4L2_PIX_FMT_RGB32))
    {
        return 0;
    }
    return 1;
}
五.整体流程的实现
1.一系列的初始化
/* 一系列的初始化 */
	/* 注册显示设备 */
	DisplayInit();
	/* 可能可支持多个显示设备: 选择和初始化指定的显示设备 */
	SelectAndInitDefaultDispDev("fb");
//获取lcd屏幕的参数
    GetDispResolution(&iLcdWidth, &iLcdHeigt, &iLcdBpp);
//设置最后整合好的数据存储的地址的一些参数,将我初始化完的显示设备的一部分参数传给tFrameBuf
    GetVideoBufForDisplay(&tFrameBuf);
//设置最后输出显示的格式
    iPixelFormatOfDisp = tFrameBuf.iPixelFormat;

    VideoInit();
//初始化采集设备
    iError = VideoDeviceInit(argv[1], &tVideoDevice);
    if (iError)
    {
        DBG_PRINTF("VideoDeviceInit for %s error!\n", argv[1]);
        return -1;
    }

//获取采集设备所采集图像的数据
    iPixelFormatOfVideo = tVideoDevice.ptOPr->GetFormat(&tVideoDevice);

//初始化转换设备
    VideoConvertInit();

//判断这种格式是否能转换,选择并返回合适的转换器
    ptVideoConvert = GetVideoConvertForFormats(iPixelFormatOfVideo, iPixelFormatOfDisp);
    if (NULL == ptVideoConvert)
    {
        DBG_PRINTF("can not support this format convert\n");
        return -1;
    }
2.启动采集设备
/* 启动摄像头设备 */
//采集设备就会一直进行采集,将采集到的图像数据存储到缓冲区
    iError = tVideoDevice.ptOPr->StartDevice(&tVideoDevice);
    if (iError)
    {
        DBG_PRINTF("StartDevice for %s error!\n", argv[1]);
        return -1;
    }

    memset(&tVideoBuf, 0, sizeof(tVideoBuf));
    memset(&tConvertBuf, 0, sizeof(tConvertBuf));

//设置转换后的结构体的一些参数,因为各个转换器的转换函数需要设置接收结构体ptVideoBufOut的一些参数
    tConvertBuf.iPixelFormat     = iPixelFormatOfDisp;
    tConvertBuf.tPixelDatas.iBpp = iLcdBpp;


    memset(&tZoomBuf, 0, sizeof(tZoomBuf));
3.读取缓冲区的数据,并完成转换,缩放,整合,显示操作
//将入队的缓冲区进行依次一个出队,然后读取此次出队的缓冲区的数据
while (1)
{
/* 读入摄像头数据 */
iError = tVideoDevice.ptOPr->GetFrame(&tVideoDevice, &tVideoBuf);
if (iError)
{
DBG_PRINTF("GetFrame for %s error!\n", argv[1]);
return -1;
}
ptVideoBufCur = &tVideoBuf;//没有进行转换的数据
if (iPixelFormatOfVideo != iPixelFormatOfDisp)
{
/* 转换为RGB */
//根据前面GetVideoConvertForFormats函数返回的转换器来进行转换数据
iError = ptVideoConvert->Convert(&tVideoBuf, &tConvertBuf);
DBG_PRINTF("Convert %s, ret = %d\n", ptVideoConvert->name, iError);
if (iError)
{
DBG_PRINTF("Convert for %s error!\n", argv[1]);
return -1;
}
ptVideoBufCur = &tConvertBuf;//进行转换的数据,将两者都赋值给同一个参数,
//方便后续判断分辨率大小
}
/* 如果图像分辨率大于LCD, 缩放 */
//当前图像的高度或宽度大于lcd的高度或宽度
if (ptVideoBufCur->tPixelDatas.iWidth > iLcdWidth || ptVideoBufCur->tPixelDatas.iHeight > iLcdHeigt)
{
/* 确定缩放后的分辨率 */
/* 把图片按比例缩放到VideoMem上, 居中显示
* 1. 先算出缩放后的大小
*/
//整体的比例不能改变,不然图像数据可能会变形
k = (float)ptVideoBufCur->tPixelDatas.iHeight / ptVideoBufCur->tPixelDatas.iWidth;
//然后尽最大可能的显示这张图像,因此每张图像都需要将长或宽设置确定的一边,然后再根据整体比例
//来设置另一边
tZoomBuf.tPixelDatas.iWidth = iLcdWidth;
tZoomBuf.tPixelDatas.iHeight = iLcdWidth * k;
if ( tZoomBuf.tPixelDatas.iHeight > iLcdHeigt)
{
tZoomBuf.tPixelDatas.iWidth = iLcdHeigt / k;
tZoomBuf.tPixelDatas.iHeight = iLcdHeigt;
}
//写入缩放后的图像的其他参数
tZoomBuf.tPixelDatas.iBpp = iLcdBpp;
tZoomBuf.tPixelDatas.iLineBytes = tZoomBuf.tPixelDatas.iWidth * tZoomBuf.tPixelDatas.iBpp / 8;
tZoomBuf.tPixelDatas.iTotalBytes = tZoomBuf.tPixelDatas.iLineBytes * tZoomBuf.tPixelDatas.iHeight;
if (!tZoomBuf.tPixelDatas.aucPixelDatas)
{
tZoomBuf.tPixelDatas.aucPixelDatas = malloc(tZoomBuf.tPixelDatas.iTotalBytes);
}
//写入缩放后的图像数据
PicZoom(&ptVideoBufCur->tPixelDatas, &tZoomBuf.tPixelDatas);
ptVideoBufCur = &tZoomBuf;
}
/* 合并进framebuffer */
/* 接着算出居中显示时左上角坐标 */
iTopLeftX = (iLcdWidth - ptVideoBufCur->tPixelDatas.iWidth) / 2;
iTopLeftX = (iLcdHeigt - ptVideoBufCur->tPixelDatas.iHeight) / 2;
//完成定位,在tFrameBuf的(iTopLeftX,iTopLeftX)点写入图像数据,如最后的图所示
PicMerge(iTopLeftX, iTopLeftY, &ptVideoBufCur->tPixelDatas, &tFrameBuf.tPixelDatas);
//将整合完的结构体tFrameBuf的数据刷新到真实lcd屏幕上
FlushPixelDatasToDev(&tFrameBuf.tPixelDatas);
//将读取完数据的缓冲区重新入队,表示已经读取完,可以重新写入数据了
iError = tVideoDevice.ptOPr->PutFrame(&tVideoDevice, &tVideoBuf);
if (iError)
{
DBG_PRINTF("PutFrame for %s error!\n", argv[1]);
return -1;
}
/* 把framebuffer的数据刷到LCD上, 显示 */
}
//刷到lcd屏幕的函数,pucDispMem表示的是lcd进行mmap内存映射后的地址
static int FBShowPage(PT_PixelDatas ptPixelDatas)
{
if (g_tFBOpr.pucDispMem != ptPixelDatas->aucPixelDatas)
{
memcpy(g_tFBOpr.pucDispMem, ptPixelDatas->aucPixelDatas, ptPixelDatas->iTotalBytes);
}
return 0;
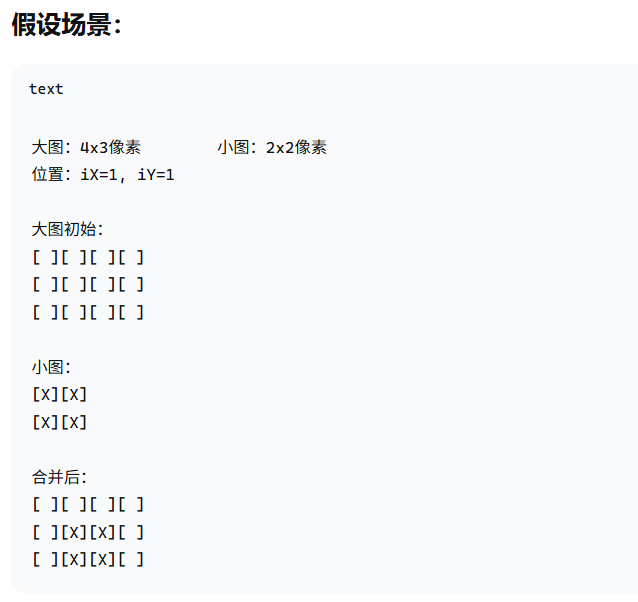
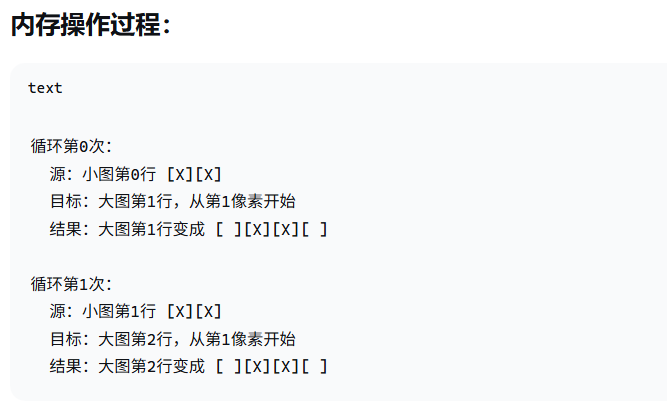
}PicMerge(iTopLeftX, iTopLeftY, &ptVideoBufCur->tPixelDatas, &tFrameBuf.tPixelDatas)函数的图解:

openvela 操作系统专为 AIoT 领域量身定制,以轻量化、标准兼容、安全性和高度可扩展性为核心特点。openvela 以其卓越的技术优势,已成为众多物联网设备和 AI 硬件的技术首选,涵盖了智能手表、运动手环、智能音箱、耳机、智能家居设备以及机器人等多个领域。
更多推荐


 20
20 0
0- 0


 已为社区贡献2条内容

所有评论(0)