
基于立创梁山派GD32F470ZGT6配置SD卡及移植 FatFs文件操作系统教程
一、配置 SDIO 驱动 SD 卡
我这里是基于GD32F470ZGT6立创梁山派进行开发设计,在移植FatFs文件系统前,要先配置好相关SD卡相关的驱动文件,我这里为了方便,直接使用了兆易创新官方固件库中有关于配置SDIO使用SD卡的例程。
(一)、获取固件库
首先先获取GD32F470的固件库,网址:兆易创新 GigaDevice | 官方网站 ,找到GD32F470的固件库并进行下载(我这里最新的是GD32F4xx_Firmware_Library_V3.3.1)。

(二)、将SDIO驱动SD卡文件添加到工程
对下载的固件库进行解压,然后打开该固件库按照如下路径:GD32F4xx_Firmware_Library_V3.3.1\GD32F4xx_Firmware_Library\Examples\SDIO\Read_write打开文件,该路径下存放的是SDIO驱动SD卡的例程。
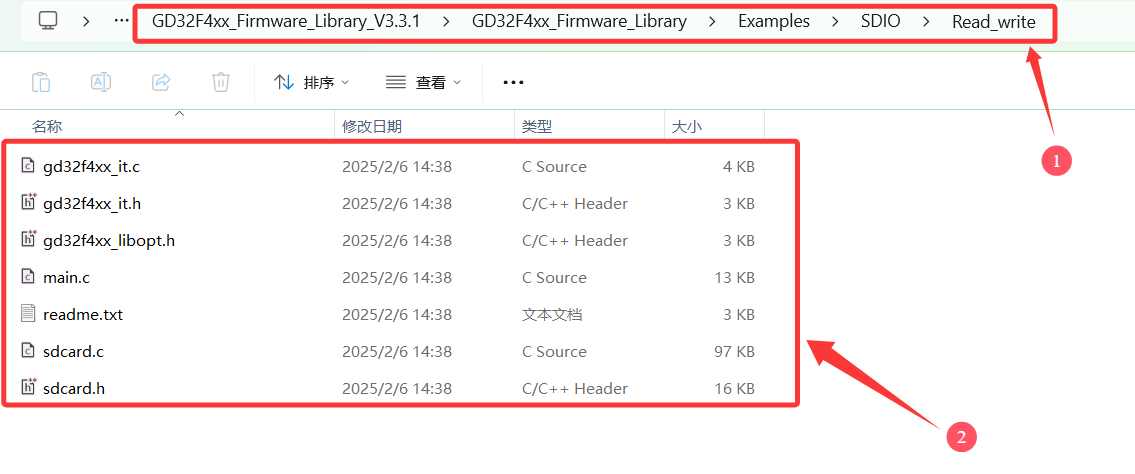
打开要移植FatFs的工程文件,将固件库中的sdcard.c和sdcard.h文件复制到工程文件存放外设的文件夹中,我这里是存放在工程文件的Hardware里的sdio文件夹中。
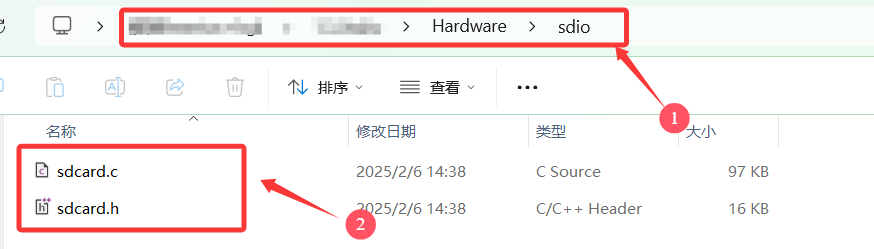
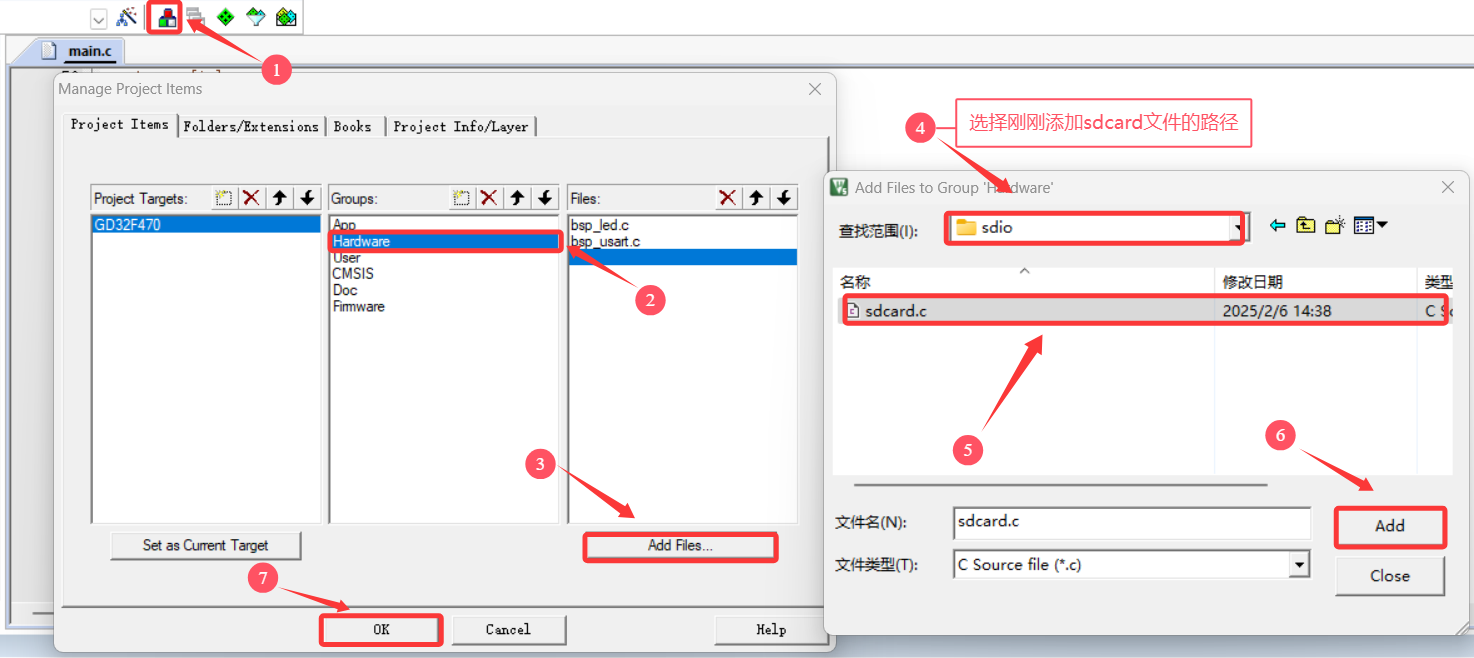
用Keil打开该工程,将刚刚保存的文件添加到工程中(按照顺序一步一步添加即可)。
添加好文件之后,还要包含其头文件路径,按照如下图所示步骤进行配置
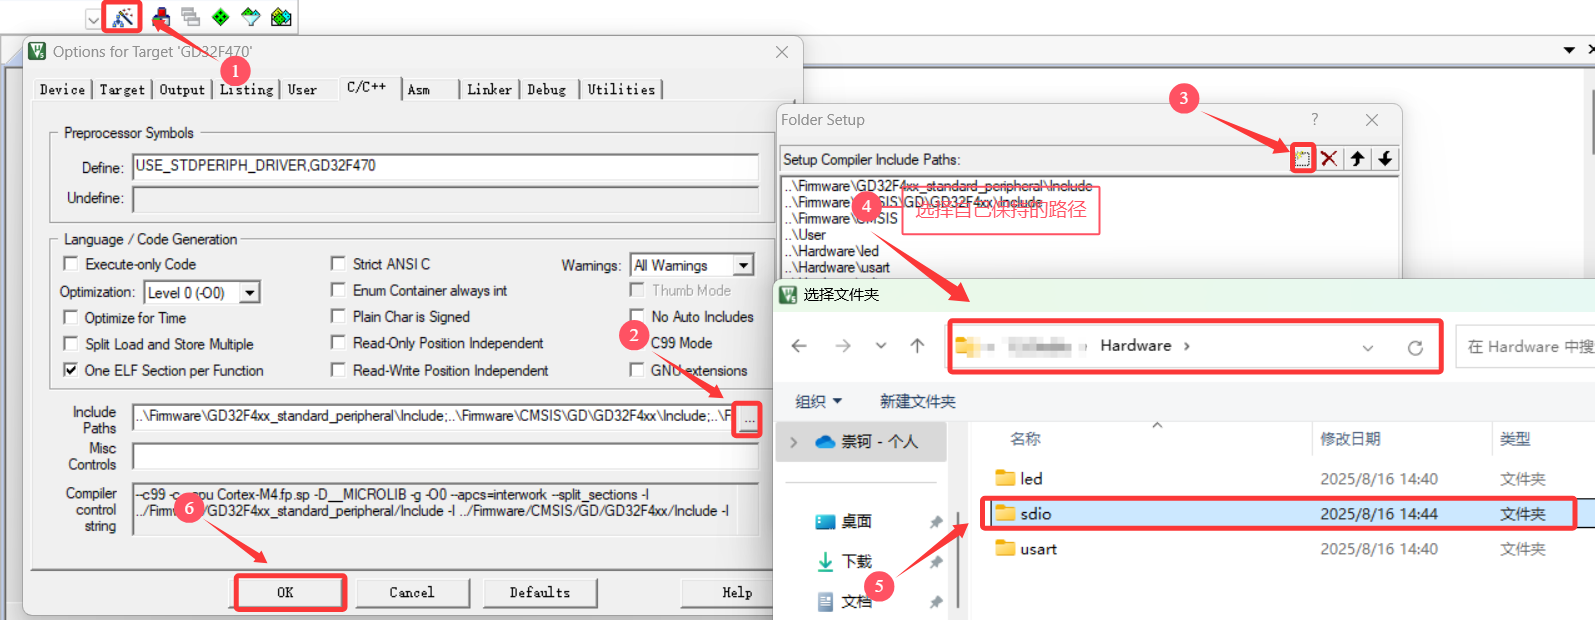
(三)、添加SDIO中断服务函数
打开gd32f4xx_it.c文件,添加头文件#include "sdcard.h",然后创建SDIO中断处理函数,执行有关于SDIO的相关中断处理,这里直接调用sdcard.c文件中的sd_interrupts_process函数即可。
#include "sdcard.h"

/*!
    \brief      this function handles SDIO interrupt request
    \param[in]  none
    \param[out] none
    \retval     none
*/
void SDIO_IRQHandler(void)
{
    sd_interrupts_process();
}
(四)、编写SD卡相关函数
回到main.c文件添加头文件#include "sdcard.h",然后编写sd_io_init函数和ard_info_get 函数,sd_io_init函数主要用于初始化 SD 卡,获取卡信息,并配置总线模式和数据传输模式;ard_info_get 函数用于获取 SD 卡的详细信息,并通过 USART 打印输出(这里的USART 打印输出要先提前配置好相关的串口函数)。
#include "sdcard.h"


/*!
    \brief      initialize the card, get the card information, set the bus mode and transfer mode
    \param[in]  none
    \param[out] none
    \retval     sd_error_enum
*/
sd_error_enum sd_io_init(void)
{
    sd_error_enum status = SD_OK;
    uint32_t cardstate = 0;
    status = sd_init();
    if(SD_OK == status) {
        status = sd_card_information_get(&sd_cardinfo);
    }
    if(SD_OK == status) {
        status = sd_card_select_deselect(sd_cardinfo.card_rca);
    }
    status = sd_cardstatus_get(&cardstate);
    if(cardstate & 0x02000000) {
        printf("\r\n the card is locked!");
        while(1) {
        }
    }
    if((SD_OK == status) && (!(cardstate & 0x02000000))) {
        /* set bus mode */
        status = sd_bus_mode_config(SDIO_BUSMODE_4BIT);
//        status = sd_bus_mode_config(SDIO_BUSMODE_1BIT);
    }
    if(SD_OK == status) {
        /* set data transfer mode */
        status = sd_transfer_mode_config(SD_DMA_MODE);
//        status = sd_transfer_mode_config(SD_POLLING_MODE);
    }
    return status;
}

/*!
    \brief      get the card information and print it out by USRAT
    \param[in]  none
    \param[out] none
    \retval     none
*/
void card_info_get(void)
{
    uint8_t sd_spec, sd_spec3, sd_spec4, sd_security;
    uint32_t block_count, block_size;
    uint16_t temp_ccc;
    printf("\r\n Card information:");
    sd_spec = (sd_scr[1] & 0x0F000000) >> 24;
    sd_spec3 = (sd_scr[1] & 0x00008000) >> 15;
    sd_spec4 = (sd_scr[1] & 0x00000400) >> 10;
    if(2 == sd_spec) {
        if(1 == sd_spec3) {
            if(1 == sd_spec4) {
                printf("\r\n## Card version 4.xx ##");
            } else {
                printf("\r\n## Card version 3.0x ##");
            }
        } else {
            printf("\r\n## Card version 2.00 ##");
        }
    } else if(1 == sd_spec) {
        printf("\r\n## Card version 1.10 ##");
    } else if(0 == sd_spec) {
        printf("\r\n## Card version 1.0x ##");
    }

    sd_security = (sd_scr[1] & 0x00700000) >> 20;
    if(2 == sd_security) {
        printf("\r\n## SDSC card ##");
    } else if(3 == sd_security) {
        printf("\r\n## SDHC card ##");
    } else if(4 == sd_security) {
        printf("\r\n## SDXC card ##");
    }

    block_count = (sd_cardinfo.card_csd.c_size + 1) * 1024;
    block_size = 512;
    printf("\r\n## Device size is %dKB ##", sd_card_capacity_get());
    printf("\r\n## Block size is %dB ##", block_size);
    printf("\r\n## Block count is %d ##", block_count);

    if(sd_cardinfo.card_csd.read_bl_partial) {
        printf("\r\n## Partial blocks for read allowed ##");
    }
    if(sd_cardinfo.card_csd.write_bl_partial) {
        printf("\r\n## Partial blocks for write allowed ##");
    }
    temp_ccc = sd_cardinfo.card_csd.ccc;
    printf("\r\n## CardCommandClasses is: %x ##", temp_ccc);
    if((SD_CCC_BLOCK_READ & temp_ccc) && (SD_CCC_BLOCK_WRITE & temp_ccc)) {
        printf("\r\n## Block operation supported ##");
    }
    if(SD_CCC_ERASE & temp_ccc) {
        printf("\r\n## Erase supported ##");
    }
    if(SD_CCC_WRITE_PROTECTION & temp_ccc) {
        printf("\r\n## Write protection supported ##");
    }
    if(SD_CCC_LOCK_CARD & temp_ccc) {
        printf("\r\n## Lock unlock supported ##");
    }
    if(SD_CCC_APPLICATION_SPECIFIC & temp_ccc) {
        printf("\r\n## Application specific supported ##");
    }
    if(SD_CCC_IO_MODE & temp_ccc) {
        printf("\r\n## I/O mode supported ##");
    }
    if(SD_CCC_SWITCH & temp_ccc) {
        printf("\r\n## Switch function supported ##");
    }
}
(五)、验证SD卡是否配置成功
接下来要验证SD卡是否配置成功,先定义相关变量在,编写SD卡挂载、类型查询,SD卡读取实验。
//先定义相关变量和宏定义
#define DATA_PRINT                                          /* uncomment the macro to print out the data */

sd_card_info_struct sd_cardinfo;                            /* information of SD card */
uint32_t buf_write[512];                                    /* store the data written to the card */
uint32_t buf_read[512];                                     /* store the data read from the card */
sd_error_enum sd_error;
uint16_t i = 5;
#ifdef DATA_PRINT
		uint8_t *pdata;
#endif /* DATA_PRINT */

//接下来的内容写在main函数中
	nvic_irq_enable(SDIO_IRQn, 0, 0);

		    /* initialize the card */
    do {
        sd_error = sd_io_init();
    } while((SD_OK != sd_error) && (--i));

    if(i) {
        printf("\r\n Card init success!\r\n");
    } else {
        printf("\r\n Card init failed!\r\n");
        /* turn on LED1, LED3 and turn off LED2 */
        led_on();
        while(1) {
        }
    }

    /* get the information of the card and print it out by USART */
    card_info_get();


		sd_error = sd_block_read(buf_read, 100 * 512, 512);
    if(SD_OK != sd_error) {
        printf("\r\n Block read fail!");
        /* turn on LED1, LED3 and turn off LED2 */
				led_on();
        while(1) {
        }
    } else {
        printf("\r\n Block read success!");
#ifdef DATA_PRINT
        pdata = (uint8_t *)buf_read;
        /* print data by USART */
        printf("\r\n");
        for(i = 0; i < 128; i++) {
            printf(" %3d %3d %3d %3d ", *pdata, *(pdata + 1), *(pdata + 2), *(pdata + 3));
            pdata += 4;
            if(0 == (i + 1) % 4) {
                printf("\r\n");
            }
        }
#endif /* DATA_PRINT */
    }
完整的main函数如下所示:
#include "gd32f4xx.h"
#include "systick.h"
#include <stdio.h>
#include <string.h>
#include "main.h"
#include "bsp_led.h"
#include "bsp_usart.h"
#include "sdcard.h"

#define DATA_PRINT                                          /* uncomment the macro to print out the data */

sd_card_info_struct sd_cardinfo;                            /* information of SD card */
uint32_t buf_write[512];                                    /* store the data written to the card */
uint32_t buf_read[512];                                     /* store the data read from the card */
sd_error_enum sd_error;
uint16_t i = 5;
#ifdef DATA_PRINT
		uint8_t *pdata;
#endif /* DATA_PRINT */


sd_error_enum sd_io_init(void);
void card_info_get(void);

/*!
    \brief    main function
    \param[in]  none
    \param[out] none
    \retval     none
*/
int main(void)
{
	nvic_priority_group_set(NVIC_PRIGROUP_PRE2_SUB2);  // 优先级分组
    systick_config();
	led_gpio_config();
	usart_gpio_config(9600U);  					// 串口0初始化

	nvic_irq_enable(SDIO_IRQn, 0, 0);

	/* initialize the card */
    do {
        sd_error = sd_io_init();
    } while((SD_OK != sd_error) && (--i));

    if(i) {
        printf("\r\n Card init success!\r\n");
    } else {
        printf("\r\n Card init failed!\r\n");
        /* turn on LED1, LED3 and turn off LED2 */
        led_on();
        while(1) {
        }
    }

    /* get the information of the card and print it out by USART */
    card_info_get();


	sd_error = sd_block_read(buf_read, 100 * 512, 512);
    if(SD_OK != sd_error) {
        printf("\r\n Block read fail!");
        /* turn on LED1, LED3 and turn off LED2 */
				led_on();
        while(1) {
        }
    } else {
        printf("\r\n Block read success!");
#ifdef DATA_PRINT
        pdata = (uint8_t *)buf_read;
        /* print data by USART */
        printf("\r\n");
        for(i = 0; i < 128; i++) {
            printf(" %3d %3d %3d %3d ", *pdata, *(pdata + 1), *(pdata + 2), *(pdata + 3));
            pdata += 4;
            if(0 == (i + 1) % 4) {
                printf("\r\n");
            }
        }
#endif /* DATA_PRINT */
    }

    while(1) {
    }
}

/*!
    \brief      initialize the card, get the card information, set the bus mode and transfer mode
    \param[in]  none
    \param[out] none
    \retval     sd_error_enum
*/
sd_error_enum sd_io_init(void)
{
    sd_error_enum status = SD_OK;
    uint32_t cardstate = 0;
    status = sd_init();
    if(SD_OK == status) {
        status = sd_card_information_get(&sd_cardinfo);
    }
    if(SD_OK == status) {
        status = sd_card_select_deselect(sd_cardinfo.card_rca);
    }
    status = sd_cardstatus_get(&cardstate);
    if(cardstate & 0x02000000) {
        printf("\r\n the card is locked!");
        while(1) {
        }
    }
    if((SD_OK == status) && (!(cardstate & 0x02000000))) {
        /* set bus mode */
        status = sd_bus_mode_config(SDIO_BUSMODE_4BIT);
//        status = sd_bus_mode_config(SDIO_BUSMODE_1BIT);
    }
    if(SD_OK == status) {
        /* set data transfer mode */
        status = sd_transfer_mode_config(SD_DMA_MODE);
//        status = sd_transfer_mode_config(SD_POLLING_MODE);
    }
    return status;
}

/*!
    \brief      get the card information and print it out by USRAT
    \param[in]  none
    \param[out] none
    \retval     none
*/
void card_info_get(void)
{
    uint8_t sd_spec, sd_spec3, sd_spec4, sd_security;
    uint32_t block_count, block_size;
    uint16_t temp_ccc;
    printf("\r\n Card information:");
    sd_spec = (sd_scr[1] & 0x0F000000) >> 24;
    sd_spec3 = (sd_scr[1] & 0x00008000) >> 15;
    sd_spec4 = (sd_scr[1] & 0x00000400) >> 10;
    if(2 == sd_spec) {
        if(1 == sd_spec3) {
            if(1 == sd_spec4) {
                printf("\r\n## Card version 4.xx ##");
            } else {
                printf("\r\n## Card version 3.0x ##");
            }
        } else {
            printf("\r\n## Card version 2.00 ##");
        }
    } else if(1 == sd_spec) {
        printf("\r\n## Card version 1.10 ##");
    } else if(0 == sd_spec) {
        printf("\r\n## Card version 1.0x ##");
    }

    sd_security = (sd_scr[1] & 0x00700000) >> 20;
    if(2 == sd_security) {
        printf("\r\n## SDSC card ##");
    } else if(3 == sd_security) {
        printf("\r\n## SDHC card ##");
    } else if(4 == sd_security) {
        printf("\r\n## SDXC card ##");
    }

    block_count = (sd_cardinfo.card_csd.c_size + 1) * 1024;
    block_size = 512;
    printf("\r\n## Device size is %dKB ##", sd_card_capacity_get());
    printf("\r\n## Block size is %dB ##", block_size);
    printf("\r\n## Block count is %d ##", block_count);

    if(sd_cardinfo.card_csd.read_bl_partial) {
        printf("\r\n## Partial blocks for read allowed ##");
    }
    if(sd_cardinfo.card_csd.write_bl_partial) {
        printf("\r\n## Partial blocks for write allowed ##");
    }
    temp_ccc = sd_cardinfo.card_csd.ccc;
    printf("\r\n## CardCommandClasses is: %x ##", temp_ccc);
    if((SD_CCC_BLOCK_READ & temp_ccc) && (SD_CCC_BLOCK_WRITE & temp_ccc)) {
        printf("\r\n## Block operation supported ##");
    }
    if(SD_CCC_ERASE & temp_ccc) {
        printf("\r\n## Erase supported ##");
    }
    if(SD_CCC_WRITE_PROTECTION & temp_ccc) {
        printf("\r\n## Write protection supported ##");
    }
    if(SD_CCC_LOCK_CARD & temp_ccc) {
        printf("\r\n## Lock unlock supported ##");
    }
    if(SD_CCC_APPLICATION_SPECIFIC & temp_ccc) {
        printf("\r\n## Application specific supported ##");
    }
    if(SD_CCC_IO_MODE & temp_ccc) {
        printf("\r\n## I/O mode supported ##");
    }
    if(SD_CCC_SWITCH & temp_ccc) {
        printf("\r\n## Switch function supported ##");
    }
}
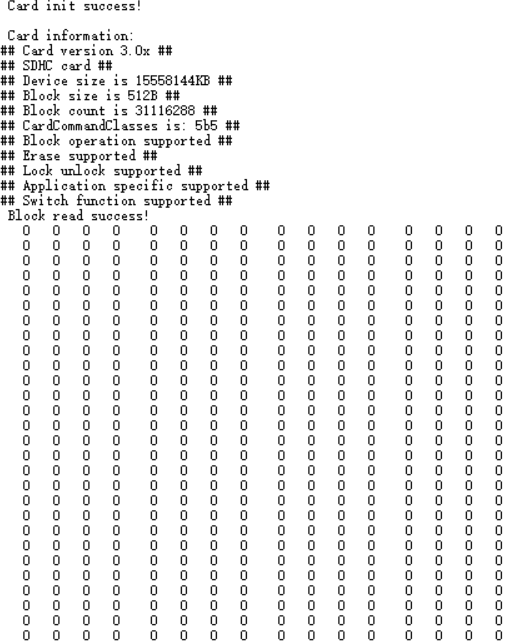
对程序编译下载,打开串口助手查看运行状况,如果如下图所示则表示SD卡配置成功
二、移植FatFs文件系统
(一)、获取FatFs库文件
准备好了SD卡驱动程序后,还要准备好FatFs程序,这里自己从官网下载最新版本的FatFs,地址:https://elm-chan.org/fsw/ff/
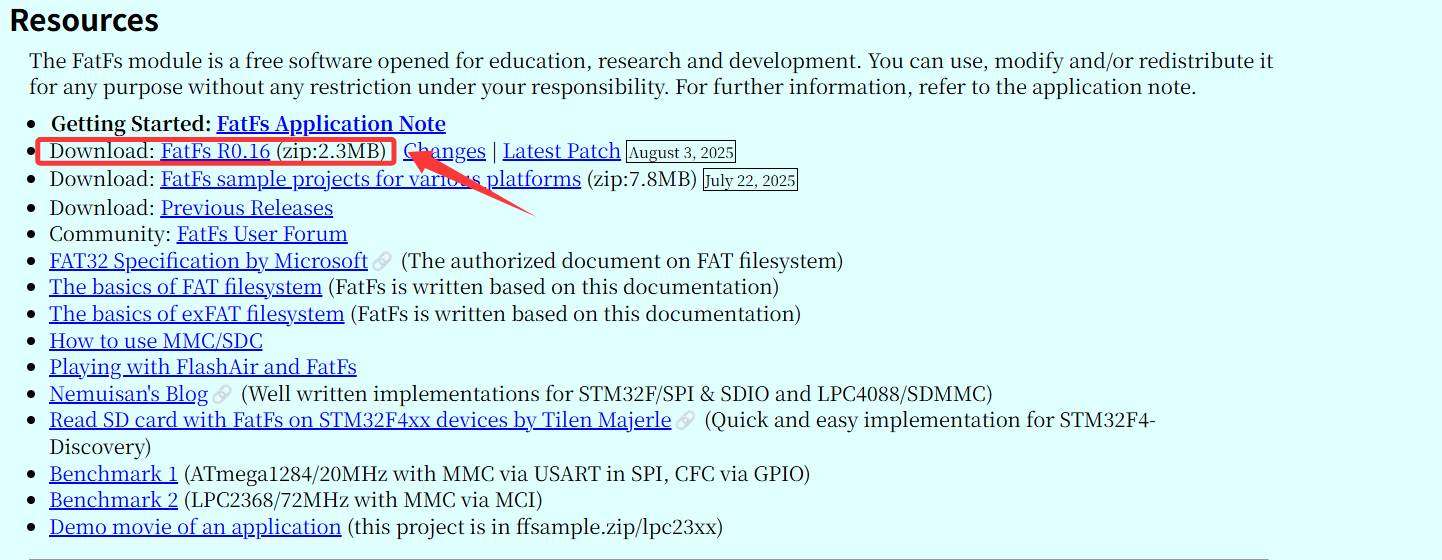
在解压下载了FatFs R0.16库文件后,会有如下三个文件夹和文件documents、source、LICENSE.txt;其中documents可以当作是一个官方的参考手册、说明书来看,里面有对文件系统的各个API的使用进行介绍说明,参考Demo等;source文件夹则是整个文件系统的核心所在,包含了文件系统的全部源文件和头文件。

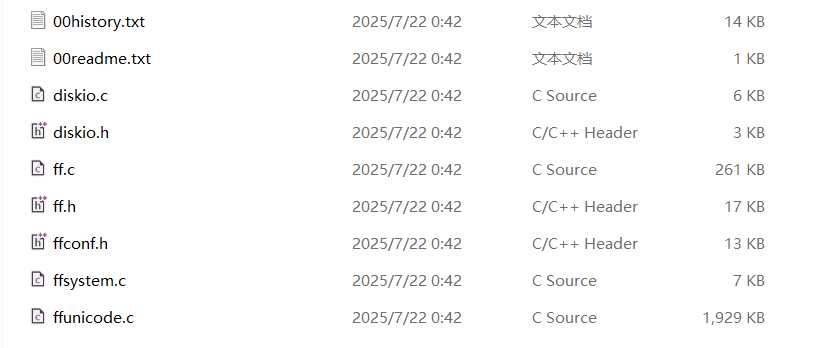
这里要进行移植是对source文件进行移植,点击进入source文件夹后,可以看到如下几个文件,在这些文件中diskio.h、ff.c、ff.h、ffsystem.c和ffunicode.c是不需要更改的;diskio.c这个文件与磁盘底层IO操作接近,其包含了底层存储介质的操作函数,这些函数需要用户自己实现,主要是添加底层驱动函数;ffconf.h这个头文件包含了对FatFs功能配置的宏定义,通过修改这些宏定义就可以裁剪FatFs的功能。ffconf.h和diskio.c是移植FatFs的重点,是后面根据实际情况需要进行修改的文件。
 (二)、将FatFs库文件添加到工程
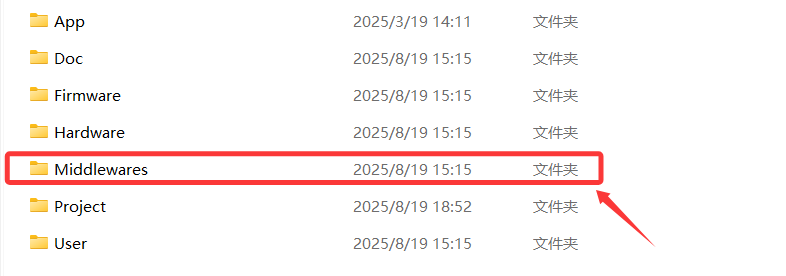
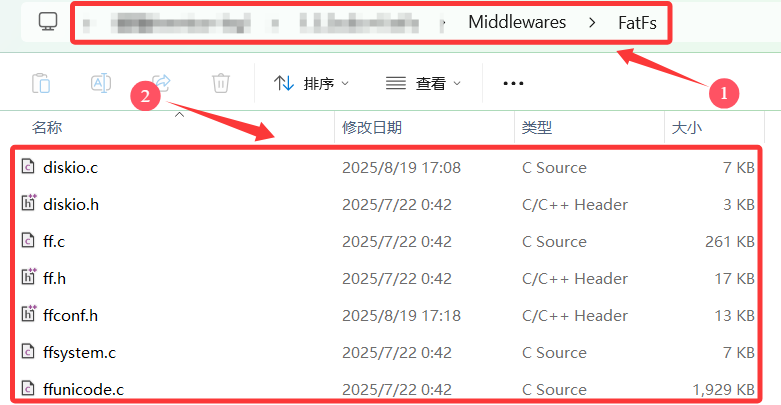
打开之前配置好驱动SD卡程序的工程文件,新建一个Middlewares文件用来存放中间层文件。
在Middlewares文件夹里新建一个FatFs文件夹用来专门存放FatFs相关的程序,并将刚刚下载下来的source文件夹里的.c和.h文件复制到该文件下。
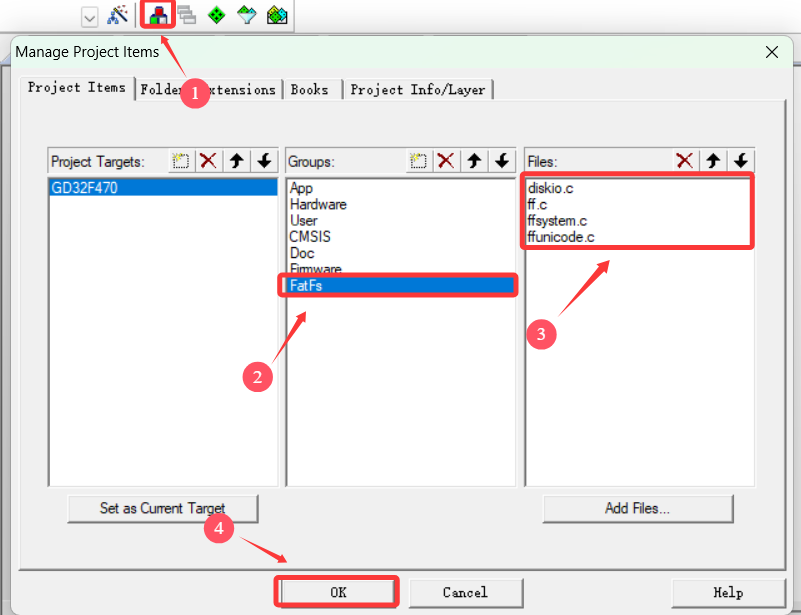
使用Keil打开该工程,按照上面移植SD卡驱动的方法将FatFs相关文件添加到该工程中,具体步骤是先添加FatFs的组,然后在该组下添加和FatFs相关的.c文件。
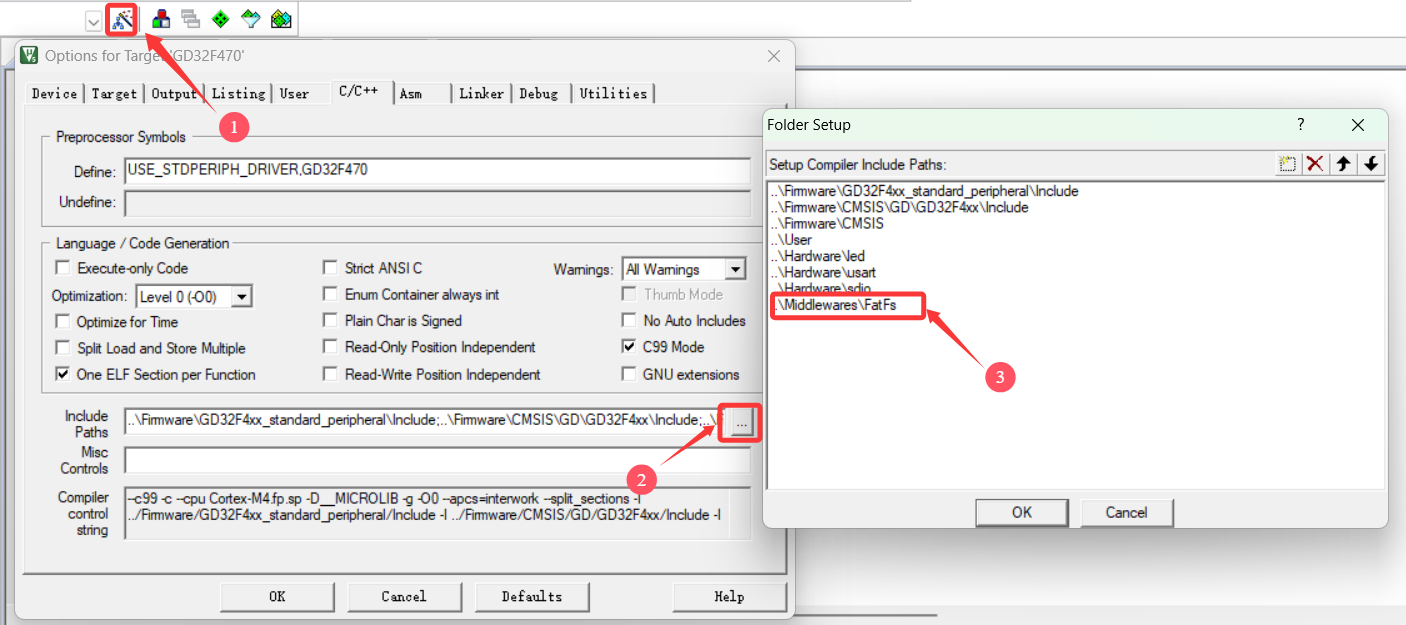
然后要包含FatFs相关文件的头文件路径(具体步骤参考上面配置SD卡驱动)。
工程文件结构就算完整了,接下来就是修改文件代码了。这来有三个文件需要修改,为diskio.c文件、main.c文件和ffconf.h文件。
(三)、移植FatFs文件系统
FatFs文件系统与存储设备的连接函数在diskio.c文件中的硬件设备初始化、读、写、状态获取函数进行配置还有关闭文件系统的时间戳功能及其一些功能模式的设置。
1.添加头文件及宏定义
打开diskio.c把下面这几个头文件注释或者删除,这几个头文件是其他范例有的,这里要用自己的头文件(这里其实只需要SD卡的驱动函数,另外两个我加入是调试用),FatFs支持同时挂载多个存储设备,通过定义为不同编号以区别三个宏定义DEV_FLASH、DEV_MMC、DEV_USB,这里可以改成自己想要的名称,我这里只是要配置SD卡的这里只留下DEV_MMC并将其对应编号改为0,其他的注释,如下所示。
/* Example: Declarations of the platform and disk functions in the project */
//#include "platform.h"
//#include "storage.h"

#include "bsp_led.h"
#include "bsp_usart.h"
#include "sdcard.h"

/* Example: Mapping of physical drive number for each drive */
//#define DEV_FLASH	0	/* Map FTL to physical drive 0 */
#define DEV_MMC		0	/* Map MMC/SD card to physical drive 1 */
//#define DEV_USB 2 /* Map USB MSD to physical drive 2 */2.存储设备状态获取函数disk_status
disk_status函数要求返回存储设备的当前状态,只有一个参数pdrv,表示物理编号。对于SD卡一般返回SD卡插入状态,因此直接返回正常状态即可。
DSTATUS disk_status (
	BYTE pdrv		/* Physical drive nmuber to identify the drive */
)
{
	DSTATUS stat;
	switch (pdrv) {
	case DEV_MMC :

		stat = STA_NOINIT;
		stat &= ~STA_NOINIT;

		return stat;
	}
	return STA_NOINIT;
}3.存储设备初始化函数disk_initialize
disk_initialize函数是设备初始化接口,也是有一个参数pdrv,用来指定设备物理编号。这里只是为了配置SD卡,这里需要写入SD卡相关的函数,直接从上文移植的sdcard.c程序里调用即可,但是由于在sdcard.c中初始化并不完全,这里要先写sd_io_init函数配置其SD卡的IO口初始化、总线模式、数据传输模式(这个函数也就是之前移植SD卡是否完全初始化在main.c文件里编写的)。提醒:请根据实际情况进行修改SD卡初始化的接口。
首先先创建一个结构体sd_card_info_struct sd_cardinfo;然后编写sd_io_init函数。
sd_card_info_struct sd_cardinfo;                            /* information of SD card */

/*!
    \brief      initialize the card, get the card information, set the bus mode and transfer mode
    \param[in]  none
    \param[out] none
    \retval     sd_error_enum
*/
sd_error_enum sd_io_init(void)
{
    sd_error_enum status = SD_OK;
    uint32_t cardstate = 0;
    status = sd_init();
    if(SD_OK == status) {
        status = sd_card_information_get(&sd_cardinfo);
    }
    if(SD_OK == status) {
        status = sd_card_select_deselect(sd_cardinfo.card_rca);
    }
    status = sd_cardstatus_get(&cardstate);
    if(cardstate & 0x02000000) {
        printf("\r\n the card is locked!");
        while(1) {
        }
    }
    if((SD_OK == status) && (!(cardstate & 0x02000000))) {
        /* set bus mode */
        status = sd_bus_mode_config(SDIO_BUSMODE_4BIT);
//        status = sd_bus_mode_config(SDIO_BUSMODE_1BIT);
    }
    if(SD_OK == status) {
        /* set data transfer mode */
        status = sd_transfer_mode_config(SD_DMA_MODE);
//        status = sd_transfer_mode_config(SD_POLLING_MODE);
    }
    return status;
}
然后再编写disk_initialize函数。
DSTATUS disk_initialize (
	BYTE pdrv				/* Physical drive nmuber to identify the drive */
)
{
	DSTATUS stat;
	sd_error_enum sd_error;
  uint8_t i = 5; // 设置重试次数

	switch (pdrv) {
		case DEV_MMC :
			do {
					sd_error = sd_io_init();
			} while((SD_OK != sd_error) && (--i));

			if(i == 0) {
					printf("\r\n Card init failed!\r\n");
					led_on();
					stat = STA_NOINIT;  // 设置未初始化标志
			} else {
					printf("\r\n Card init success!\r\n");
					stat = 0;
			}

			return stat;
	}
	return STA_NOINIT;
}4.存储设备数据读取函数disk_read
disk_read函数是读取设备信息,disk_read函数有四个形参。pdrv为设备物理编号。buff是一个BYTE类型指针变量,buff指向用来存放读取到数据的存储区首地址。 sector是一个DWORD类型变量,指定要读取数据的扇区首地址。count是一个UINT类型变量,指定扇区数量。
DRESULT disk_read (
	BYTE pdrv,		/* Physical drive nmuber to identify the drive */
	BYTE *buff,		/* Data buffer to store read data */
	LBA_t sector,	/* Start sector in LBA */
	UINT count		/* Number of sectors to read */
)
{
	DRESULT res= RES_OK;
	sd_error_enum sd_status;
	switch (pdrv) {
		case DEV_MMC :
			/* 单扇区读取 */
			if (count == 1) {
					sd_status = sd_block_read((uint32_t *)buff, sector * 512, 512);
					if (sd_status != SD_OK) {
							res = RES_ERROR;
					}
			}
			/* 多扇区读取 */
			else {
					sd_status = sd_multiblocks_read((uint32_t *)buff, sector * 512, 512, count);
					if (sd_status != SD_OK) {
							res = RES_ERROR;
					}
			}
			return res;
		}

	return RES_PARERR;
}5.存储设备数据写入函数disk_write
disk_write函数是对设备进行写入操作,disk_write函数有四个形参,pdrv为设备物理编号。buff指向待写入扇区数据的首地址。sector,指定要读取数据的扇区首地址。 count指定扇区数量。
#if FF_FS_READONLY == 0

DRESULT disk_write (
	BYTE pdrv,			/* Physical drive nmuber to identify the drive */
	const BYTE *buff,	/* Data to be written */
	LBA_t sector,		/* Start sector in LBA */
	UINT count			/* Number of sectors to write */
)
{
	DRESULT res=RES_OK;
	sd_error_enum sd_status;
	switch (pdrv) {
		case DEV_MMC :
					/* 单扇区写入 */
			if (count == 1) {
					sd_status = sd_block_write((uint32_t *)buff, sector * 512, 512);
					if (sd_status != SD_OK) {
							return RES_ERROR;
					}
			}
			/* 多扇区写入 */
			else {
					sd_status = sd_multiblocks_write((uint32_t *)buff, sector * 512, 512, count);
					if (sd_status != SD_OK) {
							return RES_ERROR;
					}
			}
			return res;
	}

	return RES_PARERR;
}

#endif6.其他控制函数disk_ioctl
disk_ioctl函数的作用是控制设备的特定功能和除通用读/写之外的其他功能。比如通过发送命令来获取该设备的扇区大小、内存大小等相关信息。disk_ioctl函数有三个形参,pdrv为设备物理编号,cmd为控制指令,包括发出同步信号、获取扇区数目、获取扇区大小、 获取擦除块数量等等指令,buff为指令对应的数据指针。这里将上文提到并且在main.c文件里编写的card_info_get()函数进行修改。
DRESULT disk_ioctl (
	BYTE pdrv,		/* Physical drive nmuber (0..) */
	BYTE cmd,		/* Control code */
	void *buff		/* Buffer to send/receive control data */
)
{
	DRESULT res=RES_OK;
	switch (pdrv) {
		case DEV_MMC :
			switch(cmd)
			{
				case CTRL_SYNC :
				{
					res = RES_OK;
				}
				break;
				case CTRL_TRIM:
				{
					res = RES_OK;
				}break;
				case GET_SECTOR_COUNT:
				{
                    *(DWORD*)buff = (sd_cardinfo.card_csd.c_size + 1) * 1024;
				}break;
				case GET_SECTOR_SIZE:
				{
					*(WORD*)buff = 512;
				}break;
				case GET_BLOCK_SIZE:
				{
					*(DWORD*)buff = 1;  /* SD卡可以单块擦除 */
				}break;
				case MMC_GET_TYPE: {
						uint8_t sd_security = (sd_scr[1] & 0x00700000) >> 20;
						*(BYTE*)buff = sd_security; // 2=SDSC, 3=SDHC, 4=SDXC
				} break;
			}
			return res;
	}

	return RES_PARERR;
}
7.FatFs系统配置
配置好diskio.c文件后,要对其ffconf.h文件进行一些配置。ffconf.h文件是FatFs功能配置文件,通过修改该文件的宏定义开关,可以实现对FatFs的阉割、裁剪等配置,以符合开发者的实际需求。本文的移植测试中,修改了如下几个宏定义:
#define FF_FS_NORTC	 1
#define FF_USE_MKFS   1
#define FF_CODE_PAGE  936
#define FF_USE_LFN    2
#define FF_VOLUMES    1
(1) FF_USE_MKFS: 时间戳功能选择,为不使用时间戳功能功能,需要把它设置为1。
(2) FF_USE_MKFS: 格式化功能选择,为使用FatFs格式化功能,需要把它设置为1。
(3) FF_CODE_PAGE: 语言功能选择,并要求把相关语言文件添加到工程宏。为支持简体中文文件名需要使用“936”。
(4) FF_USE_LFN: 长文件名支持,默认不支持长文件名,这里配置为2,支持长文件名,并指定使用栈空间为缓冲区。
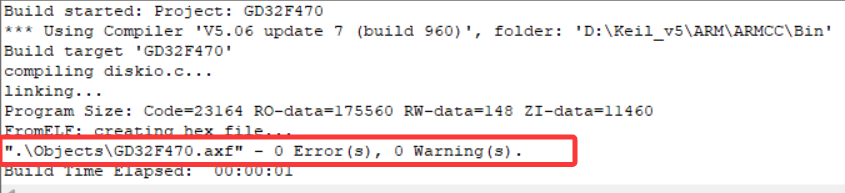
至此,基于SD卡的FatFs文件系统移植就已经完成了,最重要就是diskio.c文件中5个函数的编写和ffconf.h系统配置,如下图所示编译发现0报错0警告。接下来就编写FatFs基本的文件操作检测移植代码是否可以正确执行。
(四)、移植FatFs文件系统
主要的测试包括格式化测试、文件写入测试和文件读取测试三个部分,主要程序都在main.c文件中实现。首先要添加FatFs的相关头文件、定义相关变量。
#include "ff.h"
#include "diskio.h"

FATFS fs;                         /* FatFs文件系统对象 */
FIL fnew;                         /* 文件对象 */
FRESULT res_sd;                /* 文件操作结果 */
UINT fnum;                        /* 文件成功读写数量 */
BYTE ReadBuffer[1024]= {0};       /* 读缓冲区 */
BYTE WriteBuffer[] =              /* 写缓冲区*/
        "欢迎使用野火STM32开发板 今天是个好日子,新建文件系统测试文件\r\n";


    // 配置格式化选项
    MKFS_PARM fmt_opt = {
        .fmt = FM_ANY,  // 自动选择文件系统类型
        .n_fat = 1,      // 单 FAT 表
        .align = 0,      // 自动对齐簇
        .n_root = 0      // 自动计算根目录大小
    };
BYTE work[4096];  // FF_MAX_SS 是 FatFs 定义的最大扇区大小
然后在main函数里添加相关测试代码
	printf("\r\n****** 这是一个SD卡 文件系统实验 ******\r\n");

    //在外部SPI Flash挂载文件系统,文件系统挂载时会对SPI设备初始化
    res_sd = f_mount(&fs,"0:",1);

		    /*----------------------- 格式化测试 ---------------------------*/
    /* 如果没有文件系统就格式化创建创建文件系统 */
    if (res_sd == FR_NO_FILESYSTEM) {
        printf("》SD卡还没有文件系统,即将进行格式化...\r\n");
        /* 格式化 */
        res_sd = f_mkfs("0:", &fmt_opt, work, sizeof(work));

        if (res_sd == FR_OK) {
            printf("》SD卡已成功格式化文件系统。\r\n");
            /* 格式化后,先取消挂载 */
            res_sd = f_mount(NULL,"0:",1);
            /* 重新挂载 */
            res_sd = f_mount(&fs,"0:",1);
        } else {
            led_on();
            printf("《《格式化失败。》》\r\n");
            while (1);
        }
    } else if (res_sd!=FR_OK) {
        printf("!!SD卡挂载文件系统失败。(%d)\r\n",res_sd);
        printf("!!可能原因:SD卡初始化不成功。\r\n");
        while (1);
    } else {
        printf("》文件系统挂载成功,可以进行读写测试\r\n");
    }

    /*--------------------- 文件系统测试:写测试 -----------------------*/
    /* 打开文件,如果文件不存在则创建它 */
    printf("\r\n****** 即将进行文件写入测试... ******\r\n");
    res_sd=f_open(&fnew,"0:FatFs读写测试文件.txt",FA_CREATE_ALWAYS|FA_WRITE);
    if ( res_sd == FR_OK ) {
        printf("》打开/创建FatFs读写测试文件.txt文件成功,向文件写入数据。\r\n");
        /* 将指定存储区内容写入到文件内 */
        res_sd=f_write(&fnew,WriteBuffer,sizeof(WriteBuffer),&fnum);
        if (res_sd==FR_OK) {
            printf("》文件写入成功,写入字节数据:%d\n",fnum);
            printf("》向文件写入的数据为:\r\n%s\r\n",WriteBuffer);
        } else {
            printf("!!文件写入失败:(%d)\n",res_sd);
        }
        /* 不再读写,关闭文件 */
        f_close(&fnew);
    } else {
        led_on();
        printf("!!打开/创建文件失败。\r\n");
    }

    /*------------------ 文件系统测试:读测试 --------------------------*/
    printf("****** 即将进行文件读取测试... ******\r\n");
    res_sd=f_open(&fnew,"0:FatFs读写测试文件.txt",FA_OPEN_EXISTING|FA_READ);
    if (res_sd == FR_OK) {
        //  LED_GREEN;
        printf("》打开文件成功。\r\n");
        res_sd = f_read(&fnew, ReadBuffer, sizeof(ReadBuffer), &fnum);
        if (res_sd==FR_OK) {
            printf("》文件读取成功,读到字节数据:%d\r\n",fnum);
            printf("》读取得的文件数据为:\r\n%s \r\n", ReadBuffer);
        } else {
            printf("!!文件读取失败:(%d)\n",res_sd);
        }
    } else {
        led_on();
        printf("!!打开文件失败。\r\n");
    }
    /* 不再读写,关闭文件 */
    f_close(&fnew);

    /* 不再使用文件系统,取消挂载文件系统 */
    f_mount(NULL,"0:",1);
完整main.c代码如下
#include "gd32f4xx.h"
#include "systick.h"
#include <stdio.h>
#include <string.h>
#include "main.h"
#include "bsp_led.h"
#include "bsp_usart.h"
#include "sdcard.h"
#include "ff.h"
#include "diskio.h"

FATFS fs;                         /* FatFs文件系统对象 */
FIL fnew;                         /* 文件对象 */
FRESULT res_sd;                /* 文件操作结果 */
UINT fnum;                        /* 文件成功读写数量 */
BYTE ReadBuffer[1024]= {0};       /* 读缓冲区 */
BYTE WriteBuffer[] =              /* 写缓冲区*/
        "欢迎使用野火STM32开发板 今天是个好日子,新建文件系统测试文件\r\n";


    // 配置格式化选项
    MKFS_PARM fmt_opt = {
        .fmt = FM_ANY,  // 自动选择文件系统类型
        .n_fat = 1,      // 单 FAT 表
        .align = 0,      // 自动对齐簇
        .n_root = 0      // 自动计算根目录大小
    };
BYTE work[4096];  // FF_MAX_SS 是 FatFs 定义的最大扇区大小

/*!
    \brief    main function
    \param[in]  none
    \param[out] none
    \retval     none
*/
int main(void)
{
	nvic_priority_group_set(NVIC_PRIGROUP_PRE2_SUB2);  // 优先级分组
    systick_config();
	led_gpio_config();
	usart_gpio_config(9600U);  					// 串口0初始化
	nvic_irq_enable(SDIO_IRQn, 0, 0);

	printf("\r\n****** 这是一个SD卡 文件系统实验 ******\r\n");

    //在外部SPI Flash挂载文件系统,文件系统挂载时会对SPI设备初始化
    res_sd = f_mount(&fs,"0:",1);

		    /*----------------------- 格式化测试 ---------------------------*/
    /* 如果没有文件系统就格式化创建创建文件系统 */
    if (res_sd == FR_NO_FILESYSTEM) {
        printf("》SD卡还没有文件系统,即将进行格式化...\r\n");
        /* 格式化 */
        res_sd = f_mkfs("0:", &fmt_opt, work, sizeof(work));

        if (res_sd == FR_OK) {
            printf("》SD卡已成功格式化文件系统。\r\n");
            /* 格式化后,先取消挂载 */
            res_sd = f_mount(NULL,"0:",1);
            /* 重新挂载 */
            res_sd = f_mount(&fs,"0:",1);
        } else {
            led_on();
            printf("《《格式化失败。》》\r\n");
            while (1);
        }
    } else if (res_sd!=FR_OK) {
        printf("!!SD卡挂载文件系统失败。(%d)\r\n",res_sd);
        printf("!!可能原因:SD卡初始化不成功。\r\n");
        while (1);
    } else {
        printf("》文件系统挂载成功,可以进行读写测试\r\n");
    }

    /*--------------------- 文件系统测试:写测试 -----------------------*/
    /* 打开文件,如果文件不存在则创建它 */
    printf("\r\n****** 即将进行文件写入测试... ******\r\n");
    res_sd=f_open(&fnew,"0:FatFs读写测试文件.txt",FA_CREATE_ALWAYS|FA_WRITE);
    if ( res_sd == FR_OK ) {
        printf("》打开/创建FatFs读写测试文件.txt文件成功,向文件写入数据。\r\n");
        /* 将指定存储区内容写入到文件内 */
        res_sd=f_write(&fnew,WriteBuffer,sizeof(WriteBuffer),&fnum);
        if (res_sd==FR_OK) {
            printf("》文件写入成功,写入字节数据:%d\n",fnum);
            printf("》向文件写入的数据为:\r\n%s\r\n",WriteBuffer);
        } else {
            printf("!!文件写入失败:(%d)\n",res_sd);
        }
        /* 不再读写,关闭文件 */
        f_close(&fnew);
    } else {
        led_on();
        printf("!!打开/创建文件失败。\r\n");
    }

    /*------------------ 文件系统测试:读测试 --------------------------*/
    printf("****** 即将进行文件读取测试... ******\r\n");
    res_sd=f_open(&fnew,"0:FatFs读写测试文件.txt",FA_OPEN_EXISTING|FA_READ);
    if (res_sd == FR_OK) {
        //  LED_GREEN;
        printf("》打开文件成功。\r\n");
        res_sd = f_read(&fnew, ReadBuffer, sizeof(ReadBuffer), &fnum);
        if (res_sd==FR_OK) {
            printf("》文件读取成功,读到字节数据:%d\r\n",fnum);
            printf("》读取得的文件数据为:\r\n%s \r\n", ReadBuffer);
        } else {
            printf("!!文件读取失败:(%d)\n",res_sd);
        }
    } else {
        led_on();
        printf("!!打开文件失败。\r\n");
    }
    /* 不再读写,关闭文件 */
    f_close(&fnew);

    /* 不再使用文件系统,取消挂载文件系统 */
    f_mount(NULL,"0:",1);

    while(1) {
    }
}
添加完成相关代码后,插入SD卡编译下载,使用串口助手观察。
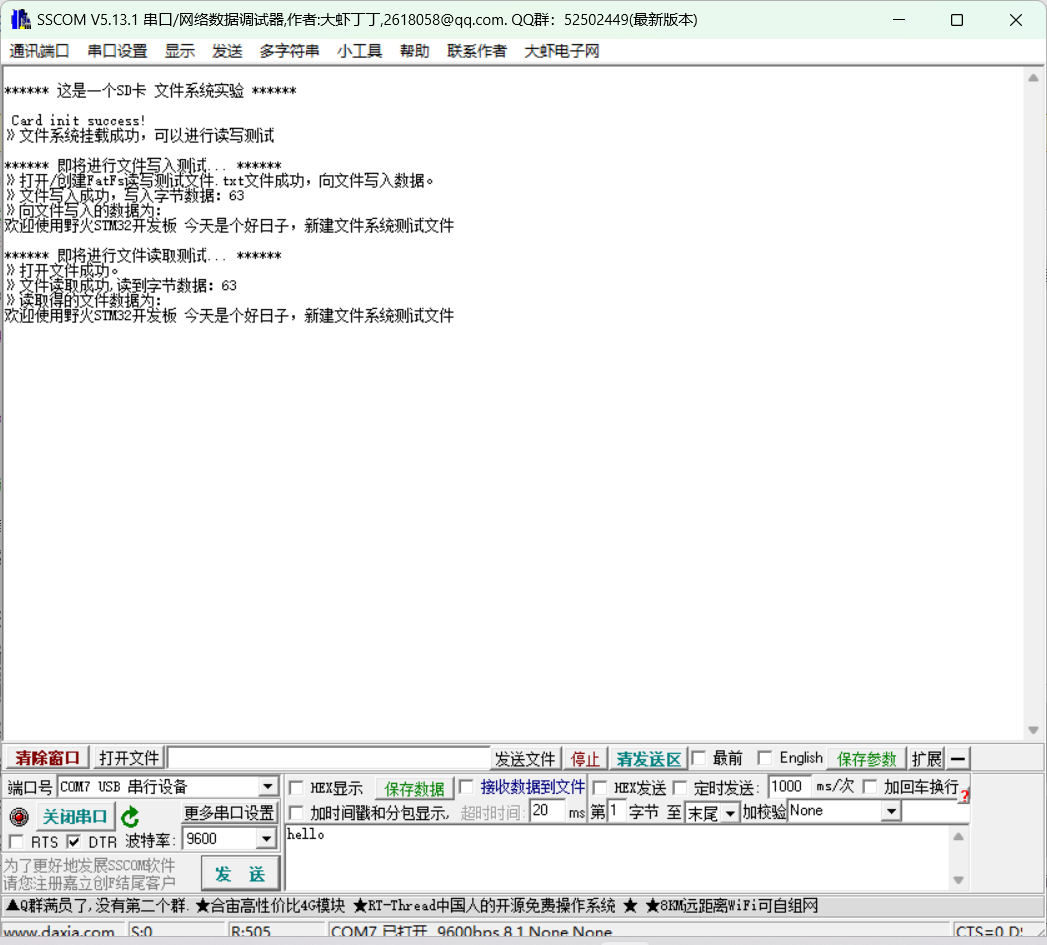
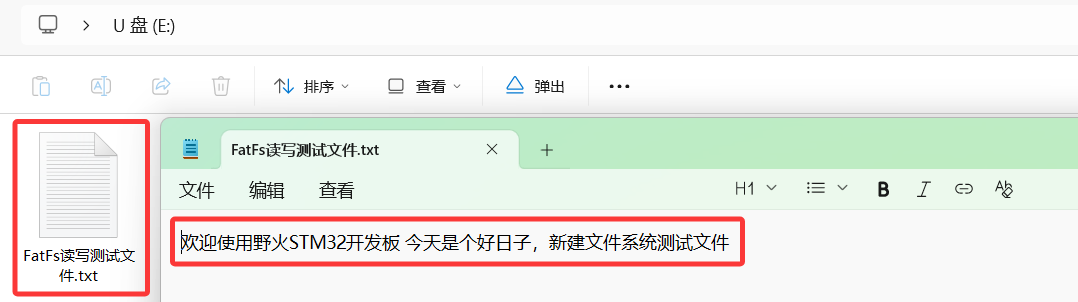
同时使用读卡器读取SD卡中的数据也能查看到其内容,表明FatFs移植成功。
三、参考资料
兆易创新——GD32F4xx的SDIO驱动程序
野火的STM32开发库实战指南中的——38. 基于SD卡的FatFs文件系统
CSDN中博客奔跑的蜗牛!——FatFs R0.15文件系统移植到MCU平台详细笔记经验教程

openvela 操作系统专为 AIoT 领域量身定制,以轻量化、标准兼容、安全性和高度可扩展性为核心特点。openvela 以其卓越的技术优势,已成为众多物联网设备和 AI 硬件的技术首选,涵盖了智能手表、运动手环、智能音箱、耳机、智能家居设备以及机器人等多个领域。
更多推荐

 13
13 0
0- 0


 已为社区贡献2条内容

所有评论(0)