
【Ardudino】ESP32驱动无源蜂鸣器并播放音乐的简便方法(后附十几首音乐数据)
本文介绍了使用ESP32C3驱动无源蜂鸣器播放音乐的方法。首先对比了有源与无源蜂鸣器的区别,并选择了贴片型号MLT7525。通过Arduino的tone()函数可轻松控制蜂鸣器播放音阶。随后详细讲解了音乐数据获取的两种方式:手动根据简谱编写频率/时长数组,或通过Python脚本将MIDI文件转换为C数组。文中提供了完整的代码示例,包括蜂鸣器驱动、音阶测试和12首歌曲播放的实现。最后给出了GitHu
一、前言
1.1 无源蜂鸣器
之前玩51单片机的时候,对蜂鸣器播放音乐情有独钟,于是在最近做的东西里面加入了无源蜂鸣器
有关蜂鸣器的介绍可参考
电子电路学习笔记(17)——蜂鸣器_有源蜂鸣器原理图-CSDN博客![]() https://blog.csdn.net/qq_36347513/article/details/121474727
https://blog.csdn.net/qq_36347513/article/details/121474727
市面上的无源蜂鸣器有很多种,有直插的,也有SMD贴片的,出于尺寸考虑,我选择了贴片的MLT7525
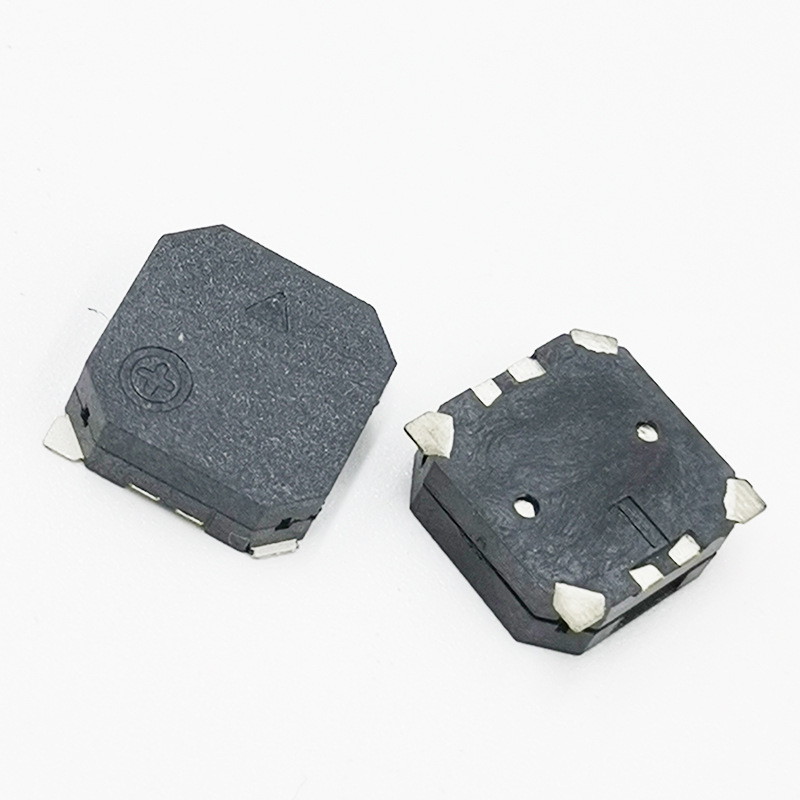
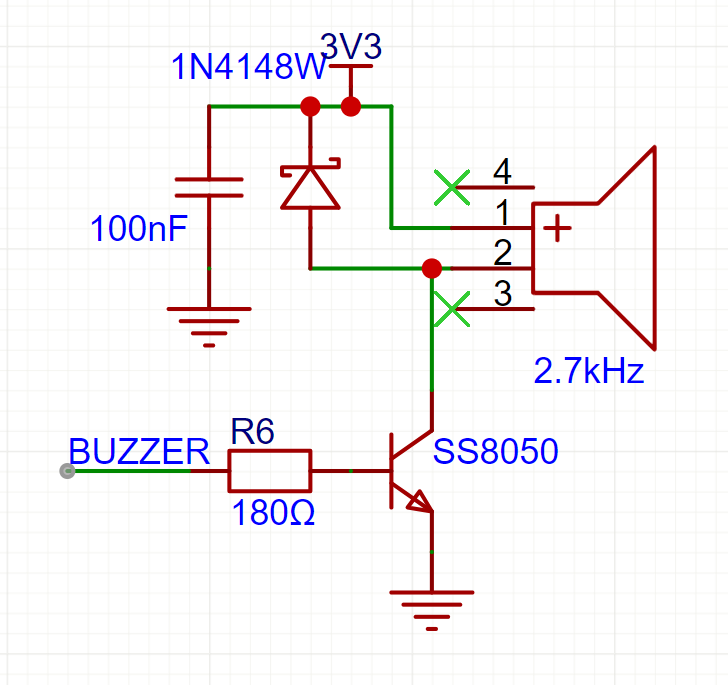
驱动电路如图,其中BUZZER接到了ESP32C3的GPIO5上
1.2 ESP32C3驱动蜂鸣器
Arduino IDE中,驱动无源蜂鸣器十分简单,使用函数
tone(BUZZER_PIN, freq, time)即可,第一个参数是GPIO编号,第二个是频率,第三个是持续时间,下面是测试程序
#define BUZZER_PIN 5 // GPIO5作为蜂鸣器引脚
void setup() {
pinMode(BUZZER_PIN, OUTPUT); // 设置引脚为输出模式
Serial.begin(115200); // 串口初始化,用于调试
Serial.println("无源蜂鸣器测试程序启动"); // 输出中文提示
}
void loop() {
// 测试简单音阶:Do-Re-Mi-Fa-So-La-Si-Do
tone(BUZZER_PIN, 262, 500); // Do (C4),持续500ms
delay(500);
tone(BUZZER_PIN, 294, 500); // Re (D4)
delay(500);
tone(BUZZER_PIN, 330, 500); // Mi (E4)
delay(500);
tone(BUZZER_PIN, 349, 500); // Fa (F4)
delay(500);
tone(BUZZER_PIN, 392, 500); // So (G4)
delay(500);
tone(BUZZER_PIN, 440, 500); // La (A4)
delay(500);
tone(BUZZER_PIN, 494, 500); // Si (B4)
delay(500);
tone(BUZZER_PIN, 523, 500); // Do (C5)
delay(500);
noTone(BUZZER_PIN); // 停止蜂鸣
Serial.println("一轮音阶测试完成"); // 调试输出
delay(2000); // 每轮测试后暂停2秒
}二、播放音乐
2.1 音乐数据获取
根据简谱编写数组
简谱可以上网找,一般都可以找到,这里以《遇见》为例
我的乐理知识很匮乏,所以只简单的说明如何根据简谱获取每个音的频率和时间
频率
#define P0 0 // 休止符频率
#define L1 262 // 低音频率
#define L2 294
#define L3 330
#define L4 349
#define L5 392
#define L6 440
#define L7 494
#define M1 523 // 中音频率
#define M2 587
#define M3 659
#define M4 698
#define M5 784
#define M6 880
#define M7 988
#define H1 1047 // 高音频率
#define H2 1175
#define H3 1319
#define H4 1397
#define H5 1568
#define H6 1760
#define H7 1976一个音符的频率取决于数字的大小和上下点的情况
-
数字上下都没有点的,频率是M1-M7,取决于具体数字,是几就是M几
-
数字上面有点的,频率是H1-H7(H=High),取决于具体数字,是几就是H几
-
数字下面有点的,频率是L1-L7(L=Low),取决于具体数字,是几就是L几
时间
表示4分音符为1拍,每小节4拍
由每分钟92拍,推算每拍的时长为
全音符:X---,四拍
半音符:X-,两拍
四分音符:X,一拍
数字下面加上一个横线时长就减一半
浮点:中间的点,延长前面的一半
由此,可以推算每个音符的时长和频率,填入数组
 const int melody_yu_jian[] PROGMEM={
     M5,M3,L1,L5,M5,M2,//......
 }
 const int durations_yu_jian[] PROGMEM={
     652/2,652/2,652/2,652/2,652/2,652/2,//......
}PROGMEM=Program Memory,为了节省SRAM来将数据存储到FLASH里面
可以参考视频零基础简谱入门教学,简谱乐理识谱教学![]() https://www.bilibili.com/video/BV1M1421k7gu/?share_source=copy_web&vd_source=5da36ff21167a0c9753df1c96ccd711d进行更深度的乐理知识学习
https://www.bilibili.com/video/BV1M1421k7gu/?share_source=copy_web&vd_source=5da36ff21167a0c9753df1c96ccd711d进行更深度的乐理知识学习
把MIDI文件转换成数组
上面的方法实在是过于繁琐且枯燥,还容易出错,所以我了解到另外一种方法
MIDI文件简介
MIDI文件不包含真实的音频信息,而是记录了乐器演奏的指令,比如什么时候哪个键被按下,弹奏的是哪个音符,音量有多大等等。这就像是一个乐谱,告诉乐器应该如何表演,但没有实际的声音。这正好能满足使用蜂鸣器播放的需求
MIDI文件获取
下面这个网站可以免费获取一首,然后支持五块钱可以在5天内免费下载20首,差不多够用了
MidiShow - 领先的MIDI音乐交流与下载网站![]() https://www.midishow.com/
https://www.midishow.com/
歌曲的选择
注意蜂鸣器播放声音和喇叭差别还是很大的,尽量选择旋律好听的歌曲
MIDI文件编辑
有了MIDI文件之后,会发现大部分文件都有好几个音轨,而一个蜂鸣器在同一个时间只能播放一种声音,所以需要使用在线编辑工具Online Sequencer,来保证每一时间只有一个音符,否则会导致导出数组时本来应该在同一时间播放的多个音符变成了按顺序播放,造成蜂鸣器播放的混乱。
因为同一时间只有一个音符,所以需要找到主旋律,一般来讲最高的是主旋律,但也不一定,需要根据实际情况调整,这一步往往最为麻烦
右键删除音符,在选择模式下可以批量选中
不行:

行:

MIDI文件转换成C数组
python脚本(由deepseek生成,实测可用)
import mido
import os
def midi_to_c_array(filename):
try:
mid = mido.MidiFile(filename)
except Exception as e:
print(f"Error opening MIDI file {filename}: {e}")
return
melody = [] # 频率数组
durations = [] # 持续时间(毫秒)
ticks_per_beat = mid.ticks_per_beat if mid.ticks_per_beat else 480
tempo = 500000 # 默认 120 BPM
# 尝试获取第一个 set_tempo 事件
for track in mid.tracks:
for msg in track:
if msg.type == 'set_tempo' and msg.is_meta:
tempo = msg.tempo
break
if tempo != 500000:
break
# 用于跟踪每个音符的开始时间(支持同音符重叠)
active_notes = {} # key: (note, channel), value: start_tick
for track in mid.tracks:
current_tick = 0
for msg in track:
current_tick += msg.time # 累计时间
if msg.type == 'note_on' and msg.velocity > 0:
key = (msg.note, msg.channel)
# 记录这个音符的开始时间(tick)
active_notes[key] = current_tick
elif msg.type == 'note_off' or (msg.type == 'note_on' and msg.velocity == 0):
key = (msg.note, msg.channel)
if key in active_notes:
start_tick = active_notes.pop(key)
duration_ticks = current_tick - start_tick
duration_ms = int(mido.tick2second(duration_ticks, ticks_per_beat, tempo) * 1000)
frequency = int(440 * (2 ** ((msg.note - 69) / 12)))
melody.append(frequency)
durations.append(duration_ms)
if not melody:
print(f"Warning: No notes found in {filename}")
return
# 生成头文件
base_name = os.path.splitext(os.path.basename(filename))[0]
output_filename = f"{base_name}.h"
try:
with open(output_filename, 'w') as f:
f.write("const int melody[] PROGMEM= {\n")
for i, note in enumerate(melody):
f.write(f" {note},")
if (i + 1) % 10 == 0:
f.write("\n")
else:
f.write(" ")
f.write("\n};\n\n")
f.write("const int durations[] PROGMEM= {\n")
for i, duration in enumerate(durations):
f.write(f" {duration},")
if (i + 1) % 10 == 0:
f.write("\n")
else:
f.write(" ")
f.write("\n};\n")
f.write(f"\n// Song length: {len(melody)} notes\n")
f.write(f"// Generated from {filename}\n")
print(f"✅ Successfully wrote: {output_filename} ({len(melody)} notes)")
except Exception as e:
print(f"❌ Error writing {output_filename}: {e}")
if __name__ == "__main__":
current_dir = "."
midi_files = [f for f in os.listdir(current_dir) if f.lower().endswith(('.mid', '.midi'))]
if not midi_files:
print("No MIDI files found in the current directory.")
else:
print(f"Found {len(midi_files)} MIDI file(s):")
for f in midi_files:
print(f" → {f}")
print("-" * 40)
for midi_file in midi_files:
midi_to_c_array(midi_file)把.mid文件和这个脚本放入同一目录,把该脚本保存为midi_to_c_array.py,按照教程Python安装与环境配置全程详细教学(包含Windows版和Mac版)_python环境-CSDN博客![]() https://blog.csdn.net/sensen_kiss/article/details/141940274安装python,打开cmd,输入
https://blog.csdn.net/sensen_kiss/article/details/141940274安装python,打开cmd,输入
 pip install mido
 python midi_to_c_array.py
即可在当前目录查看生成的.h文件,有两个数组,包含每个音符的频率和时间数据
2.2 播放音乐
每次都调用tone函数播放每个音符的频率和时间即可
#include "Music_processed/cai_bu_tou.h"
#include "Music_processed/cheng_du.h"
#include "Music_processed/hai_kuo_tian_kong.h"
#include "Music_processed/hong_dou.h"
#include "Music_processed/hou_lai.h"
#include "Music_processed/kai_shi_dong_le.h"
#include "Music_processed/lv_se.h"
#include "Music_processed/qing_hua_ci.h"
#include "Music_processed/xin_qiang.h"
#include "Music_processed/you_dian_tian.h"
#include "Music_processed/chun_jiao_yu_zhi_ming.h"
#include "Music_processed/Windows.h"
#include "Music_processed/mi_ren_de_wei_xian.h"
// 定义蜂鸣器连接的引脚
#define BUZZER_PIN 5 // 请根据您的硬件连接修改此引脚号

// 定义 Song 结构体
typedef struct {
  const char* name;
  const int* melody;
  const int* durations;
  int length;
} Song;


const Song songs[] PROGMEM= {
  { "Cai Bu Tou", melody_cai_bu_tou, durations_cai_bu_tou, sizeof(melody_cai_bu_tou) / sizeof(melody_cai_bu_tou[0]) },
  { "Chun Jiao Yu Zhi Ming",melody_chun_jiao_yu_zhi_ming,durations_chun_jiao_yu_zhi_ming,sizeof(melody_chun_jiao_yu_zhi_ming)/sizeof(melody_chun_jiao_yu_zhi_ming[0])},
  { "Cheng Du", melody_cheng_du, durations_cheng_du, sizeof(melody_cheng_du)/sizeof(melody_cheng_du[0]) },
  { "Hai Kuo Tian Kong",melody_hai_kuo_tian_kong,durations_hai_kuo_tian_kong, sizeof(melody_hai_kuo_tian_kong)/sizeof(melody_hai_kuo_tian_kong[0]) },
  { "Hong Dou", melody_hong_dou, durations_hong_dou, sizeof(melody_hong_dou)/sizeof(melody_hong_dou[0])},
  { "Hou Lai", melody_hou_lai, durations_hou_lai, sizeof(melody_hou_lai)/sizeof(melody_hou_lai[0])},
  { "Kai Shi Dong Le", melody_kai_shi_dong_le, durations_kai_shi_dong_le, sizeof(melody_kai_shi_dong_le)/sizeof(melody_kai_shi_dong_le[0])},
  { "Lv Se", melody_lv_se, durations_lv_se, sizeof(melody_lv_se)/sizeof(melody_lv_se[0])},
  { "Mi Ren De Wei Xian",melody_mi_ren_de_wei_xian,durations_mi_ren_de_wei_xian,sizeof(melody_mi_ren_de_wei_xian)/sizeof(melody_mi_ren_de_wei_xian[0])},
  { "Qing Hua Ci", melody_qing_hua_ci, durations_qing_hua_ci, sizeof(melody_qing_hua_ci)/sizeof(melody_qing_hua_ci[0])},
  { "Xin Qiang", melody_xin_qiang, durations_xin_qiang,sizeof(melody_xin_qiang)/sizeof(melody_xin_qiang[0])},
  { "You Dian Tian", melody_you_dian_tian, durations_you_dian_tian, sizeof(melody_you_dian_tian)/sizeof(melody_you_dian_tian[0])},
  // {"Da Hai", melody_da_hai, durations_da_hai, sizeof(melody_da_hai) / sizeof(melody_da_hai[0])},
  // {"Happy Birthday", melody_happy_birthday, durations_happy_birthday, sizeof(melody_happy_birthday) / sizeof(melody_happy_birthday[0])},
  { "Windows XP",melody_windows,durations_windows,sizeof(melody_windows) / sizeof(melody_windows[0])},
};
const int numSongs = sizeof(songs) / sizeof(songs[0]);

// 播放音乐函数
void playSong(int songIndex) {
  // 检查索引是否有效
  if (songIndex < 0 || songIndex >= numSongs) {
    Serial.print("Invalid song index: ");
    Serial.println(songIndex);
    return;
  }

  Song song;
  memcpy_P(&song, &songs[songIndex], sizeof(Song));

  Serial.print("Playing song: ");
  Serial.println(song.name);

  // 播放旋律
  for (int i = 0; i < song.length; i++) {
    // 从 PROGMEM 读取音符和持续时间
    int note = pgm_read_word(&(song.melody[i]));
    int duration = pgm_read_word(&(song.durations[i]));

    Serial.print("Note: ");
    Serial.print(note);
    Serial.print(", Duration: ");
    Serial.println(duration);

    // 播放音符
    tone(BUZZER_PIN, note, duration);

    // 等待音符播放完成,并留一点间隔
    delay(duration * 1.1); // 增加10%间隔时间

    // 确保蜂鸣器在下一个音符前关闭
    noTone(BUZZER_PIN);
  }

  Serial.print("Finished playing song: ");
  Serial.println(song.name);
}

void setup() {
  // 初始化串口监视器
  Serial.begin(115200);
  Serial.println("Buzzer Music Player Started");

  // 设置蜂鸣器引脚为输出
  pinMode(BUZZER_PIN, OUTPUT);
}

void loop() {
  // 循环播放所有歌曲
  for (int i = 0; i < numSongs; i++) {
    playSong(i);
    delay(1000); // 每首歌之间暂停1秒
  }
  Serial.println("All songs played once. Restarting...");
  delay(2000); // 全部播放完后暂停2秒再重新开始
}
三、效果展示
Music
四、一些音乐的.mid和.h文件
https://github.com/xiaomiao321/Music.git![]() https://github.com/xiaomiao321/Music.git谢谢
https://github.com/xiaomiao321/Music.git谢谢

openvela 操作系统专为 AIoT 领域量身定制,以轻量化、标准兼容、安全性和高度可扩展性为核心特点。openvela 以其卓越的技术优势,已成为众多物联网设备和 AI 硬件的技术首选,涵盖了智能手表、运动手环、智能音箱、耳机、智能家居设备以及机器人等多个领域。
更多推荐

 36
36 0
0- 0


 已为社区贡献2条内容

所有评论(0)