
第4章 软件也要拼脸蛋,UI开发的点点滴滴(布局)
在 Android 开发中,布局(Layout) 是构建用户界面的基石。它决定了 UI 元素(如按钮、文本、图片等)在屏幕上的排列方式与交互行为。Android 提供了多种布局容器,每种都有其适用场景与性能特点。本文将深入讲解三种最基础且常用的布局:LinearLayout(线性布局)、RelativeLayout(相对布局) 和 FrameLayout(帧布局),并通过可视化示例帮助你直观理解其

布局
在 Android 开发中,布局(Layout) 是构建用户界面的基石。它决定了 UI 元素(如按钮、文本、图片等)在屏幕上的排列方式与交互行为。Android 提供了多种布局容器,每种都有其适用场景与性能特点。本文将深入讲解三种最基础且常用的布局:LinearLayout(线性布局)、RelativeLayout(相对布局) 和 FrameLayout(帧布局),并通过可视化示例帮助你直观理解其工作原理。
线性布局 LinearLayout
LinearLayout 是最简单、最常用的布局之一,它将子视图按单一方向(水平或垂直)依次排列,如同排队一样。由于其结构清晰、性能稳定,常用于表单、列表项、工具栏等场景。
布局方向
LinearLayout 通过 android:orientation 属性控制排列方向:
horizontal(默认):子视图从左到右水平排列;vertical:子视图从上到下垂直排列。
📌 注意:若未显式设置,系统默认为
horizontal。
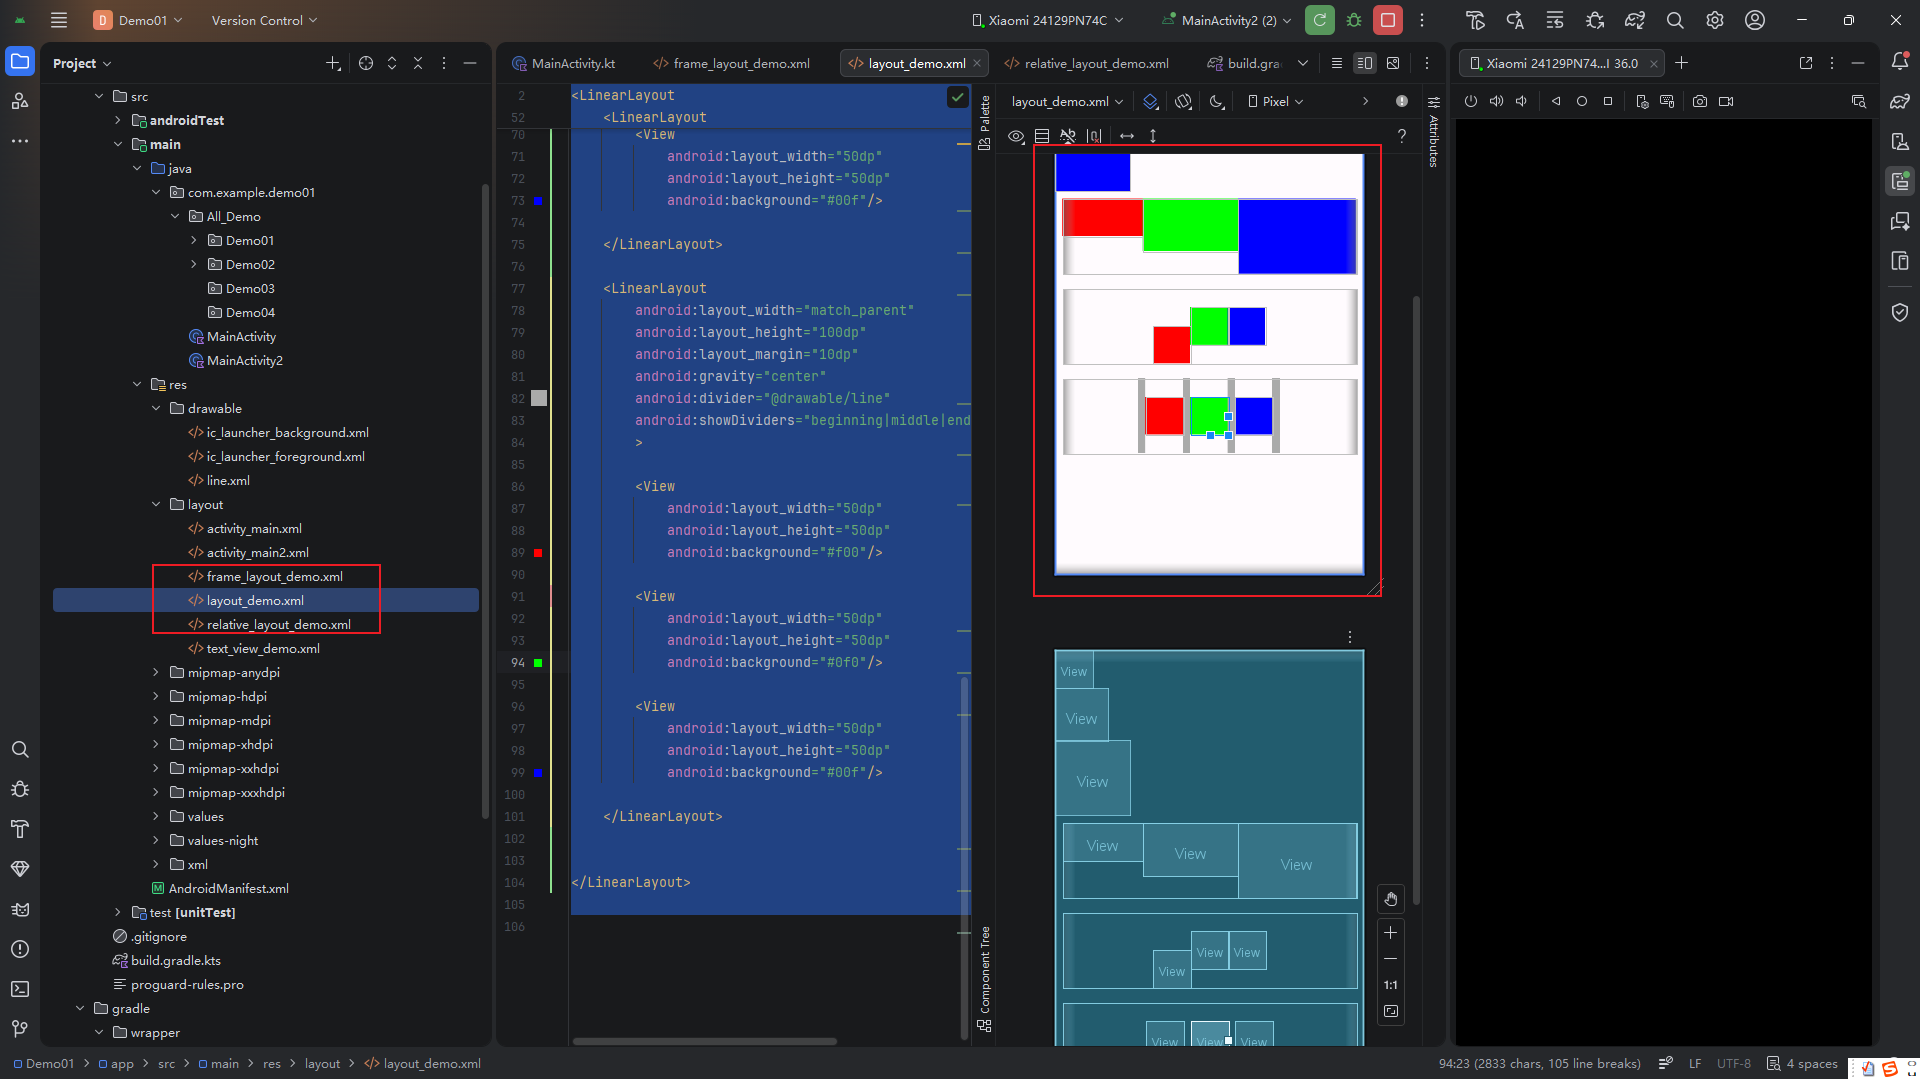
示例:三个方块的布局对比
垂直布局(orientation="vertical")
子视图纵向堆叠,每个占据一行:
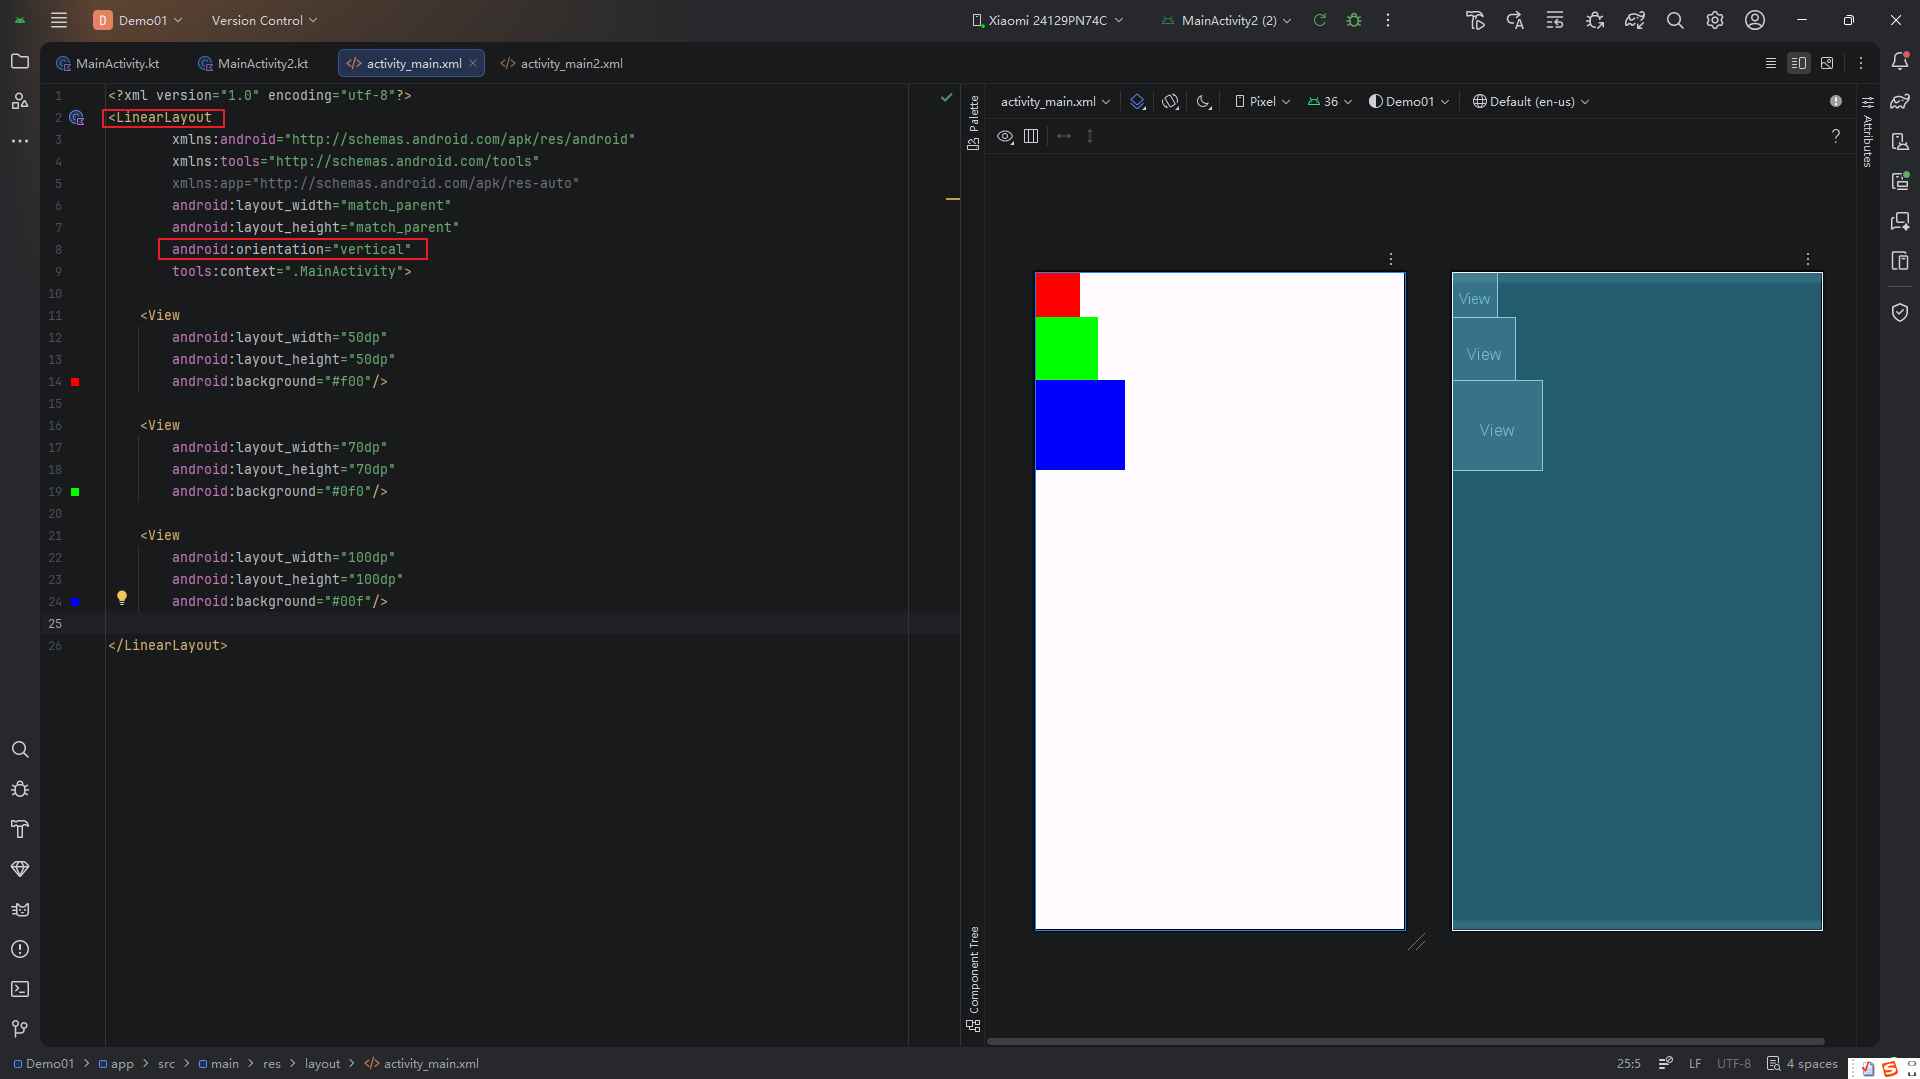
<LinearLayout
    android:layout_width="match_parent"
    android:layout_height="wrap_content"
    android:orientation="vertical">
    <View android:layout_width="100dp" android:layout_height="50dp" android:background="#FF5722"/>
    <View android:layout_width="100dp" android:layout_height="50dp" android:background="#4CAF50"/>
    <View android:layout_width="100dp" android:layout_height="50dp" android:background="#2196F3"/>
</LinearLayout>
效果如下:
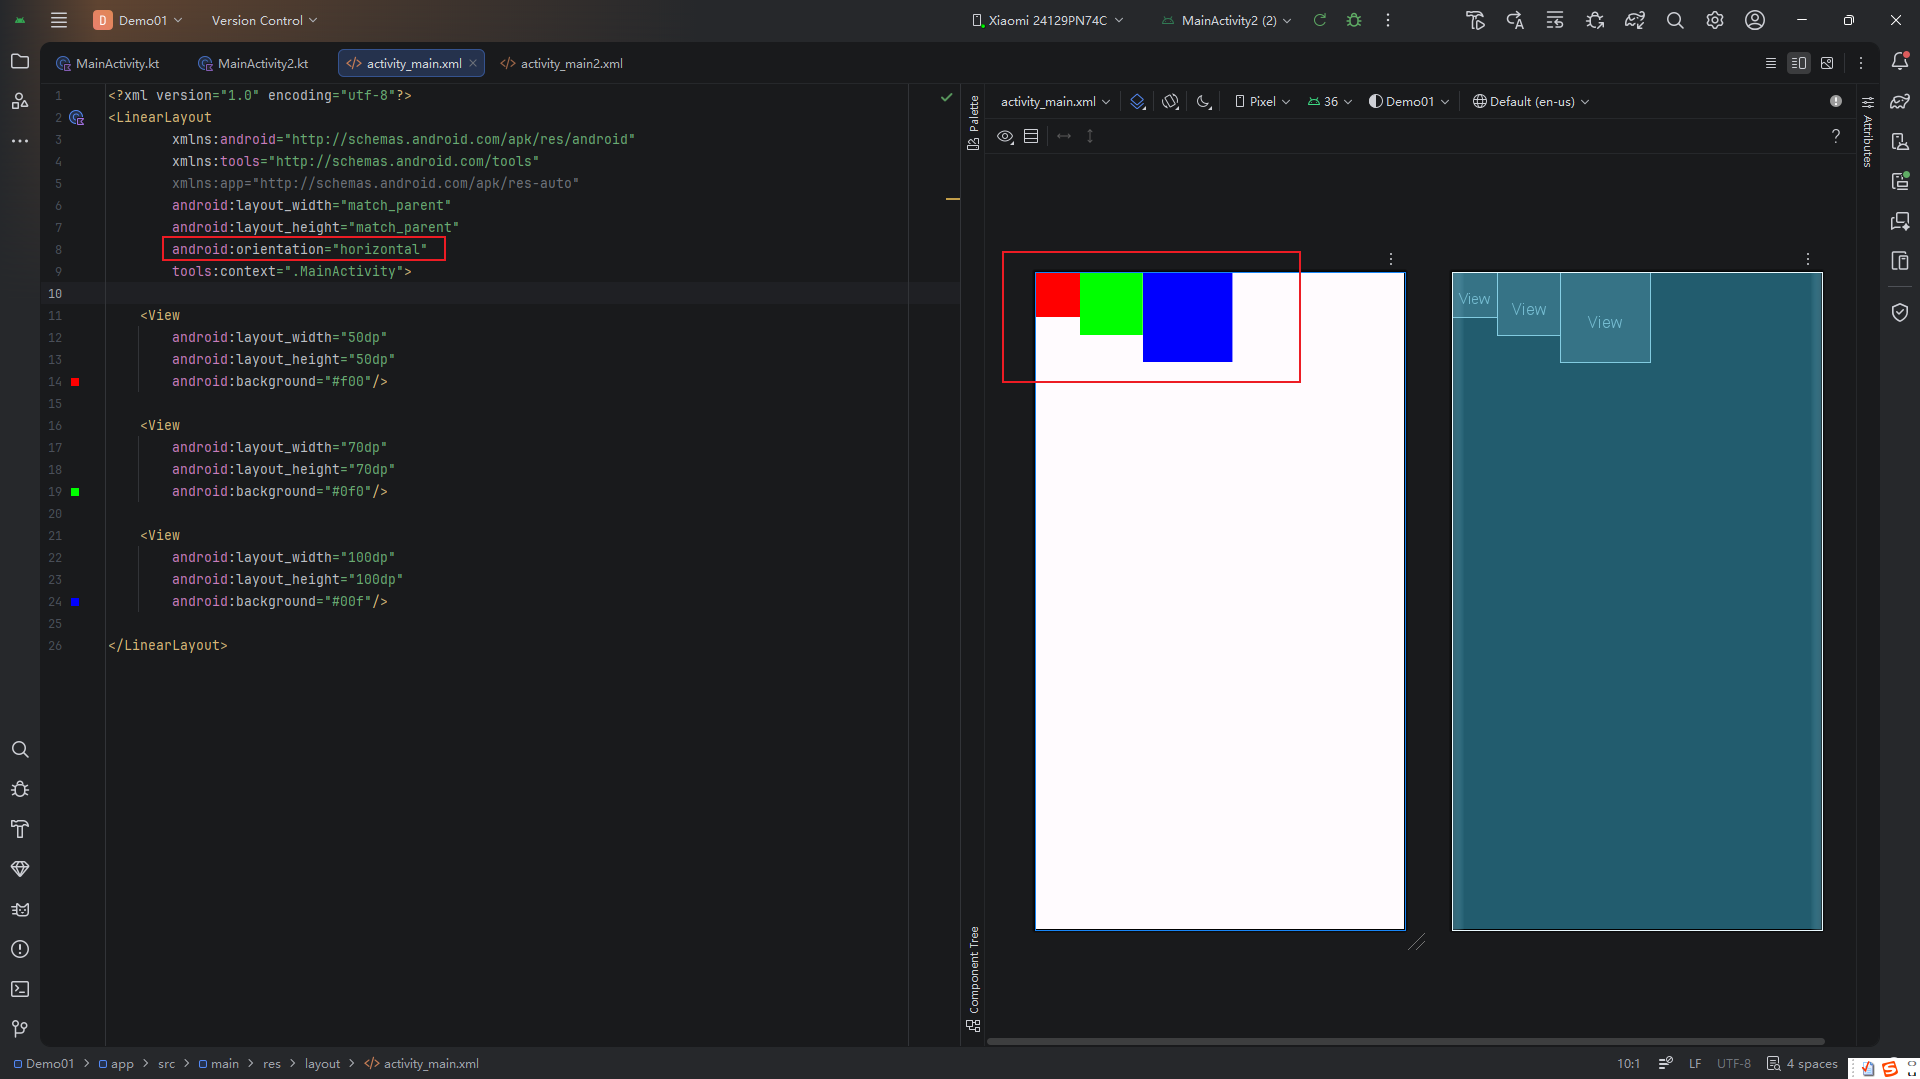
水平布局(orientation="horizontal")
子视图横向并排,共享同一行:
<LinearLayout
    android:layout_width="match_parent"
    android:layout_height="wrap_content"
    android:orientation="horizontal">
    <!-- 同上三个 View -->
</LinearLayout>
效果如下:
✅ 适用场景:
- 水平:顶部导航栏、底部操作按钮组;
- 垂直:注册表单、设置项列表。
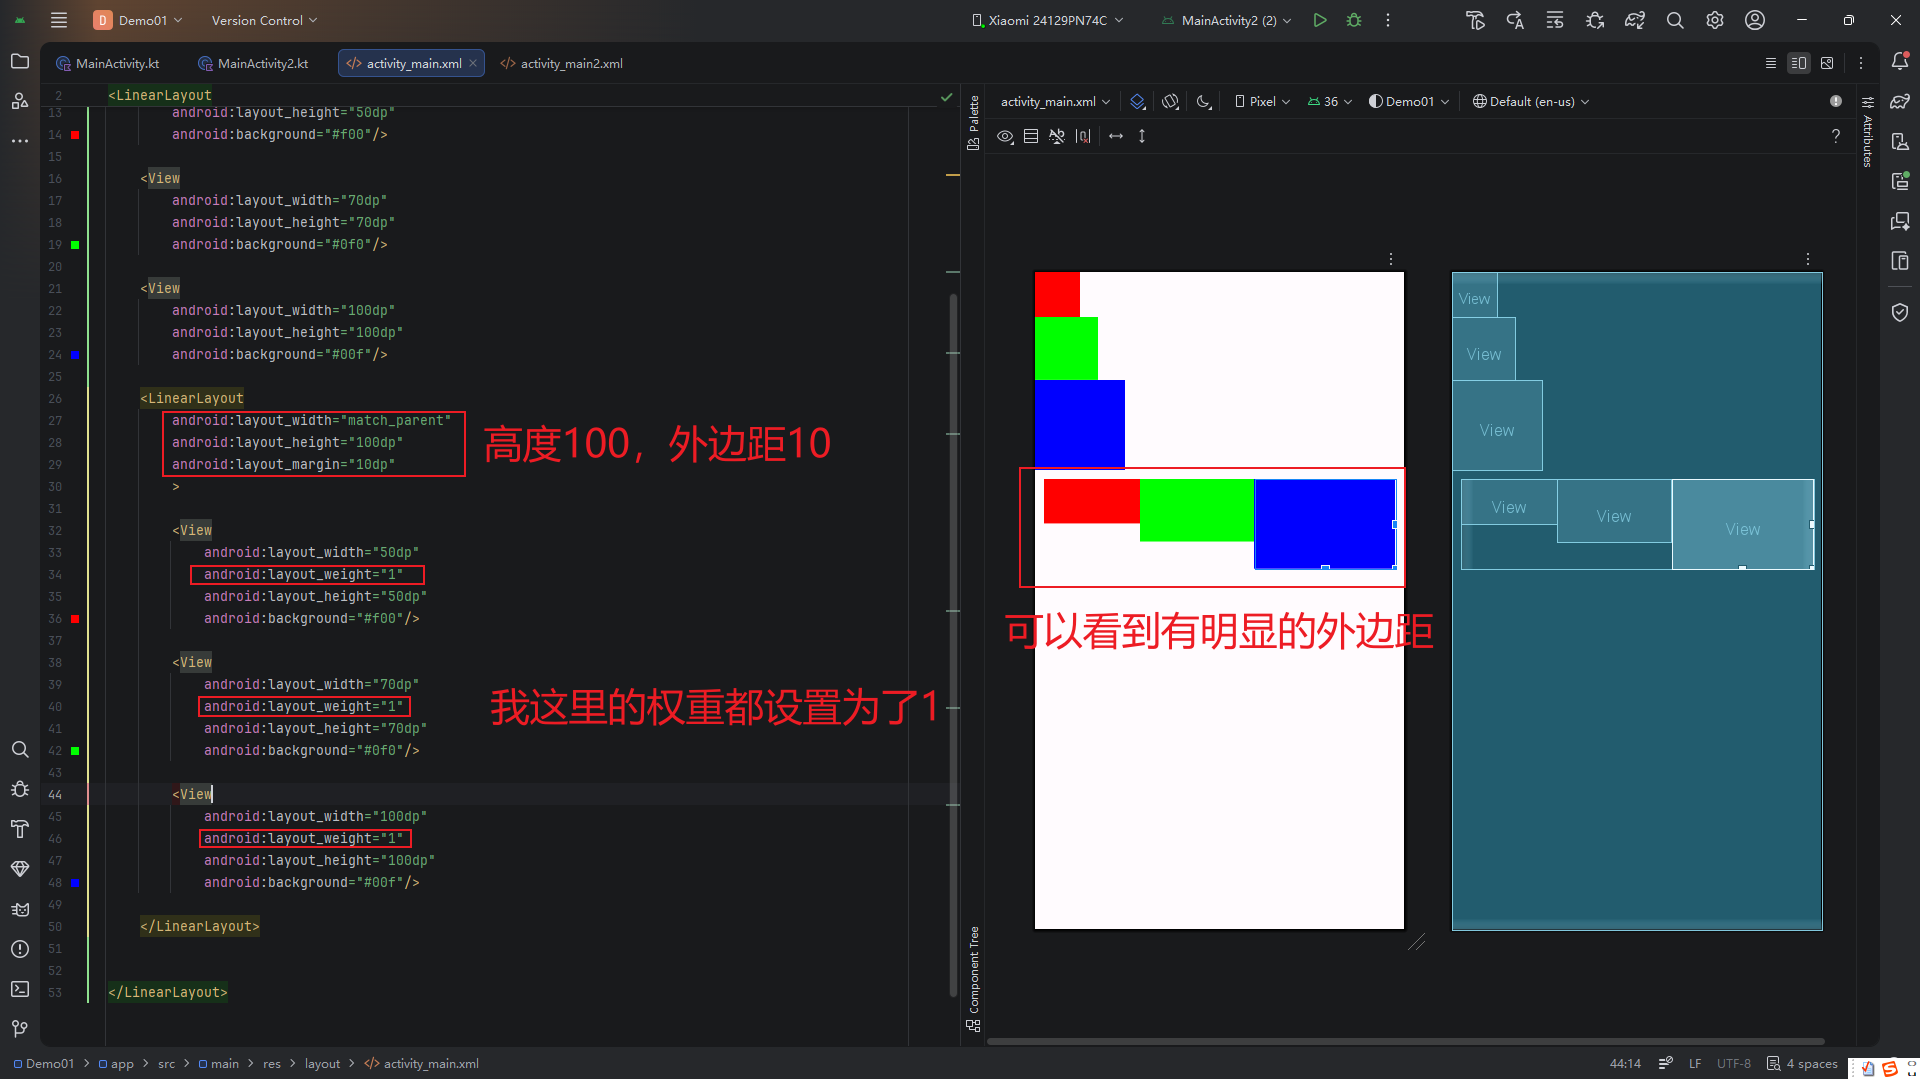
权重(Weight)
当子视图需要按比例分配剩余空间时,android:layout_weight 属性就派上用场了。它常用于实现“自适应宽度”或“等高分栏”。
工作原理:
- 所有子视图先按
layout_width/height分配初始空间; - 剩余空间按
weight比例重新分配; - 通常将
layout_width设为0dp(水平)或layout_height设为0dp(垂直),以避免计算冲突。
示例:垂直布局中的权重分配
<LinearLayout
    android:layout_width="match_parent"
    android:layout_height="200dp"
    android:orientation="vertical">

    <View
        android:layout_width="match_parent"
        android:layout_height="0dp"
        android:layout_weight="1"
        android:background="#FF5722"/>

    <View
        android:layout_width="match_parent"
        android:layout_height="0dp"
        android:layout_weight="2"
        android:background="#4CAF50"/>
</LinearLayout>
虽然两个 View 的 layout_height 都设为 0dp,但由于权重比为 1:2,上方占 1/3 高度,下方占 2/3。
🔍 观察重点:
尽管 XML 中尺寸相同,但实际渲染高度不同——这正是weight的作用。
⚠️ 性能提示:
过度使用weight会导致LinearLayout多次测量(measure),影响性能。复杂布局建议改用ConstraintLayout。
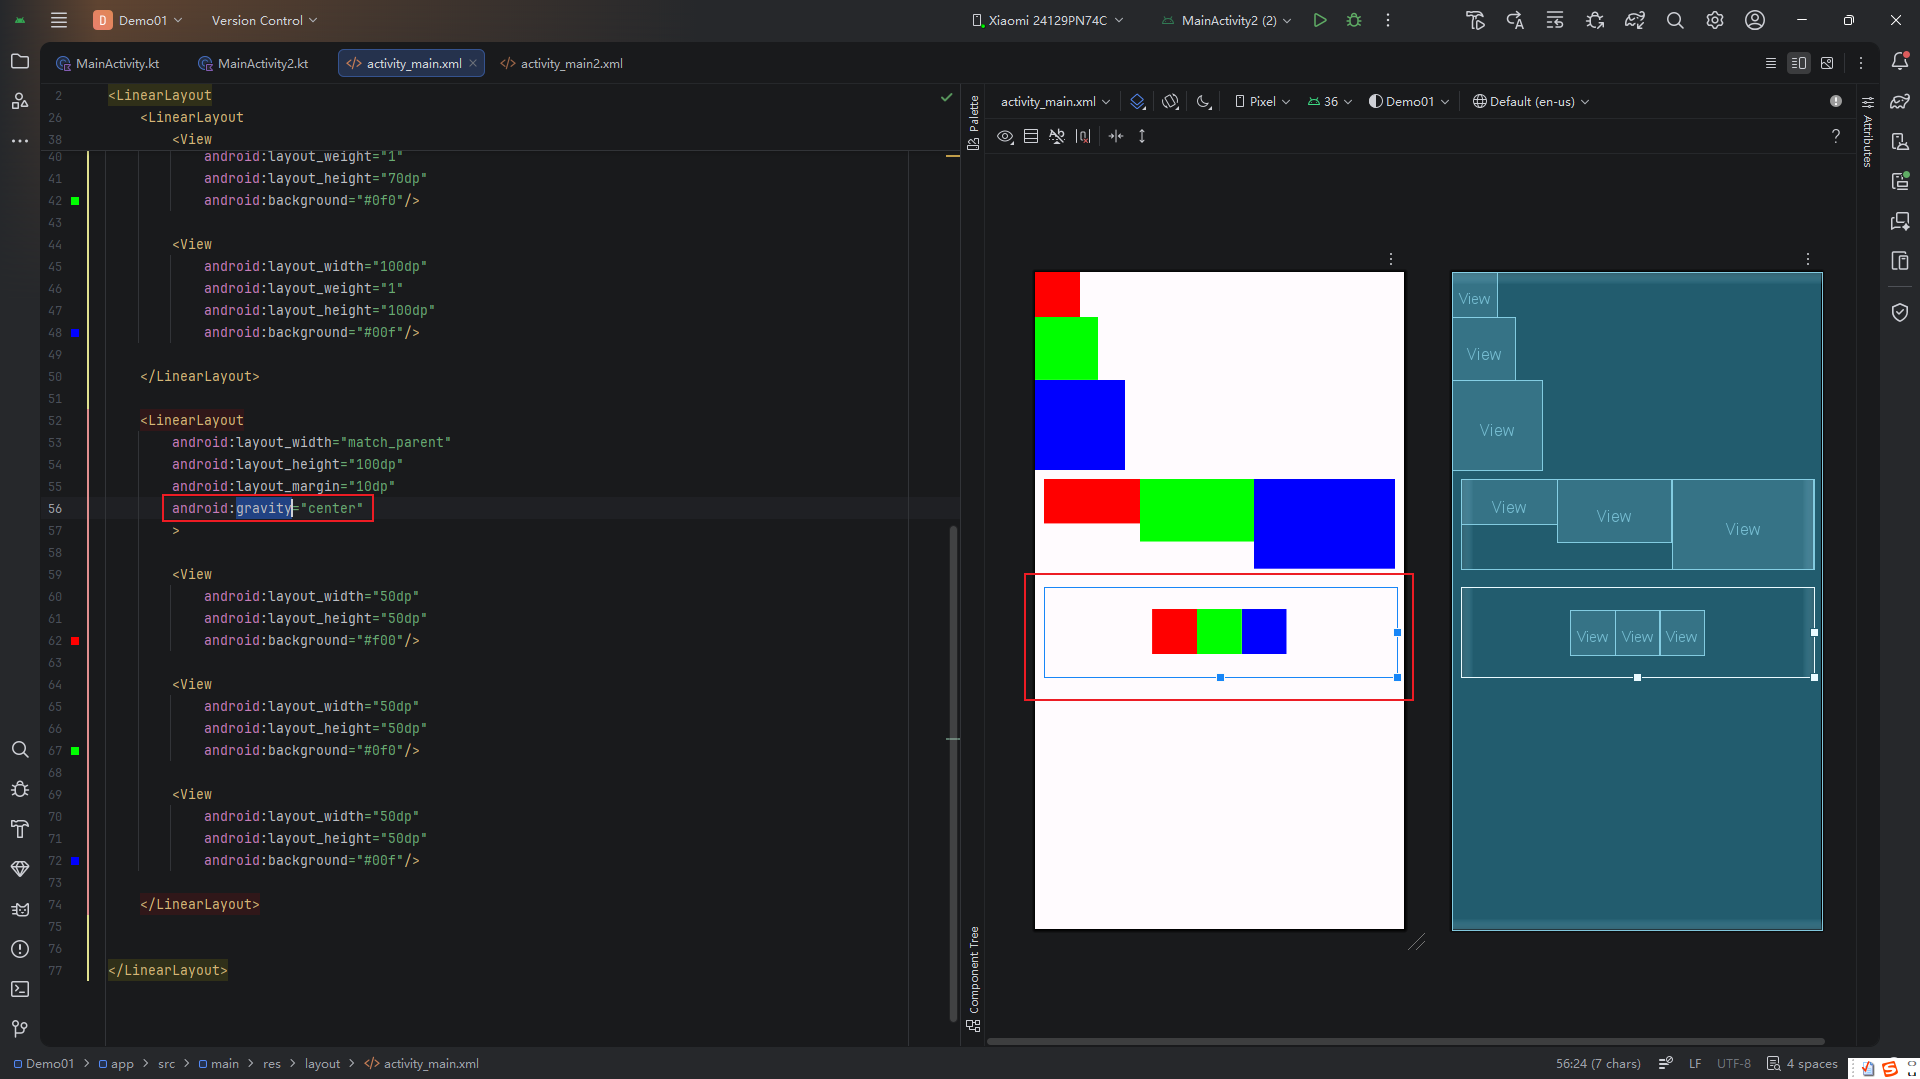
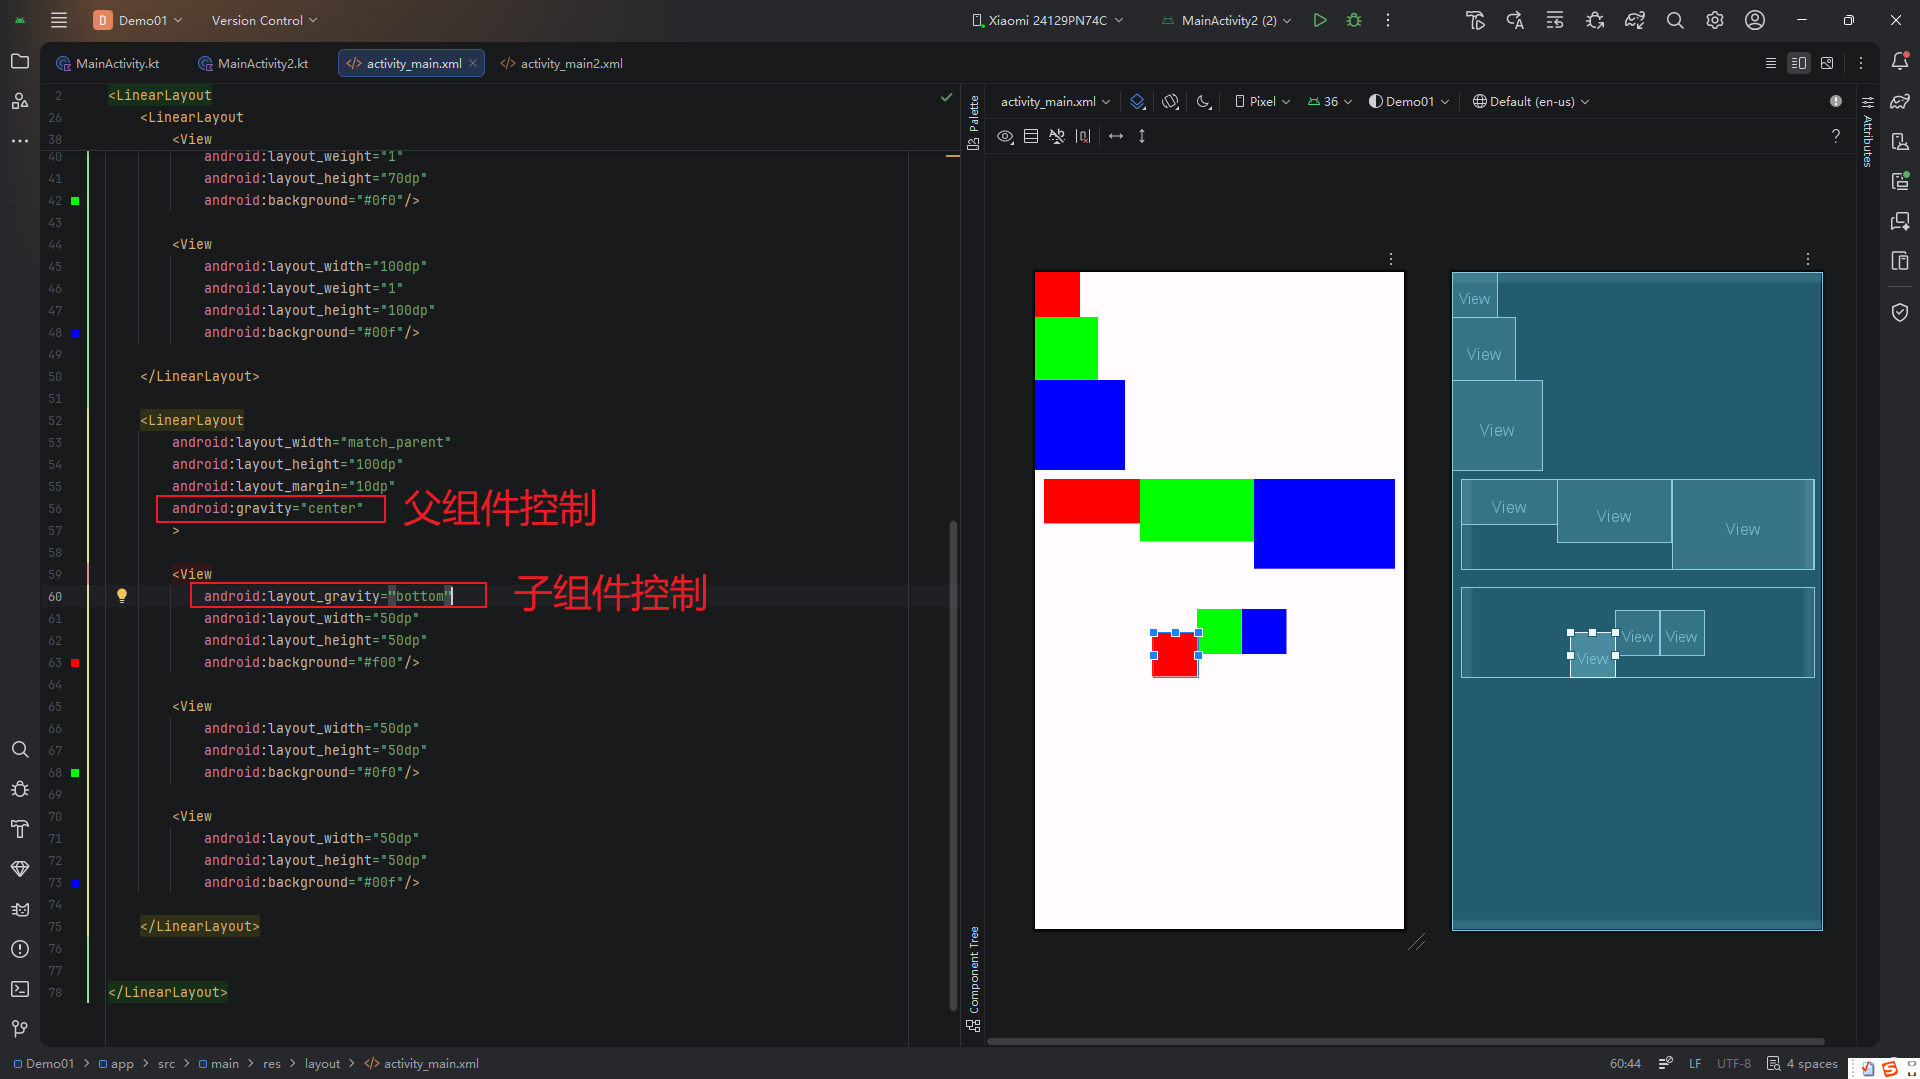
对齐方式(Gravity)
android:gravity 控制子视图在父容器内的对齐方式,而 android:layout_gravity 控制当前视图在其父容器中的位置(仅在部分布局中生效,如 LinearLayout)。
常见值:
center:水平 + 垂直居中;center_horizontal/center_vertical:仅水平或垂直居中;top,bottom,left,right:靠边对齐。
示例:整体居中
<LinearLayout
    android:layout_width="match_parent"
    android:layout_height="200dp"
    android:gravity="center"
    android:background="#EEEEEE">
    <Button android:layout_width="wrap_content" android:layout_height="wrap_content" android:text="居中按钮"/>
</LinearLayout>
按钮将在灰色区域内完全居中:
优先级规则:
- 子视图的
layout_gravity优先级高于父容器的gravity; - 若子视图显式设置了对齐方式,将覆盖父容器的全局设置。
例如,父容器设为 gravity="center",但某个子按钮设为 layout_gravity="top",则该按钮会靠上显示:
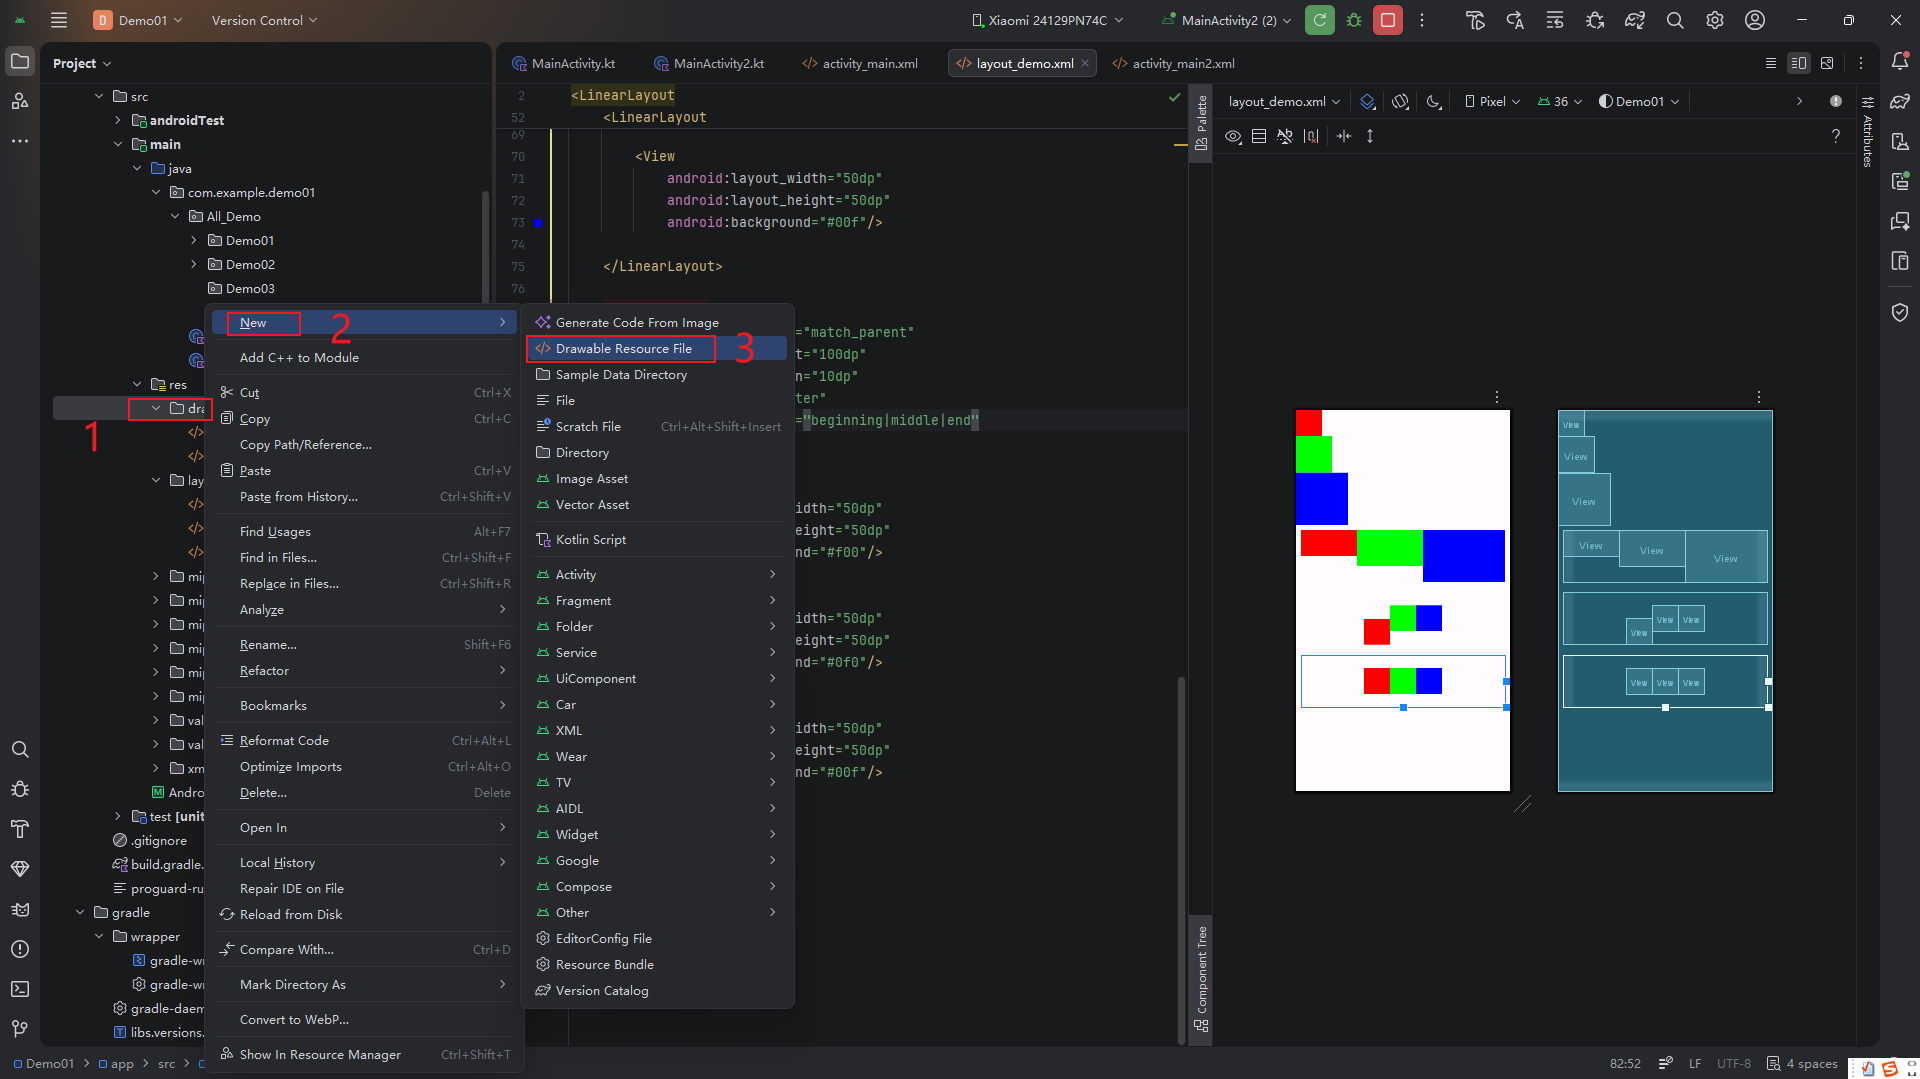
分割线(Divider)
为提升 UI 层次感,常需在列表项之间添加分割线。LinearLayout 原生支持 divider 属性,但需配合自定义 Drawable 使用。
步骤 1:创建 Shape 资源文件
在 res/drawable/ 目录下新建 divider_shape.xml:
💡 注意:创建时需选择 “Drawable resource file” 类型。
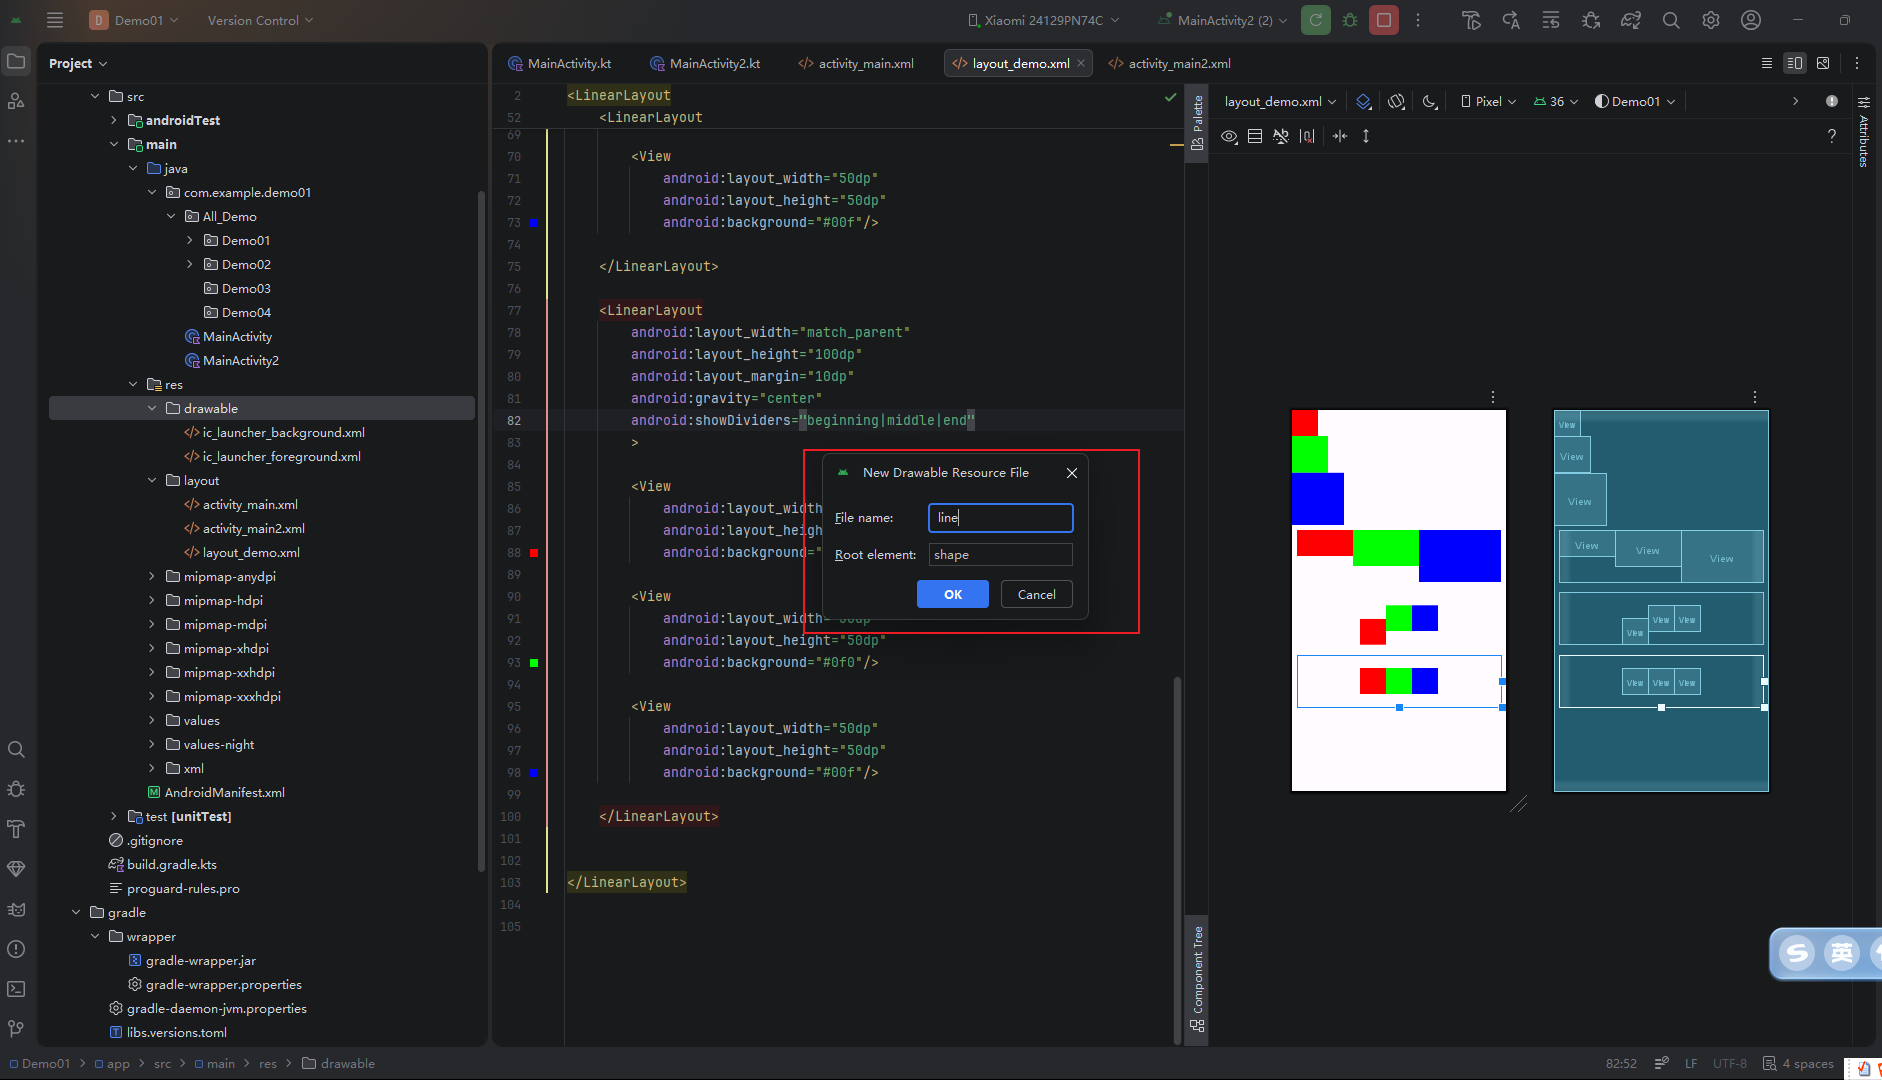
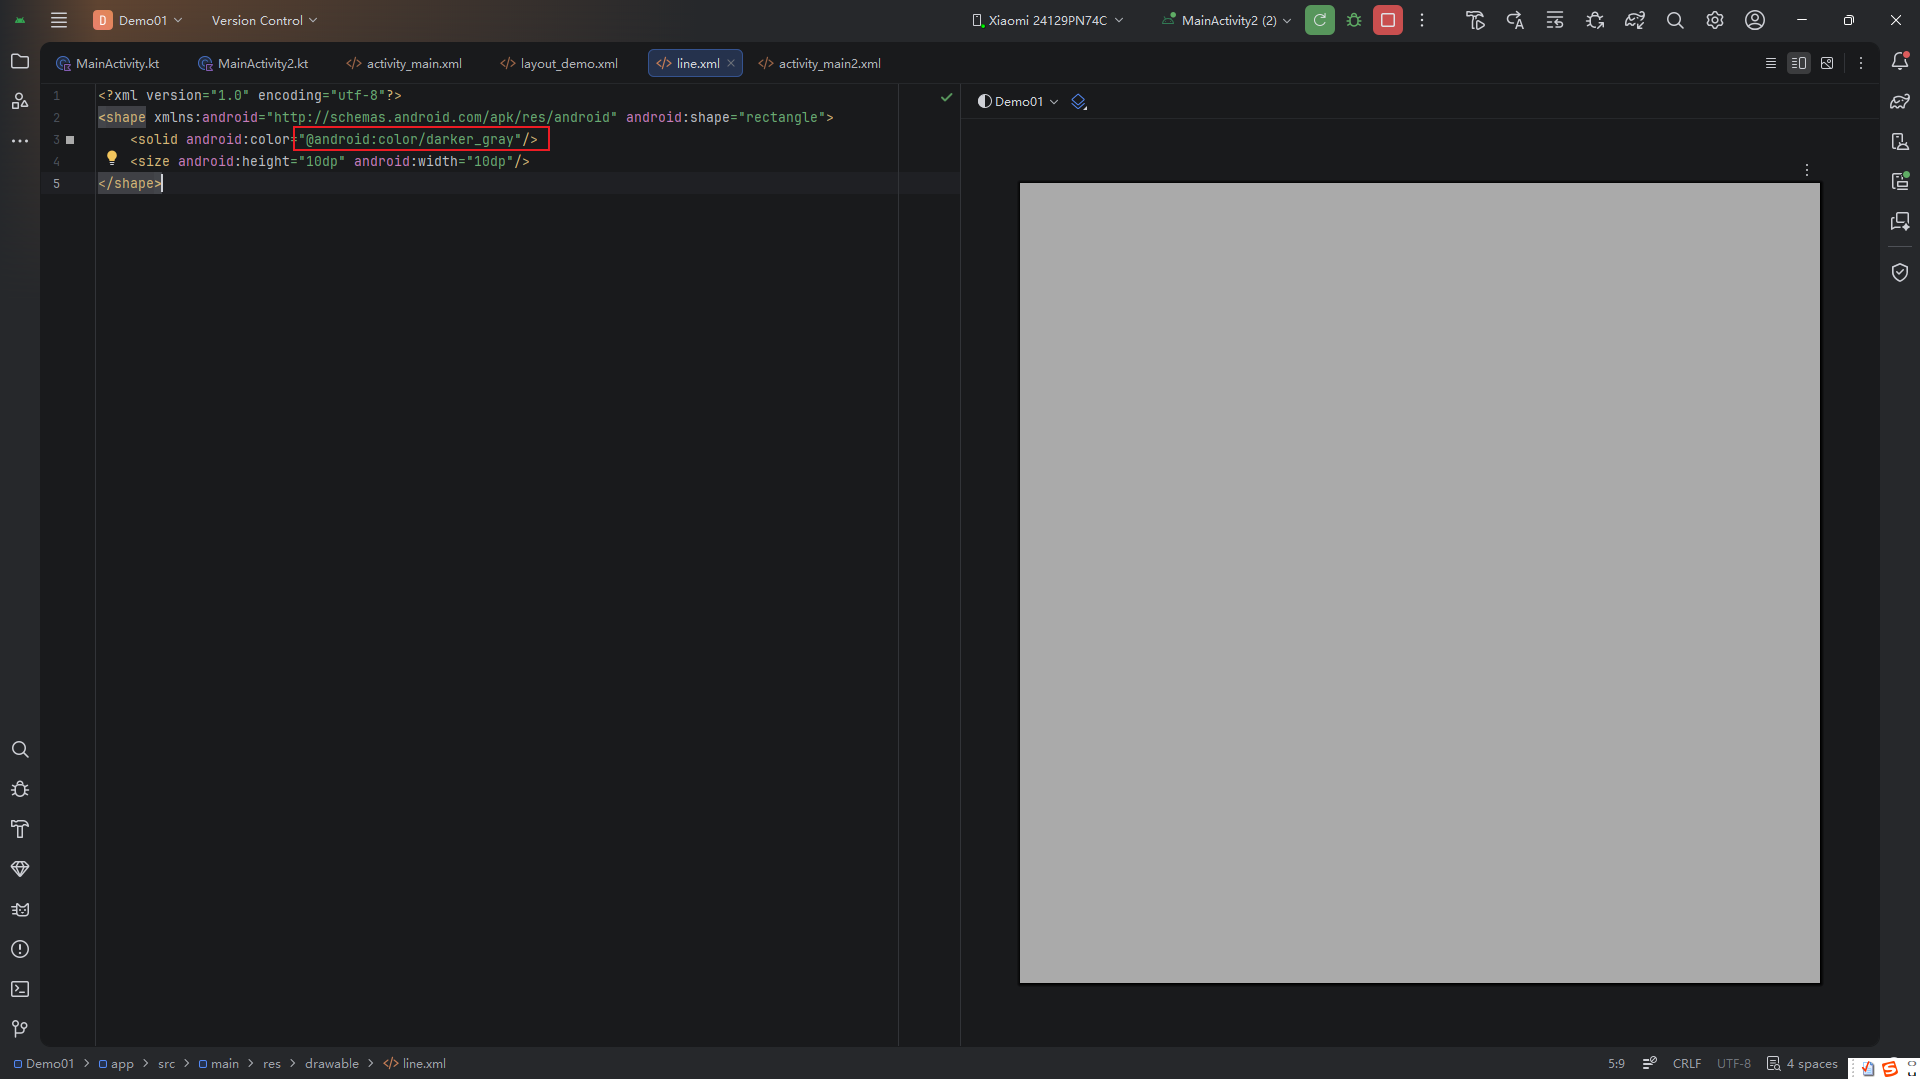
文件内容如下(10dp 高的透明矩形,作为占位):
<?xml version="1.0" encoding="utf-8"?>
<shape xmlns:android="http://schemas.android.com/apk/res/android"
    android:shape="rectangle">
    <solid android:color="@android:color/transparent"/>
    <size android:height="10dp" android:width="10dp"/>
</shape>
🎨 美化建议:
将color改为#E0E0E0可获得浅灰色分割线,视觉效果更佳。

步骤 2:在 LinearLayout 中引用
<LinearLayout
    android:layout_width="match_parent"
    android:layout_height="wrap_content"
    android:orientation="vertical"
    android:divider="@drawable/divider_shape"
    android:showDividers="middle"> <!-- middle 表示仅在中间项之间显示 -->

    <TextView ... />
    <TextView ... />
    <TextView ... />
</LinearLayout>
效果如下,可见明显的间隔:
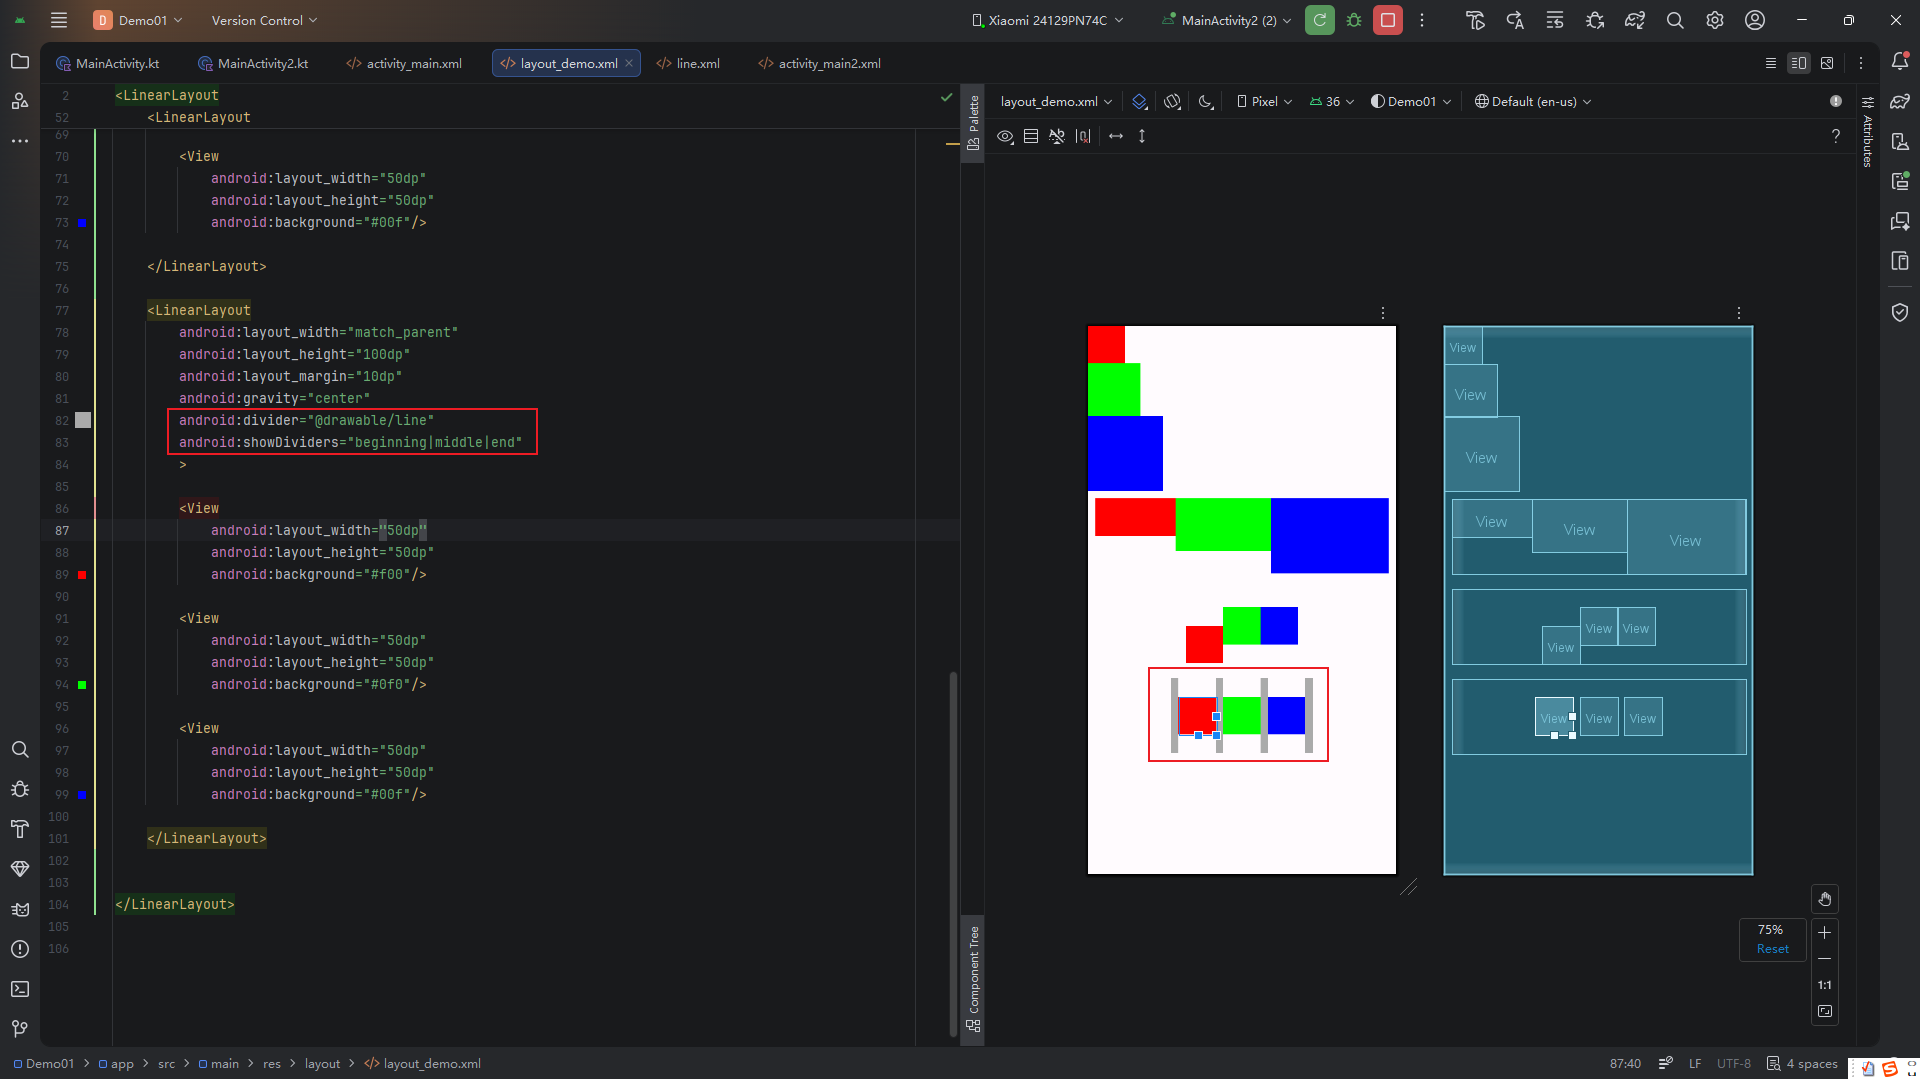
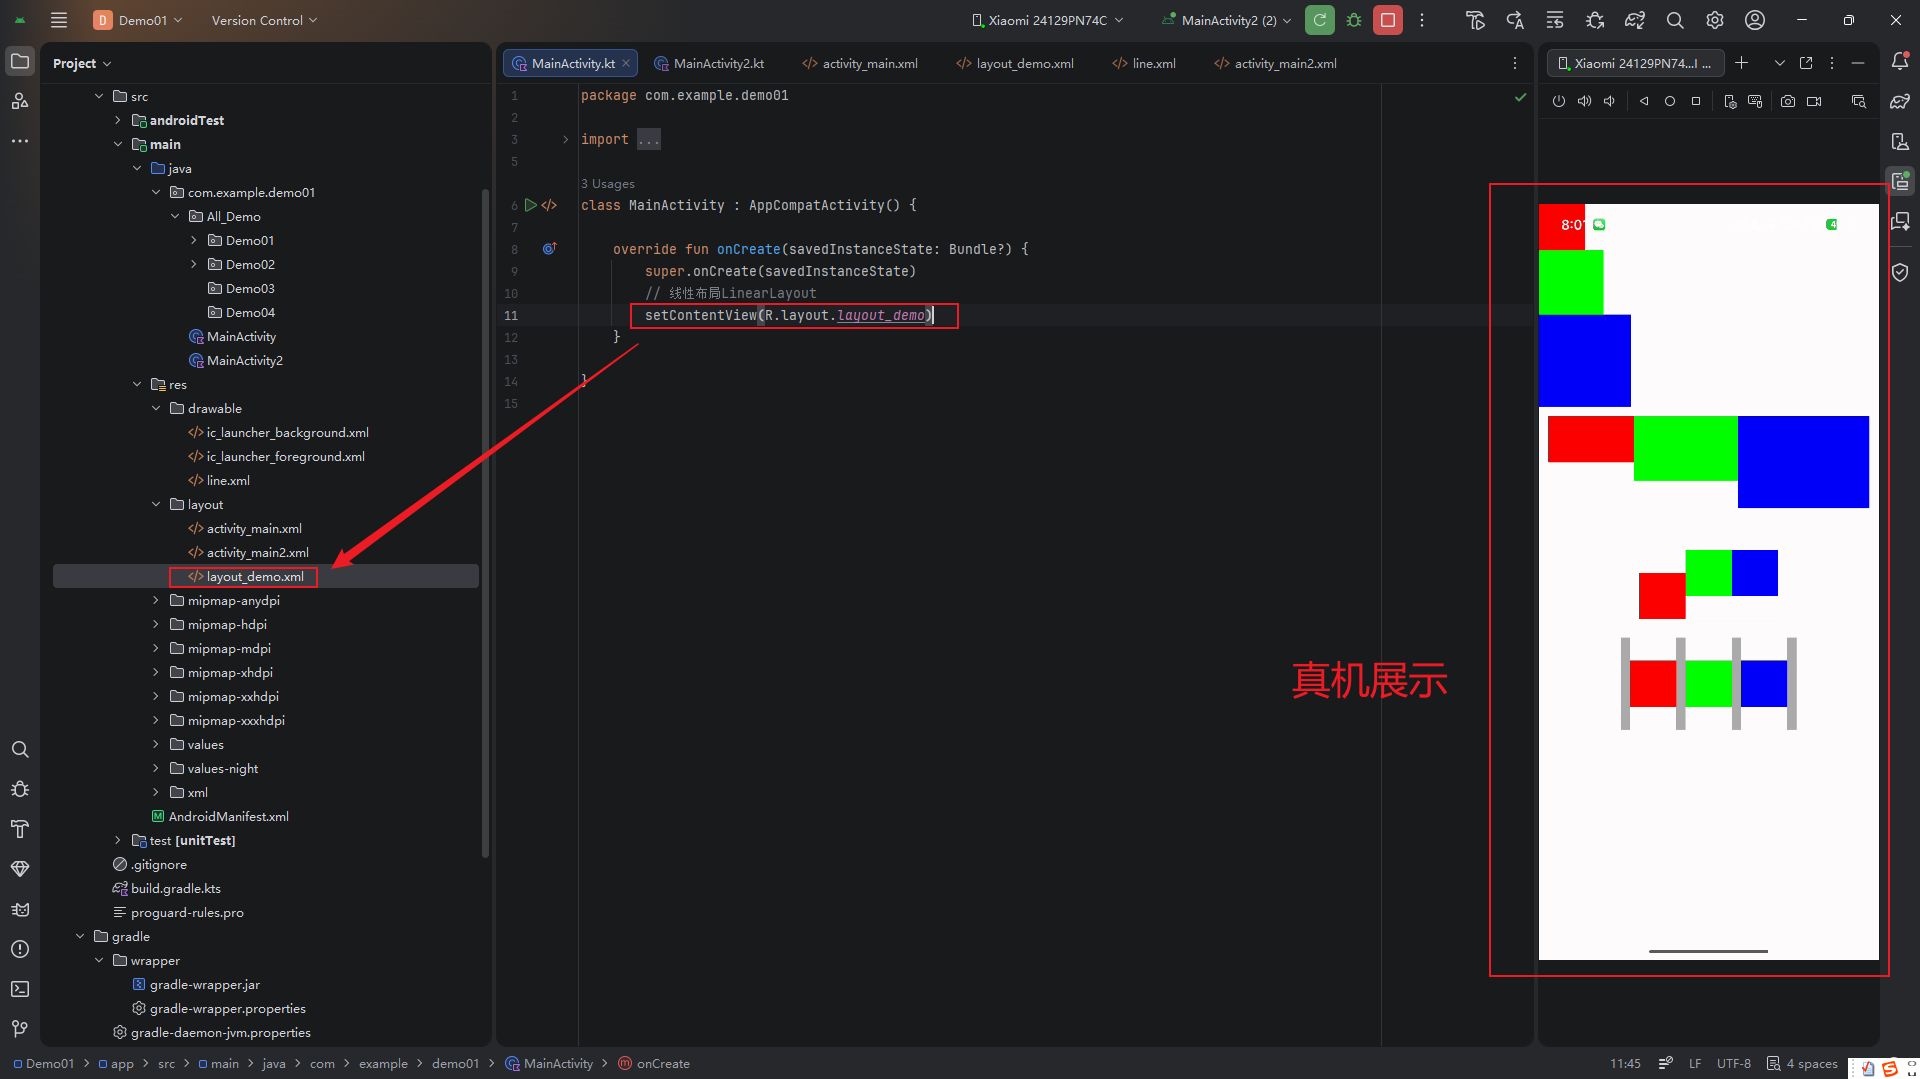
真机运行效果更真实:
✅ 优势:
无需手动添加多个View作为分割线,代码更简洁。
相对布局 RelativeLayout
RelativeLayout 允许子视图相对于父容器或其他兄弟视图进行定位,灵活性极高,曾是复杂布局的首选(现多被 ConstraintLayout 取代)。
核心特性:
- 通过
layout_toLeftOf、layout_below、layout_centerInParent等属性定义位置关系; - 无需嵌套即可实现复杂排版,减少 View 层级;
- 性能优于多层嵌套的
LinearLayout。
示例代码解析:
<RelativeLayout
    android:layout_width="match_parent"
    android:layout_height="match_parent">

    <!-- 中心主方块 -->
    <View
        android:id="@+id/box1"
        android:layout_width="100dp"
        android:layout_height="50dp"
        android:background="#3A3895"
        android:layout_centerInParent="true"/>

    <!-- 上方小方块:对齐 box1 顶部 & 水平居中 -->
    <View
        android:layout_width="50dp"
        android:layout_height="50dp"
        android:background="#CC1955"
        android:layout_above="@+id/box1"
        android:layout_centerHorizontal="true"/>

    <!-- 左侧方块:垂直居中 & 在 box1 左侧 -->
    <View
        android:layout_width="100dp"
        android:layout_height="50dp"
        android:background="#36E716"
        android:layout_toStartOf="@+id/box1"
        android:layout_centerVertical="true"/>

    <!-- 右侧方块 -->
    <View
        android:layout_width="100dp"
        android:layout_height="50dp"
        android:background="#E78916"
        android:layout_toEndOf="@+id/box1"
        android:layout_centerVertical="true"/>

    <!-- 下方小方块:对齐 box1 底部 & 右对齐 -->
    <View
        android:layout_width="50dp"
        android:layout_height="50dp"
        android:background="#8916E7"
        android:layout_below="@+id/box1"
        android:layout_alignEnd="@+id/box1"/>
</RelativeLayout>
最终效果呈“十字”分布,围绕中心方块:
⚠️ 局限性:
- 过度依赖 ID,ID 修改易导致布局错乱;
- 循环依赖(A 在 B 左,B 在 A 右)会引发崩溃;
- Google 官方已推荐使用
ConstraintLayout替代。
帧布局 FrameLayout
FrameLayout 是最简单的布局容器,所有子视图默认堆叠在左上角,后添加的视图覆盖在前一个之上。它常用于:
- 实现叠加效果(如头像+徽章);
- 作为
Fragment容器; - 构建全屏覆盖层(如 Loading 遮罩)。
示例:同心圆效果
<FrameLayout
    android:layout_width="match_parent"
    android:layout_height="match_parent">

    <View
        android:layout_width="200dp"
        android:layout_height="200dp"
        android:background="#F44336"
        android:layout_gravity="center"/>

    <View
        android:layout_width="150dp"
        android:layout_height="150dp"
        android:background="#E91E63"
        android:layout_gravity="center"/>

    <View
        android:layout_width="100dp"
        android:layout_height="100dp"
        android:background="#673AB7"
        android:layout_gravity="center"/>
</FrameLayout>
三个正方形通过 layout_gravity="center" 实现同心居中叠加,形成靶心效果:
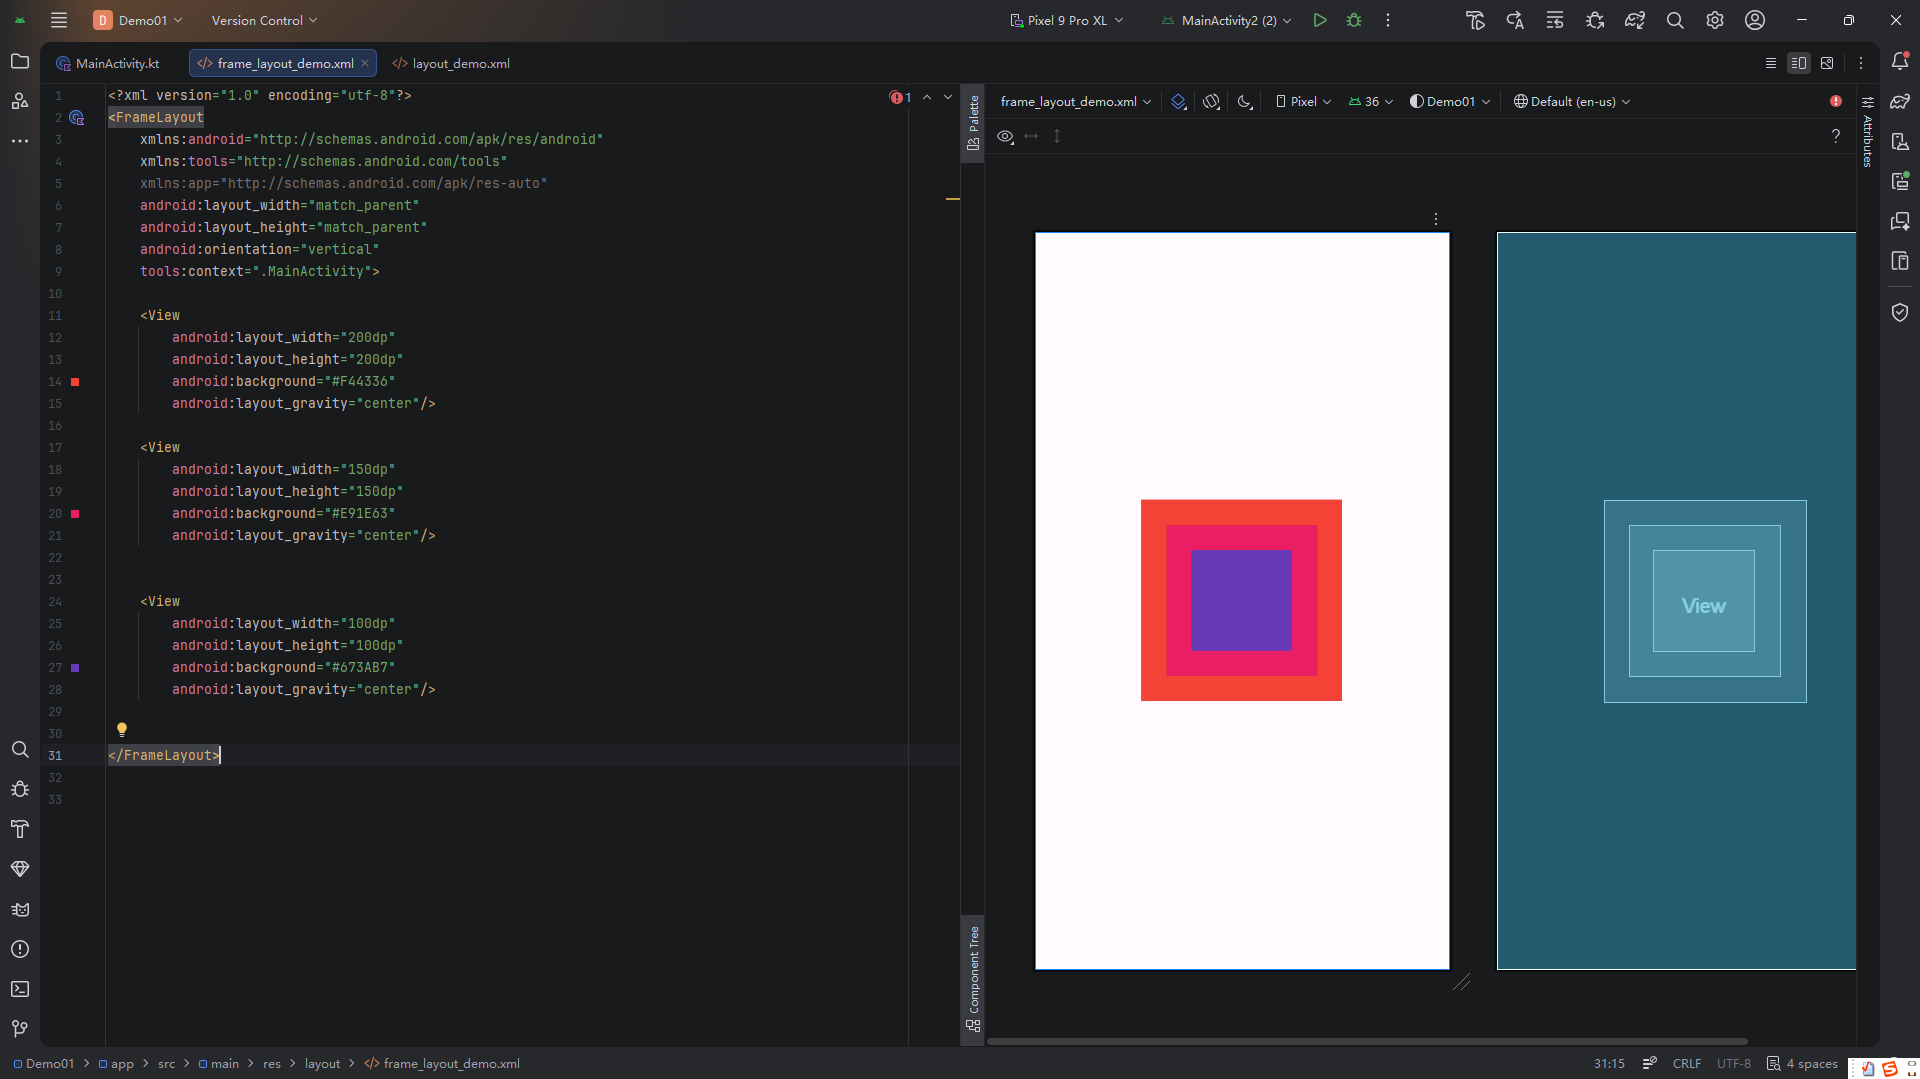
✅ 性能优势:
FrameLayout测量次数最少,是性能最高的布局容器之一。
总结与选型建议
| 布局类型 | 优点 | 缺点 | 推荐场景 |
|---|---|---|---|
| LinearLayout | 简单直观,支持权重 | 嵌套深时性能差 | 表单、简单列表 |
| RelativeLayout | 灵活,减少嵌套 | 易循环依赖,维护难 | 已被 ConstraintLayout 取代 |
| FrameLayout | 性能极高,适合叠加 | 仅适合简单堆叠 | Fragment 容器、遮罩层 |
🚀 现代开发建议:
- 新项目优先使用
ConstraintLayout(拖拽式设计 + 扁平化层级);- 保留
LinearLayout用于简单线性排列;- 用
FrameLayout实现覆盖或 Fragment 容器。
掌握这三种基础布局,是迈向高效 Android UI 开发的第一步。后续可深入学习 ConstraintLayout、RecyclerView 与 Jetpack Compose,构建更现代化的应用界面。
代码部分
<?xml version="1.0" encoding="utf-8"?>
<LinearLayout
        xmlns:android="http://schemas.android.com/apk/res/android"
        xmlns:tools="http://schemas.android.com/tools"
        xmlns:app="http://schemas.android.com/apk/res-auto"
        android:layout_width="match_parent"
        android:layout_height="match_parent"
        android:orientation="vertical"
        tools:context=".MainActivity">
    <View
        android:layout_width="50dp"
        android:layout_height="50dp"
        android:background="#f00"/>

    <View
        android:layout_width="70dp"
        android:layout_height="70dp"
        android:background="#0f0"/>

    <View
        android:layout_width="100dp"
        android:layout_height="100dp"
        android:background="#00f"/>

    <LinearLayout
        android:layout_width="match_parent"
        android:layout_height="100dp"
        android:layout_margin="10dp"
        >


        <View
            android:layout_width="50dp"
            android:layout_weight="1"
            android:layout_height="50dp"
            android:background="#f00"/>

        <View
            android:layout_width="70dp"
            android:layout_weight="1"
            android:layout_height="70dp"
            android:background="#0f0"/>

        <View
            android:layout_width="100dp"
            android:layout_weight="1"
            android:layout_height="100dp"
            android:background="#00f"/>

    </LinearLayout>

    <LinearLayout
        android:layout_width="match_parent"
        android:layout_height="100dp"
        android:layout_margin="10dp"
        android:gravity="center"
        >

        <View
            android:layout_gravity="bottom"
            android:layout_width="50dp"
            android:layout_height="50dp"
            android:background="#f00"/>

        <View
            android:layout_width="50dp"
            android:layout_height="50dp"
            android:background="#0f0"/>

        <View
            android:layout_width="50dp"
            android:layout_height="50dp"
            android:background="#00f"/>

    </LinearLayout>

    <LinearLayout
        android:layout_width="match_parent"
        android:layout_height="100dp"
        android:layout_margin="10dp"
        android:gravity="center"
        android:divider="@drawable/line"
        android:showDividers="beginning|middle|end"
        >

        <View
            android:layout_width="50dp"
            android:layout_height="50dp"
            android:background="#f00"/>

        <View
            android:layout_width="50dp"
            android:layout_height="50dp"
            android:background="#0f0"/>

        <View
            android:layout_width="50dp"
            android:layout_height="50dp"
            android:background="#00f"/>

    </LinearLayout>


</LinearLayout>
<?xml version="1.0" encoding="utf-8"?>
<RelativeLayout
        xmlns:android="http://schemas.android.com/apk/res/android"
        xmlns:tools="http://schemas.android.com/tools"
        xmlns:app="http://schemas.android.com/apk/res-auto"
        android:layout_width="match_parent"
        android:layout_height="match_parent"
        android:orientation="vertical"
        tools:context=".MainActivity">
        <View
            android:layout_margin="20dp"
            android:id="@+id/box1"
            android:layout_width="100dp"
            android:layout_height="50dp"
            android:background="#3A3895"
            android:layout_centerInParent="true"
       />

        <View
            android:layout_width="50dp"
            android:layout_height="50dp"
            android:background="#CC1955"
            android:layout_above="@+id/box1"
            android:layout_centerHorizontal="true"
            android:layout_alignStart="@+id/box1"
            />

        <View
            android:layout_width="100dp"
            android:layout_height="50dp"
            android:background="#36E716"
            android:layout_toStartOf="@+id/box1"
            android:layout_centerVertical="true"
            />

        <View
            android:layout_width="100dp"
            android:layout_height="50dp"
            android:background="#E78916"
            android:layout_toEndOf="@+id/box1"
            android:layout_centerVertical="true"
            />

        <View
            android:layout_width="50dp"
            android:layout_height="50dp"
            android:background="#8916E7"
            android:layout_below="@+id/box1"
            android:layout_alignEnd="@+id/box1"
        />


</RelativeLayout>
<?xml version="1.0" encoding="utf-8"?>
<FrameLayout
    xmlns:android="http://schemas.android.com/apk/res/android"
    xmlns:tools="http://schemas.android.com/tools"
    xmlns:app="http://schemas.android.com/apk/res-auto"
    android:layout_width="match_parent"
    android:layout_height="match_parent"
    android:orientation="vertical"
    tools:context=".MainActivity">

    <View
        android:layout_width="200dp"
        android:layout_height="200dp"
        android:background="#F44336"
        android:layout_gravity="center"/>

    <View
        android:layout_width="150dp"
        android:layout_height="150dp"
        android:background="#E91E63"
        android:layout_gravity="center"/>


    <View
        android:layout_width="100dp"
        android:layout_height="100dp"
        android:background="#673AB7"
        android:layout_gravity="center"/>


</FrameLayout>

openvela 操作系统专为 AIoT 领域量身定制,以轻量化、标准兼容、安全性和高度可扩展性为核心特点。openvela 以其卓越的技术优势,已成为众多物联网设备和 AI 硬件的技术首选,涵盖了智能手表、运动手环、智能音箱、耳机、智能家居设备以及机器人等多个领域。
更多推荐

 24
24 0
0- 0


 已为社区贡献1条内容

所有评论(0)