
Sability安卓(四)_ 页面布局开始扫盲,了解古法传统式布局!!!!!
一、基础布局
1.1.介绍
在Android开发 中,布局(Layout)和组件(Component)是构建用户界面的两大核心要素。它们共同协作,决定了应用在屏幕上的呈现方式和用户与应用的交互方式。
布局用于组织和安排界面中的各个组件(如按钮、文本框、图片等),决定了它们在屏幕上的位置和排列方式。Android提供了多种布局类型,每种布局都有其独特的排列方式和适用场景。
常用的布局组件包括:
线性布局 LinearLayout
相对布局 RelativeLayout
帧布局 FrameLayout
表格布局 TableLayout
约束布局
1.2.组件的通用属性
通用属性(如
android:layout_width、android:layout_height)是构建任何UI组件的基础。掌握这些属性有助于你理解每个组件的基本行为和外观。
android:layout_width组件宽度
android:layout_height组件高度android:background 设置背景
android:layout_margin外边距
android:padding内边距
android:id唯一的标识符
1.3.组件宽高尺寸的设置
1.3.1.Px
定义:使用固定的像素值来设置视图的宽高,如
100px。不推荐原因:不同设备的屏幕分辨率和密度各异,使用固定像素会导致在某些设备上显示效果不佳,影响界面的适配性和一致性。
1.3.2.dp/sp
定义:
dp(density-independent pixel)是一种与设备密度无关的单位,用于在不同分辨率的设备上实现一致的显示效果。例如,100dp在不同设备上会根据屏幕密度自动调整实际像素值。推荐使用:在Android开发中,推荐使用
dp来设置视图的宽高,以确保界面在各种设备上都能保持良好的显示效果。
1.3.3.match_parent
定义:视图的宽高设置为
match_parent时,表示该视图将占据其父布局的全部可用空间。使用场景:适用于需要视图与父布局同宽或同高的情况,例如全屏显示的背景图或填充整个屏幕的容器。
1.3.4.wrap_content
定义:视图的宽高设置为
wrap_content时,表示该视图的尺寸将根据其内部内容自动调整,仅占据必要的空间。使用场景:适用于需要根据内容动态调整尺寸的视图,例如按钮上的文本长度不固定时,按钮的宽度会根据文本长度自动调整。
二、线性布局 (LinearLayout)
概念:线性布局按照水平或垂直方向依次排列子组
2.1.方向(Orientation)
android:orientation:必须设置的属性,决定子视图的排列方向。
horizontal:水平排列(从左到右)vertical:垂直排列(从上到下)。- 默认方向:如果不设置,默认是水平排列(但建议显式指定)。
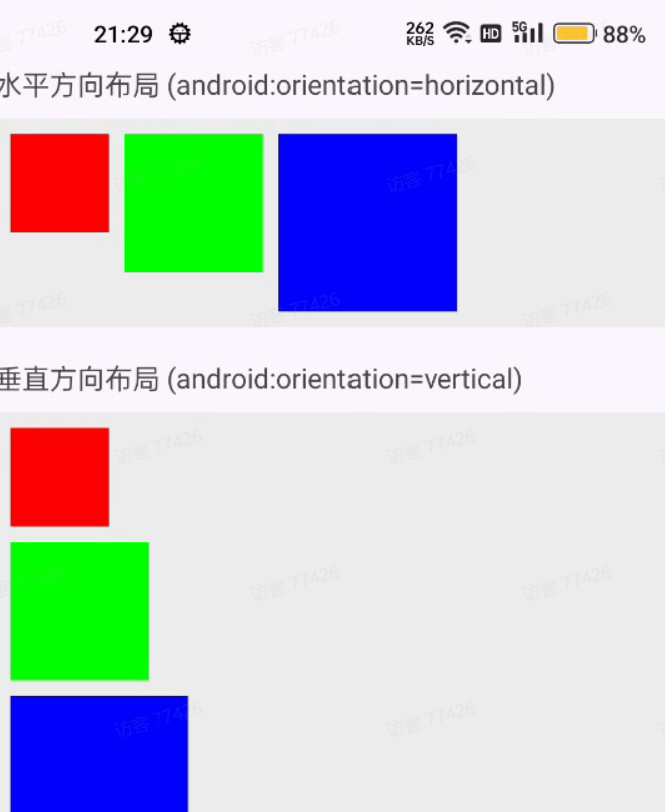
示例代码:activity_linear_layout_demo.xml
<?xml version="1.0" encoding="utf-8"?>
<ScrollView xmlns:android="http://schemas.android.com/apk/res/android"
    android:id="@+id/main"
    android:layout_width="match_parent"
    android:layout_height="match_parent"
    android:padding="16dp">

    <LinearLayout
        android:layout_width="match_parent"
        android:layout_height="wrap_content"
        android:orientation="vertical">

        <!-- 水平方向演示 -->
        <TextView
            android:layout_width="wrap_content"
            android:layout_height="wrap_content"
            android:layout_marginBottom="8dp"
            android:text="水平方向布局 (android:orientation=horizontal)" />

        <LinearLayout
            android:layout_width="match_parent"
            android:layout_height="wrap_content"
            android:layout_marginBottom="16dp"
            android:background="#EEEEEE"
            android:orientation="horizontal"
            android:padding="8dp">

            <View
                android:layout_width="50dp"
                android:layout_height="50dp"
                android:background="#FF0000" />

            <View
                android:layout_width="70dp"
                android:layout_height="70dp"
                android:layout_marginHorizontal="8dp"
                android:background="#00FF00" />

            <View
                android:layout_width="90dp"
                android:layout_height="90dp"
                android:background="#0000FF" />

        </LinearLayout>

        <!-- 垂直方向演示 -->
        <TextView
            android:layout_width="wrap_content"
            android:layout_height="wrap_content"
            android:layout_marginBottom="8dp"
            android:text="垂直方向布局 (android:orientation=vertical)" />

        <LinearLayout
            android:layout_width="match_parent"
            android:layout_height="wrap_content"
            android:background="#EEEEEE"
            android:orientation="vertical"
            android:padding="8dp">

            <View
                android:layout_width="50dp"
                android:layout_height="50dp"
                android:background="#FF0000" />

            <View
                android:layout_width="70dp"
                android:layout_height="70dp"
                android:layout_marginVertical="8dp"
                android:background="#00FF00" />

            <View
                android:layout_width="90dp"
                android:layout_height="90dp"
                android:background="#0000FF" />

        </LinearLayout>

    </LinearLayout>

</ScrollView>
2.2.权重(Weight)
layout_weight:通过权重分配剩余空间,实现比例布局。- 适用场景:适配不同屏幕尺寸,如按钮按比例占据空间。
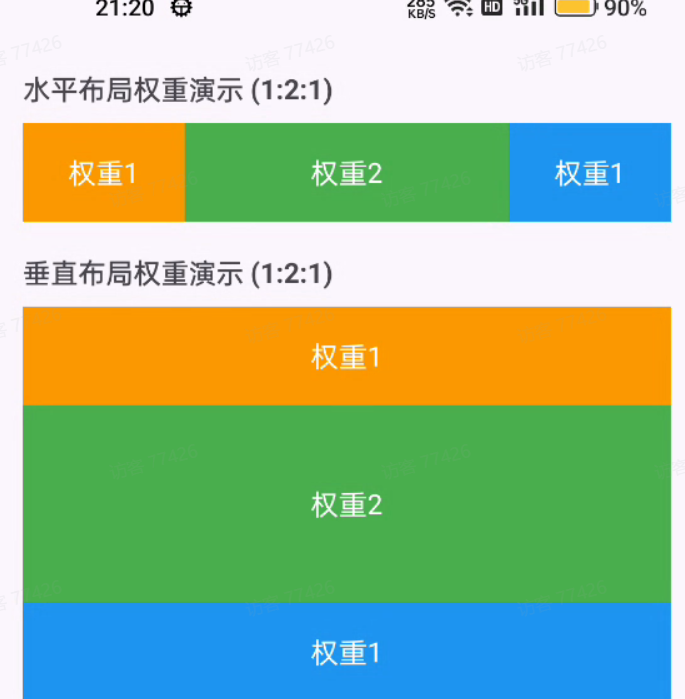
权重示例代码:activity_weight_demo.xml
<?xml version="1.0" encoding="utf-8"?>
<ScrollView xmlns:android="http://schemas.android.com/apk/res/android"
    android:id="@+id/main"
    android:layout_width="match_parent"
    android:layout_height="match_parent">

    <LinearLayout
        android:layout_width="match_parent"
        android:layout_height="wrap_content"
        android:orientation="vertical"
        android:padding="16dp">

        <TextView
            android:layout_width="match_parent"
            android:layout_height="wrap_content"
            android:layout_marginBottom="8dp"
            android:text="水平布局权重演示 (1:2:1)"
            android:textStyle="bold" />

        <LinearLayout
            android:layout_width="match_parent"
            android:layout_height="50dp"
            android:layout_marginBottom="16dp"
            android:orientation="horizontal">

            <TextView
                android:layout_width="0dp"
                android:layout_height="match_parent"
                android:layout_weight="1"
                android:background="#FF9800"
                android:gravity="center"
                android:text="权重1"
                android:textColor="#FFFFFF" />

            <TextView
                android:layout_width="0dp"
                android:layout_height="match_parent"
                android:layout_weight="2"
                android:background="#4CAF50"
                android:gravity="center"
                android:text="权重2"
                android:textColor="#FFFFFF" />

            <TextView
                android:layout_width="0dp"
                android:layout_height="match_parent"
                android:layout_weight="1"
                android:background="#2196F3"
                android:gravity="center"
                android:text="权重1"
                android:textColor="#FFFFFF" />

        </LinearLayout>

        <TextView
            android:layout_width="match_parent"
            android:layout_height="wrap_content"
            android:layout_marginBottom="8dp"
            android:text="垂直布局权重演示 (1:2:1)"
            android:textStyle="bold" />

        <LinearLayout
            android:layout_width="match_parent"
            android:layout_height="200dp"
            android:orientation="vertical">

            <TextView
                android:layout_width="match_parent"
                android:layout_height="0dp"
                android:layout_weight="1"
                android:background="#FF9800"
                android:gravity="center"
                android:text="权重1"
                android:textColor="#FFFFFF" />

            <TextView
                android:layout_width="match_parent"
                android:layout_height="0dp"
                android:layout_weight="2"
                android:background="#4CAF50"
                android:gravity="center"
                android:text="权重2"
                android:textColor="#FFFFFF" />

            <TextView
                android:layout_width="match_parent"
                android:layout_height="0dp"
                android:layout_weight="1"
                android:background="#2196F3"
                android:gravity="center"
                android:text="权重1"
                android:textColor="#FFFFFF" />

        </LinearLayout>

    </LinearLayout>

</ScrollView>
2.3.对齐方式
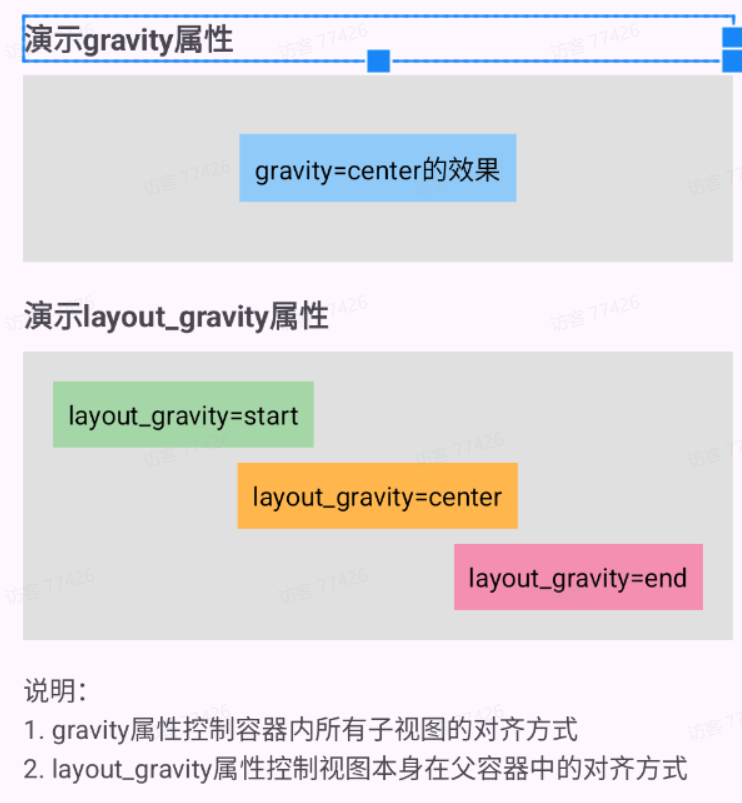
gravity:控制子视图内部内容的对齐(如文本在按钮中的位置)。
例如:
android:gravity="center"让子视图内容居中。
layout_gravity:控制子视图自身在父容器中的对齐方式。
例如:
android:layout_gravity="end"让子视图靠右对齐。
示例代码:layout_gravity_demo.xml
<?xml version="1.0" encoding="utf-8"?>
<LinearLayout xmlns:android="http://schemas.android.com/apk/res/android"
    android:layout_width="match_parent"
    android:layout_height="match_parent"
    android:orientation="vertical"
    android:padding="16dp">

    <!-- 演示gravity属性 -->
    <TextView
        android:layout_width="match_parent"
        android:layout_height="wrap_content"
        android:text="演示gravity属性"
        android:textStyle="bold"
        android:textSize="16sp"
        android:layout_marginBottom="8dp" />

    <LinearLayout
        android:layout_width="match_parent"
        android:layout_height="100dp"
        android:background="#E0E0E0"
        android:gravity="center"
        android:orientation="horizontal"
        android:layout_marginBottom="16dp">

        <TextView
            android:layout_width="wrap_content"
            android:layout_height="wrap_content"
            android:background="#90CAF9"
            android:padding="8dp"
            android:text="gravity=center的效果"
            android:textColor="#000000" />
    </LinearLayout>

    <!-- 演示layout_gravity属性 -->
    <TextView
        android:layout_width="match_parent"
        android:layout_height="wrap_content"
        android:text="演示layout_gravity属性"
        android:textStyle="bold"
        android:textSize="16sp"
        android:layout_marginBottom="8dp" />

    <LinearLayout
        android:layout_width="match_parent"
        android:layout_height="wrap_content"
        android:background="#E0E0E0"
        android:orientation="vertical"
        android:padding="16dp">

        <TextView
            android:layout_width="wrap_content"
            android:layout_height="wrap_content"
            android:layout_gravity="start"
            android:background="#A5D6A7"
            android:padding="8dp"
            android:layout_marginBottom="8dp"
            android:text="layout_gravity=start"
            android:textColor="#000000" />

        <TextView
            android:layout_width="wrap_content"
            android:layout_height="wrap_content"
            android:layout_gravity="center"
            android:background="#FFB74D"
            android:padding="8dp"
            android:layout_marginBottom="8dp"
            android:text="layout_gravity=center"
            android:textColor="#000000" />

        <TextView
            android:layout_width="wrap_content"
            android:layout_height="wrap_content"
            android:layout_gravity="end"
            android:background="#F48FB1"
            android:padding="8dp"
            android:text="layout_gravity=end"
            android:textColor="#000000" />
    </LinearLayout>

    <!-- 补充说明文本 -->
    <TextView
        android:layout_width="match_parent"
        android:layout_height="wrap_content"
        android:layout_marginTop="16dp"
        android:text="说明:\n1. gravity属性控制容器内所有子视图的对齐方式\n2. layout_gravity属性控制视图本身在父容器中的对齐方式"
        android:textSize="14sp" />

</LinearLayout>
2.4.分割线(Divider)
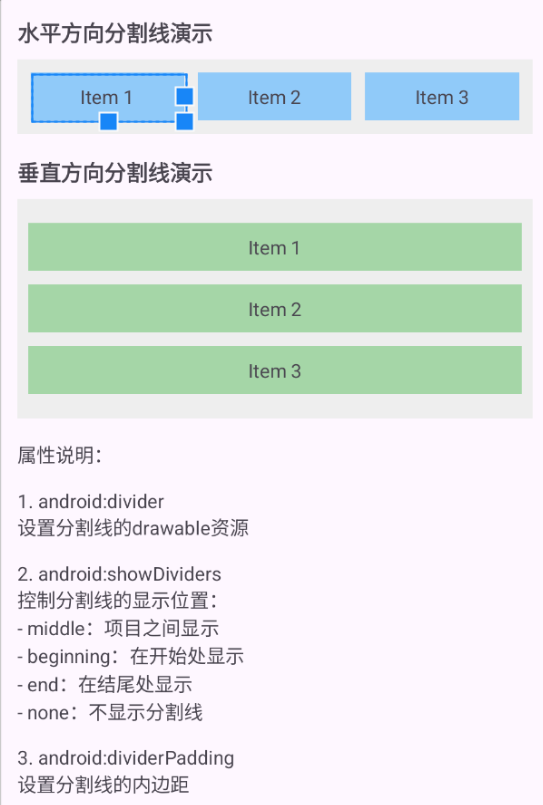
android:divider:设置分割线的形状
android:showDividers:指定分割线显示的位置:
none(无)、beginning(起始)、middle(子视图之间)、end(末尾)。
<?xml version="1.0" encoding="utf-8"?>
<ScrollView xmlns:android="http://schemas.android.com/apk/res/android"
    android:id="@+id/main"
    android:layout_width="match_parent"
    android:layout_height="match_parent">

    <LinearLayout
        android:layout_width="match_parent"
        android:layout_height="wrap_content"
        android:orientation="vertical"
        android:padding="16dp">

        <!-- 水平方向分割线演示 -->
        <TextView
            android:layout_width="match_parent"
            android:layout_height="wrap_content"
            android:layout_marginBottom="8dp"
            android:text="水平方向分割线演示"
            android:textSize="16sp"
            android:textStyle="bold" />

        <LinearLayout
            android:layout_width="match_parent"
            android:layout_height="wrap_content"
            android:layout_marginBottom="16dp"
            android:background="#EEEEEE"
            android:divider="@drawable/line"
            android:orientation="horizontal"
            android:showDividers="middle"
            android:padding="10dp">

            <TextView
                android:layout_width="0dp"
                android:layout_height="wrap_content"
                android:layout_weight="1"
                android:background="#90CAF9"
                android:gravity="center"
                android:padding="8dp"
                android:text="Item 1" />

            <TextView
                android:layout_width="0dp"
                android:layout_height="wrap_content"
                android:layout_weight="1"
                android:background="#90CAF9"
                android:gravity="center"
                android:padding="8dp"
                android:text="Item 2" />

            <TextView
                android:layout_width="0dp"
                android:layout_height="wrap_content"
                android:layout_weight="1"
                android:background="#90CAF9"
                android:gravity="center"
                android:padding="8dp"
                android:text="Item 3" />
        </LinearLayout>

        <!-- 垂直方向分割线演示 -->
        <TextView
            android:layout_width="match_parent"
            android:layout_height="wrap_content"
            android:layout_marginBottom="8dp"
            android:text="垂直方向分割线演示"
            android:textSize="16sp"
            android:textStyle="bold" />

        <LinearLayout
            android:layout_width="match_parent"
            android:layout_height="wrap_content"
            android:layout_marginBottom="16dp"
            android:background="#EEEEEE"
            android:divider="@drawable/line"
            android:orientation="vertical"
            android:showDividers="middle|beginning|end"
            android:padding="8dp">

            <TextView
                android:layout_width="match_parent"
                android:layout_height="wrap_content"
                android:background="#A5D6A7"
                android:gravity="center"
                android:padding="8dp"
                android:text="Item 1" />

            <TextView
                android:layout_width="match_parent"
                android:layout_height="wrap_content"
                android:background="#A5D6A7"
                android:gravity="center"
                android:padding="8dp"
                android:text="Item 2" />

            <TextView
                android:layout_width="match_parent"
                android:layout_height="wrap_content"
                android:background="#A5D6A7"
                android:gravity="center"
                android:padding="8dp"
                android:text="Item 3" />
        </LinearLayout>

        <!-- 属性说明 -->
        <TextView
            android:layout_width="match_parent"
            android:layout_height="wrap_content"
            android:text="属性说明:\n\n1. android:divider\n设置分割线的drawable资源\n\n2. android:showDividers\n控制分割线的显示位置:\n- middle:项目之间显示\n- beginning:在开始处显示\n- end:在结尾处显示\n- none:不显示分割线\n\n3. android:dividerPadding\n设置分割线的内边距"
            android:textSize="14sp" />

    </LinearLayout>

</ScrollView>
2.5.扩展知识:Shape文件
在 Android Studio 中,
shape文件是一种用于定义形状绘制的 XML 文件,它属于 Android 资源文件的一种,通常用于定义背景、按钮、分隔线等图形元素。通过shape文件,开发者可以灵活地自定义各种形状和样式,而无需使用图片资源,从而减少应用的体积并提高灵活性。
shape 文件通常位于 res/drawable 目录下,文件扩展名为 .xml
<?xml version="1.0" encoding="utf-8"?>
<shape xmlns:android="http://schemas.android.com/apk/res/android"
    android:shape="rectangle">

    <size
        android:width="10dp"
        android:height="10dp" />
    <solid android:color="@android:color/transparent" />
    <!--    <solid android:color="#ff0000" />-->

</shape>
这个 shape 文件定义了一个宽度为 10dp、高度为 10dp 的透明矩形
2.5.1.shape 标签
shape是定义形状绘制的 XML 文件的根标签。
android:shape="rectangle"表示该形状是一个矩形。常见的形状类型还有:
oval:椭圆形
line:直线
ring:圆环
2.5.2.<size> 标签
用于定义形状的大小。
android:width="10dp":设置形状的宽度为10dp。
android:height="10dp":设置形状的高度为10dp。
2.5.3.<solid> 标签
用于设置形状的填充颜色。
android:color="@android:color/transparent":填充颜色为透明。
@android:color/transparent是 Android 系统提供的透明颜色资源。注释掉的代码
<solid android:color="#ff0000" />表示填充颜色为红色(#ff0000)。
三、相对布局 (RelativeLayout)
Android中的RelativeLayout(相对布局)是一种通过相对位置关系排列子视图的布局容器,适合需要灵活定位的场景
相对定位的核心属性
子视图通过相对于父容器或其他子视图的位置来定位。常用属性包括:
-
相对于父容器:
-
android:layout_alignParentTop、android:layout_alignParentBottom:对齐父容器顶部/底部。 -
android:layout_alignParentLeft、android:layout_alignParentRight:对齐父容器左侧/右侧。 -
android:layout_centerInParent:居中于父容器。 -
android:layout_centerHorizontal、android:layout_centerVertical:水平/垂直居中。
-
-
相对于其他子视图(需指定目标视图的
id):-
android:layout_above、android:layout_below:位于指定视图的上方/下方。 -
android:layout_toLeftOf、android:layout_toRightOf:位于指定视图的左侧/右侧。 -
android:layout_alignTop、android:layout_alignBottom:与指定视图的顶部/底部对齐。 -
android:layout_alignLeft、android:layout_alignRight:与指定视图的左侧/右侧对齐。
-
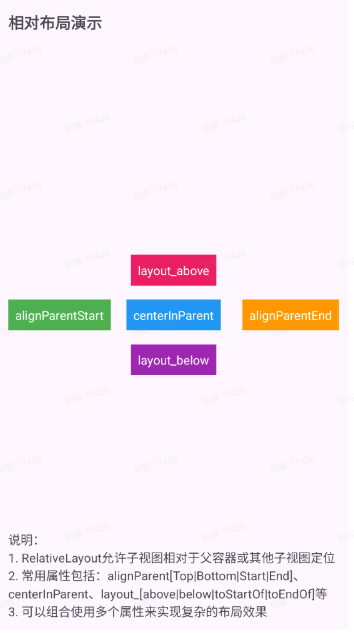
示例代码:
<?xml version="1.0" encoding="utf-8"?>
<RelativeLayout xmlns:android="http://schemas.android.com/apk/res/android"
android:id="@+id/main"
android:layout_width="match_parent"
android:layout_height="match_parent"
android:padding="16dp">
<!-- 标题文本 -->
<TextView
android:id="@+id/titleText"
android:layout_width="match_parent"
android:layout_height="wrap_content"
android:layout_alignParentTop="true"
android:text="相对布局演示"
android:textStyle="bold"
android:textSize="18sp"
android:layout_marginBottom="16dp" />
<!-- 相对于父容器定位的演示 -->
<TextView
android:id="@+id/centerText"
android:layout_width="wrap_content"
android:layout_height="wrap_content"
android:layout_centerInParent="true"
android:text="centerInParent"
android:padding="8dp"
android:background="#2196F3"
android:textColor="#FFFFFF" />
<TextView
android:layout_width="wrap_content"
android:layout_height="wrap_content"
android:layout_alignParentStart="true"
android:layout_centerVertical="true"
android:text="alignParentStart"
android:padding="8dp"
android:background="#4CAF50"
android:textColor="#FFFFFF" />
<TextView
android:layout_width="wrap_content"
android:layout_height="wrap_content"
android:layout_alignParentEnd="true"
android:layout_centerVertical="true"
android:text="alignParentEnd"
android:padding="8dp"
android:background="#FF9800"
android:textColor="#FFFFFF" />
<!-- 相对于其他控件定位的演示 -->
<TextView
android:id="@+id/aboveText"
android:layout_width="wrap_content"
android:layout_height="wrap_content"
android:layout_above="@id/centerText"
android:layout_centerHorizontal="true"
android:layout_marginBottom="16dp"
android:text="layout_above"
android:padding="8dp"
android:background="#E91E63"
android:textColor="#FFFFFF" />
<TextView
android:layout_width="wrap_content"
android:layout_height="wrap_content"
android:layout_below="@id/centerText"
android:layout_centerHorizontal="true"
android:layout_marginTop="16dp"
android:text="layout_below"
android:padding="8dp"
android:background="#9C27B0"
android:textColor="#FFFFFF" />
<!-- 说明文本 -->
<TextView
android:layout_width="match_parent"
android:layout_height="wrap_content"
android:layout_alignParentBottom="true"
android:text="说明:\n1. RelativeLayout允许子视图相对于父容器或其他子视图定位\n2. 常用属性包括:alignParent[Top|Bottom|Start|End]、centerInParent、layout_[above|below|toStartOf|toEndOf]等\n3. 可以组合使用多个属性来实现复杂的布局效果"
android:textSize="14sp"
android:layout_marginTop="16dp" />
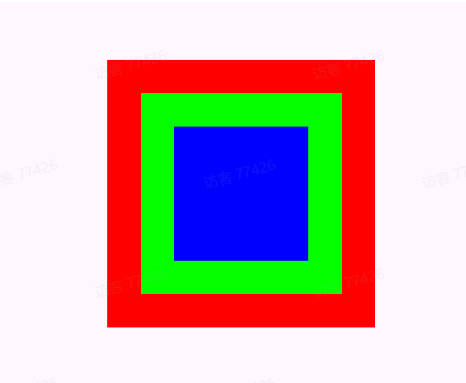
</RelativeLayout>四、帧布局 FrameLayout
帧布局 FrameLayout 是 Android 中常用的布局之一,通常用于承载一块空白区域,可以在其中动态添加子视图。例如,可以将它作为应用的主视图容器,用于页面切换时显示不同的内容
核心特性
-
层叠排列:子视图默认从左上角开始依次堆叠,后添加的视图会覆盖之前的视图。
-
轻量高效:布局逻辑简单,性能优于
RelativeLayout等复杂布局。 -
灵活定位:通过
layout_gravity属性调整子视图的位置(如居中、右下角)。
示例代码
<?xml version="1.0" encoding="utf-8"?>
<FrameLayout xmlns:android="http://schemas.android.com/apk/res/android"
    xmlns:tools="http://schemas.android.com/tools"
    android:id="@+id/main"
    android:layout_width="match_parent"
    android:layout_height="match_parent"
    android:padding="16dp"
    tools:context=".demo.layout.FrameLayoutDemoActivity">

    <!-- 最大的矩形,蓝色半透明 -->
    <View
        android:layout_width="200dp"
        android:layout_height="200dp"
        android:layout_gravity="center"
        android:background="#FF0000" />

    <!-- 中等大小的矩形,绿色半透明 -->
    <View
        android:layout_width="150dp"
        android:layout_height="150dp"
        android:layout_gravity="center"
        android:background="#00FF00" />

    <!-- 最小的矩形,橙色半透明 -->
    <View
        android:layout_width="100dp"
        android:layout_height="100dp"
        android:layout_gravity="center"
        android:background="#0000FF" />


</FrameLayout>
openvela 操作系统专为 AIoT 领域量身定制,以轻量化、标准兼容、安全性和高度可扩展性为核心特点。openvela 以其卓越的技术优势,已成为众多物联网设备和 AI 硬件的技术首选,涵盖了智能手表、运动手环、智能音箱、耳机、智能家居设备以及机器人等多个领域。
更多推荐


 27
27 0
0- 0


 已为社区贡献1条内容

所有评论(0)