
Arm Ethos‑U65:YOLOv8n 模型准备与 Vela 编译
本文是 Arm Ethos‑U65 学习笔记的第四篇,接下来两篇将基于 U65 实现一个 YOLO v8n 目标检测实例,其中本篇完成模型准备与 Vela 编译生成命令流,下一篇将命令流导入芯片仿真环境执行推理验证,整个示例以芯片验证仿真为主线,同时对裸机环境下的软件开发也有一定参考价值。
模型选取
YOLO v8n
正常流程需要将模型按照 Tensorflow lite 格式量化,这里直接使用现成 YOLO v8n tflite 模型:
https://github.com/camthink-ai/ne302/blob/main/Model/weights/yolov8n_256_quant_pc_ui_od_coco.tflite
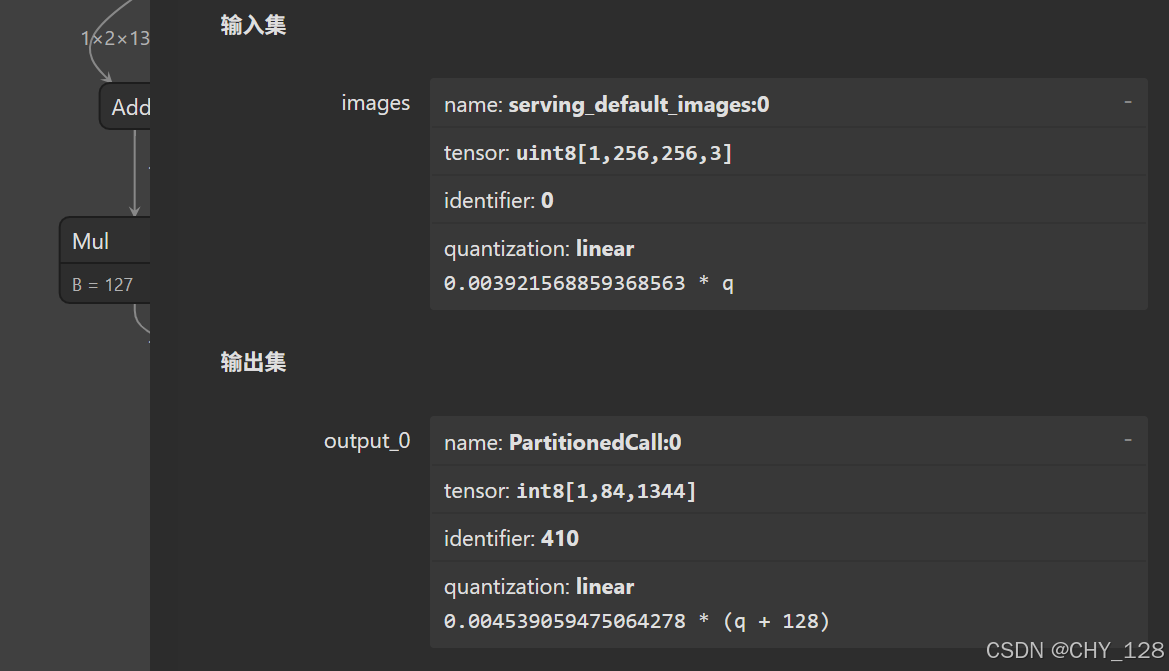
查看模型,可以看到输入是256x256x3 uint8,输出是1x84x1344 int8,对应80个分类1344个框。需要注意 tflite 模型是不包含后处理的,后处理需要外部实现(阈值比较、排序和 NMS),同时需要给模型提供前处理后的数据(resize 和格式转换)。
检测程序
python程序
下面完成基于 YOLO v8n tflite 实现目标检测的python程序,大体流程为:
a) 将图像resize成256x256,再量化为uint8。
b) 执行推理,通过tf.lite.Interpreter方法运行tfllite网络,得到输出结果。
c) 将输出反量化为浮点。
d) 对于每个窗,找到80个置信度中最大值,再和阈值比对,筛选出大于阈值的点。
e) 进行nms,去掉重合的窗。
f) 框坐标resize恢复,添加到图片中。
后面芯片仿真验证流程还需要复用程序的 c~f 也就是后处理部分。
tfile_model_run_yolov8n.py
import cv2
import numpy as np
import tensorflow as tf

# ---------- 配置 ----------
MODEL_PATH = "./tfile_model/yolov8n_256_quant_pc_ui_od_coco.tflite"
IMAGE_PATH = "bike.jpg"
CONFIDENCE_THRESHOLD = 0.5      # 置信度阈值
IOU_THRESHOLD = 0.45            # NMS 的 IOU 阈值
INPUT_SIZE = 256                # 模型输入尺寸 (256x256)

# 只关心这些类别的索引 (COCO: person=0, bicycle=1, car=2)TARGET_CLASS_IDS = [0, 1, 2]
TARGET_CLASS_NAMES = ["person", "bicycle", "car"]

# ---------- 加载模型 ----------
interpreter = tf.lite.Interpreter(model_path=MODEL_PATH)
interpreter.allocate_tensors()
input_details = interpreter.get_input_details()
output_details = interpreter.get_output_details()

# 获取输入类型(应为 uint8)
input_dtype = input_details[0]['dtype']
input_shape = input_details[0]['shape']  # [1, 256, 256, 3]

# ---------- 后处理函数 ----------
def sigmoid(x):
    return 1 / (1 + np.exp(-x))

def decode_yolov8_output(output, input_width, input_height, conf_threshold):
    # 去除 batch 维度
    preds = np.transpose(output, (0, 2, 1))[0]

    # preds shape: (num_anchors, 84)
    boxes = []
    scores = []
    class_ids = []

    for pred in preds:
        # 前4个是 bbox (cx, cy, w, h) 归一化到 0~1        cx, cy, w, h = pred[:4]
        # 后80个是类别得分
        class_scores = pred[4:]
        # 最大得分及其类别
        class_id = np.argmax(class_scores)
        score = class_scores[class_id]

        # 过滤低置信度
        if score < conf_threshold:
            continue

        # 只关心指定类别
        if class_id not in TARGET_CLASS_IDS:
            continue

        # 将中心坐标和宽高转换为左上角和右下角 (x1,y1,x2,y2) 归一化到 0~1 x1=cx-w/2
        y1 = cy - h / 2
        x2 = cx + w / 2
        y2 = cy + h / 2

        # 限制在 [0,1] 范围内
        x1 = max(0, min(1, x1))
        y1 = max(0, min(1, y1))
        x2 = max(0, min(1, x2))
        y2 = max(0, min(1, y2))

        boxes.append([x1, y1, x2, y2])
        scores.append(float(score))
        class_ids.append(class_id)

    return boxes, scores, class_ids

def nms(boxes, scores, iou_threshold):
    """
    非极大值抑制,返回保留的索引列表
    """    if len(boxes) == 0:
        return []
    boxes = np.array(boxes)
    # 计算每个框的面积
    areas = (boxes[:, 2] - boxes[:, 0]) * (boxes[:, 3] - boxes[:, 1])
    # 按置信度降序排序
    indices = np.argsort(scores)[::-1]
    keep = []
    while len(indices) > 0:
        current = indices[0]
        keep.append(current)
        if len(indices) == 1:
            break
        # 计算当前框与其余框的IOU
        other = indices[1:]
        xx1 = np.maximum(boxes[current, 0], boxes[other, 0])
        yy1 = np.maximum(boxes[current, 1], boxes[other, 1])
        xx2 = np.minimum(boxes[current, 2], boxes[other, 2])
        yy2 = np.minimum(boxes[current, 3], boxes[other, 3])
        w = np.maximum(0, xx2 - xx1)
        h = np.maximum(0, yy2 - yy1)
        intersection = w * h
        iou = intersection / (areas[current] + areas[other] - intersection)
        # 保留IOU低于阈值的框
        indices = indices[1:][iou < iou_threshold]
    return keep

# ---------- 主程序 ----------
if __name__ == "__main__":
    # 读取图像
    img = cv2.imread(IMAGE_PATH)
    orig_h, orig_w = img.shape[:2]

    # 预处理:调整大小并转换为 uint8 (模型期望)
    img_rgb = cv2.cvtColor(img, cv2.COLOR_BGR2RGB)
    resized = cv2.resize(img_rgb, (INPUT_SIZE, INPUT_SIZE))
    input_tensor = np.expand_dims(resized, axis=0).astype(np.uint8)

    # 推理
    interpreter.set_tensor(input_details[0]['index'], input_tensor)
    interpreter.invoke()

    # 获取输出
    # 可能模型有多个输出,但通常只有一个,先取第一个
    output = interpreter.get_tensor(output_details[0]['index'])

    # 处理量化输出:需要反量化
    scale, zero_point = output_details[0]['quantization']
    # 反量化:float_val = (quant_val - zero_point) * scale
    output = (output.astype(np.float32) - zero_point) * scale

    print(f"原始输出形状: {output.shape}")

    # 解码输出
    boxes, scores, class_ids = decode_yolov8_output(
        output, INPUT_SIZE, INPUT_SIZE, CONFIDENCE_THRESHOLD
    )

    # 执行 NMS (对所有类别一起做)
    keep_indices = nms(boxes, scores, IOU_THRESHOLD)
    final_boxes = [boxes[i] for i in keep_indices]
    final_scores = [scores[i] for i in keep_indices]
    final_class_ids = [class_ids[i] for i in keep_indices]

    # 绘制检测结果
    for (x1, y1, x2, y2), score, cls_id in zip(final_boxes, final_scores, final_class_ids):
        # 将归一化坐标转换为原图尺寸
        x1 = int(x1 * orig_w)
        y1 = int(y1 * orig_h)
        x2 = int(x2 * orig_w)
        y2 = int(y2 * orig_h)

        # 绘制矩形和标签
        label = f"{TARGET_CLASS_NAMES[TARGET_CLASS_IDS.index(cls_id)]} {score:.2f}"
        cv2.rectangle(img, (x1, y1), (x2, y2), (0, 255, 0), 2)
        cv2.putText(img, label, (x1, y1 - 5), cv2.FONT_HERSHEY_SIMPLEX, 0.5, (0, 255, 0), 2)

    # 显示图像
    cv2.imshow("Result", img)
    cv2.waitKey(0)
    cv2.destroyAllWindows()
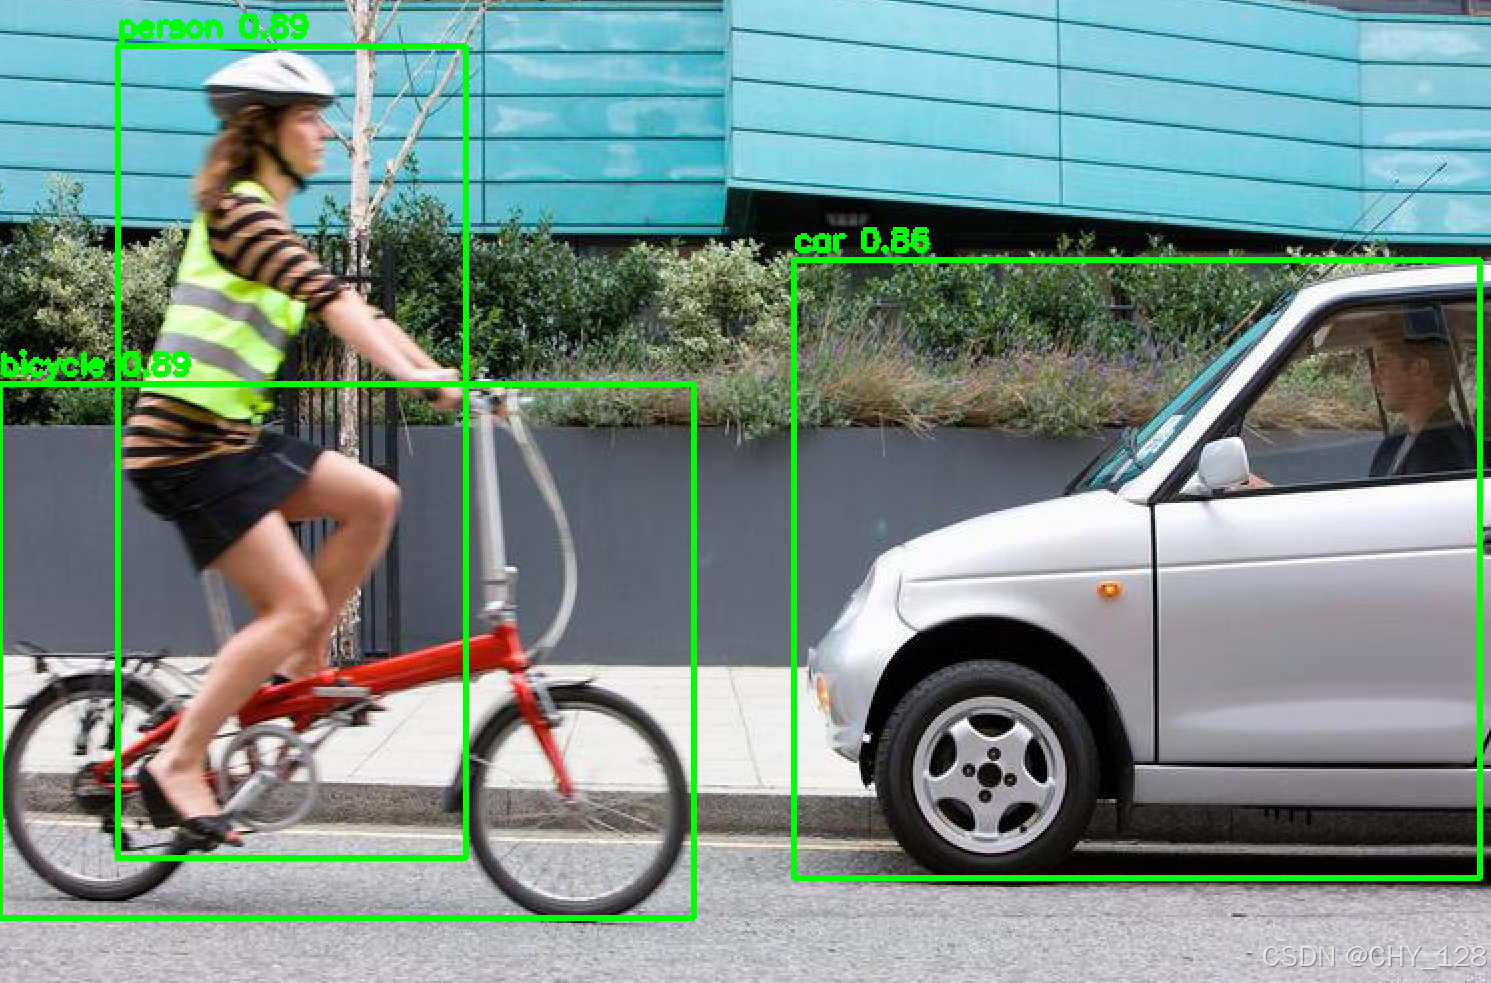
运行程序,对人、汽车、自行车进行了识别。
Vela编译
Vela 安装和执行
Vela 是 ARM 开发的一款编译器工具,可以将 TensorFlow Lite 模型(.tflite文件)编译为Ethos U65 可以执行的命令流,编译同时会对模型会进行权重压缩、内存分配等优化,这个优化过程不会有精度损失。
Vela 以 python 软件包形式使用,首先通过 pip 安装。
pip install ethos-u-vela
安装后可以直接在端口执行,指定模型、NPU版本和输出路径。
vela ./tfile_model/yolov8n_256_quant_pc_ui_od_coco.tflite --accelerator-config ethos-u65-512 --output-dir ./output
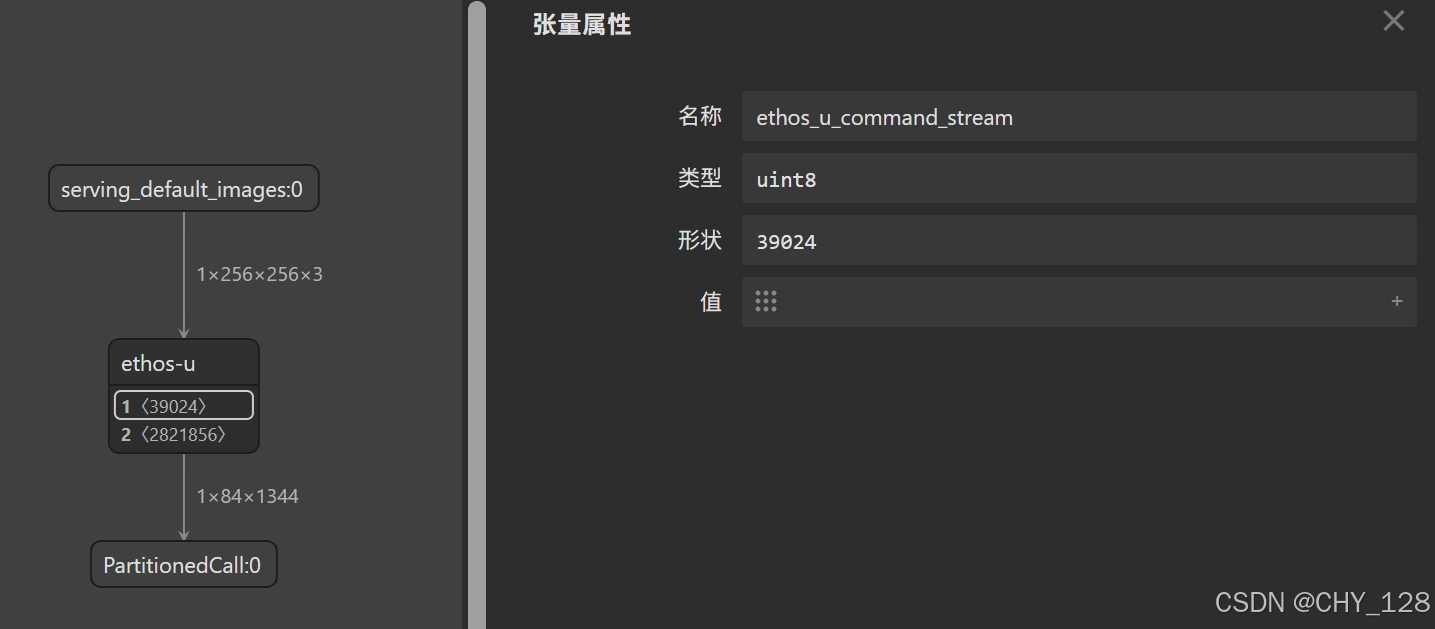
运行后会生成带 _vela 后缀的 tflite 格式文件,生成文件并不是网络,只是借用了 .tflite 格式,文件实际内容是命令流+权重(下图中的1<>和2<>),命令流可以通过hex格式打开查看,权重因为经过压缩直接看会对不上。
Vela指令
运行 Vela 指令的同时会打印 log 信息,能看到存储和带宽使用情况,还可以通过添加指令后缀调整存储使用和优化策略、查看更多信息项。vela -h 可以显示所有命令后缀,更推荐的是直接查看 Vela 官方文档。
https://gitlab.arm.com/artificial-intelligence/ethos-u/ethos-u-vela
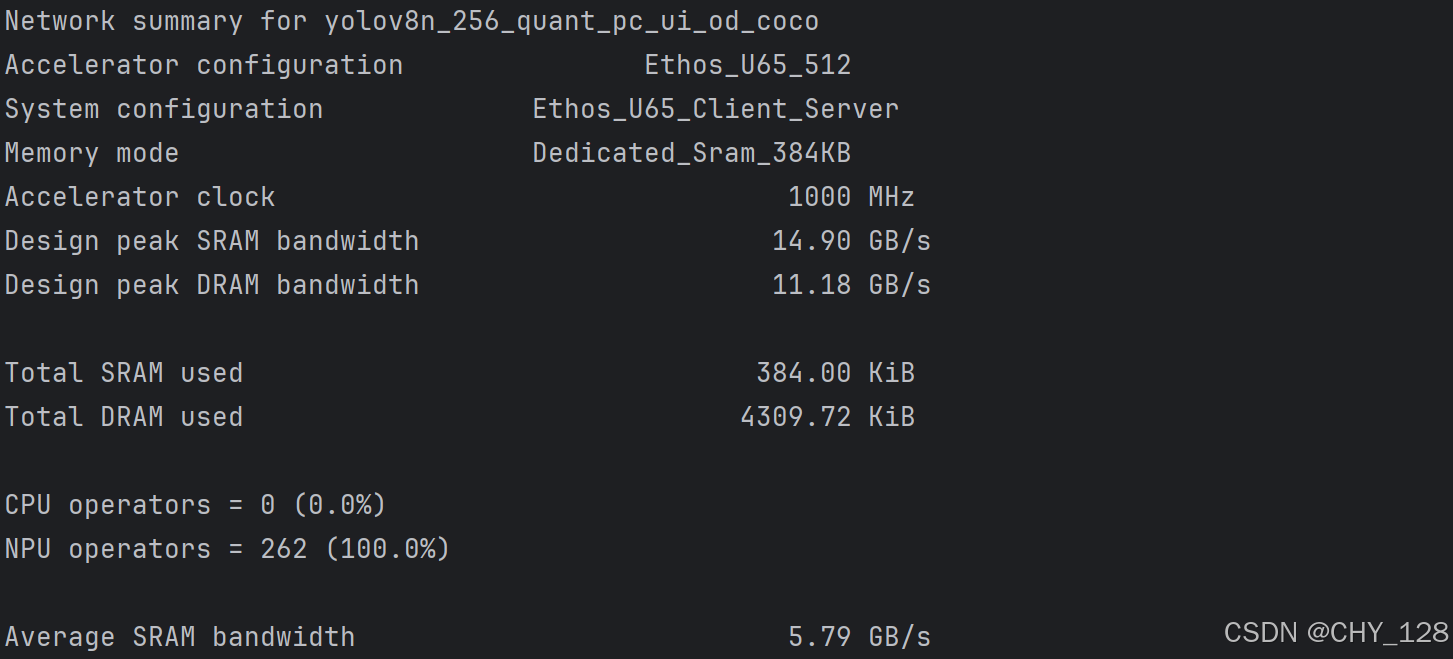
通过 --memory-mode 可以指定存储使用模式,支持 Shared_Sram 和 Dedicated Sram;通过 --config 可以指定配置文件;通过 --system-config 可以指定系统配置。后两者可以在vela安装目录找到参考 (…\Lib\site-packages\ethosu\config_files\Arm\vela.ini)。
--memory-mode Shared_Sram
--config Arm/vela.ini
--system-config Ethos_U55_High_End_Embedded
调试信息
有2条比较有用的调试指令后缀。
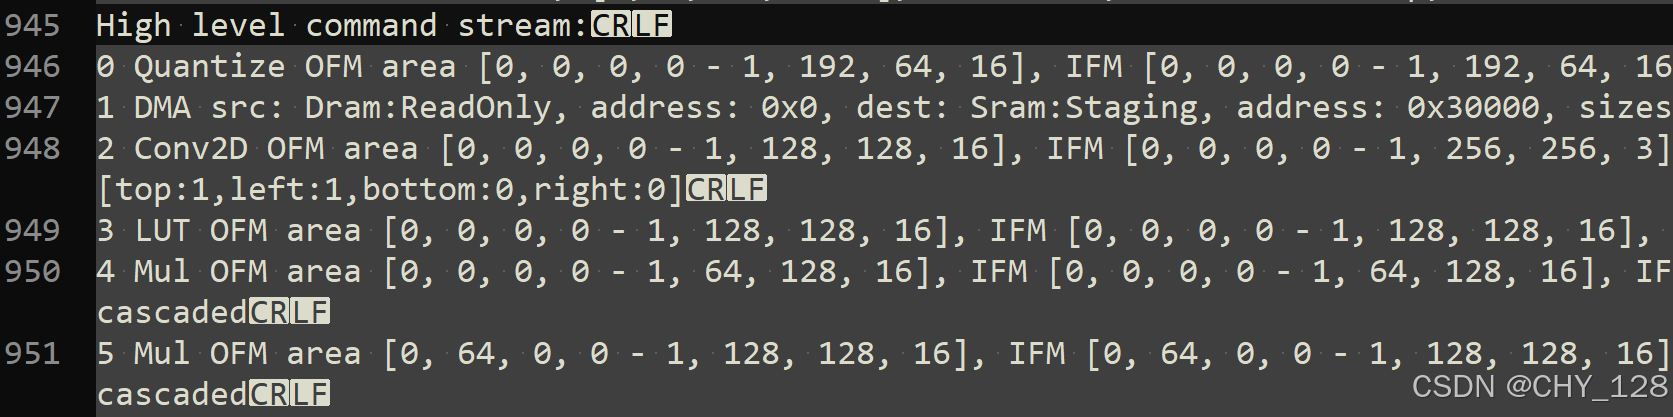
--verbose-high-level-command-stream > high-level-command.log
--verbose-register-command-stream > register-command.log
通过high-level-command可以看到优化后的网络结构,可以看到原尺寸已经被拆分成 Block 尺寸。
通过register-command可以直接看到带注释的命令行。


openvela 操作系统专为 AIoT 领域量身定制,以轻量化、标准兼容、安全性和高度可扩展性为核心特点。openvela 以其卓越的技术优势,已成为众多物联网设备和 AI 硬件的技术首选,涵盖了智能手表、运动手环、智能音箱、耳机、智能家居设备以及机器人等多个领域。
更多推荐

 24
24 0
0- 0


 已为社区贡献4条内容

所有评论(0)