
SpringBoot——嵌入式 Servlet容器_servlet 容器怎么配置
public void contextInitialized(ServletContextEvent servletContextEvent) {
    System.out.printf("服务启动");
}

@Override
public void contextDestroyed(ServletContextEvent servletContextEvent) {
    System.out.printf("服务销毁");
}
}
//通过配置类注入自定义的listener
@Configuration
public class MyMvcConfig extends WebMvcConfigurerAdapter {
public ServletListenerRegistrationBean myListener(){
    ServletListenerRegistrationBean<MyListener> servletListenerRegistrationBean = new ServletListenerRegistrationBean<>(new MyListener());
    return servletListenerRegistrationBean;
}
### 三、使用其他 Servlet容器:Jetty(长连接引用)、Undertow(不支持JSP)


【1】我们在定制嵌入式的`Servlet`容器时,会传入`ConfigurableEmbeddedServletContainer`类,我们通过`Ctrl+T`查看此可配置嵌入式类容器中可以配置`Tomcat`、`Jetty`和`Undertow`。
//ConfigurableEmbeddedServletContainer
@Bean
public EmbeddedServletContainerCustomizer embeddedServletContainerCustomizer(){
return new EmbeddedServletContainerCustomizer() {
@Override
public void customize(ConfigurableEmbeddedServletContainer container) {
container.setPort(8082);
}
};
}
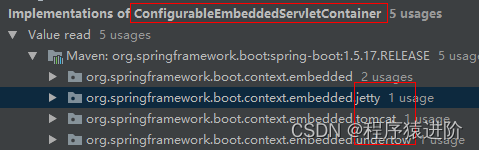
【2】默认使用`Tomcat`,因为`starter-web`引入的是`Tomcat`的`starter`。我们排除`Tomcat`的依赖,引入`Jetty`的依赖即可。
### 四、嵌入式 Servlet容器自动配置原理


【1】`EmbeddedServletContainerAutoConfiguration`类主要用来自动配置嵌入式的`Servlet`容器。
@AutoConfigureOrder(-2147483648)
@Configuration
@ConditionalOnWebApplication
//导入BeanPostProcessorsRegistrar:后置处理器:在bean初始化前后,执行(刚创建完对象,还没属性赋值)初始化工作.
//给容器中导入一些组件,导入了embeddedServletContainerCustomizerBeanPostProcessor
@Import({EmbeddedServletContainerAutoConfiguration.BeanPostProcessorsRegistrar.class})
public class EmbeddedServletContainerAutoConfiguration {
@Configuration
@ConditionalOnClass({Servlet.class, Tomcat.class})//判断当前Servlet中是否引入的Tomcat依赖
@ConditionalOnMissingBean(
value = {EmbeddedServletContainerFactory.class},
search = SearchStrategy.CURRENT
)//判断当前容器中,没有用户自定义的EmbeddedServletContainerFactory嵌入式的Servlet容器工厂,
//作用:创建嵌入式的servlet容器。
public static class EmbeddedTomcat {
public EmbeddedTomcat() {
}
    @Bean
    public TomcatEmbeddedServletContainerFactory tomcatEmbeddedServletContainerFactory() {
        return new TomcatEmbeddedServletContainerFactory();
    }
}

@Configuration
@ConditionalOnClass({Servlet.class, Undertow.class, SslClientAuthMode.class})
@ConditionalOnMissingBean(
    value = {EmbeddedServletContainerFactory.class},
    search = SearchStrategy.CURRENT
)
public static class EmbeddedUndertow {
    public EmbeddedUndertow() {
    }

    @Bean
    public UndertowEmbeddedServletContainerFactory undertowEmbeddedServletContainerFactory() {
        return new UndertowEmbeddedServletContainerFactory();
    }
}

@Configuration
@ConditionalOnClass({Servlet.class, Server.class, Loader.class, WebAppContext.class})
@ConditionalOnMissingBean(
    value = {EmbeddedServletContainerFactory.class},
    search = SearchStrategy.CURRENT
)
public static class EmbeddedJetty {
    public EmbeddedJetty() {
    }

    @Bean
    public JettyEmbeddedServletContainerFactory jettyEmbeddedServletContainerFactory() {
        return new JettyEmbeddedServletContainerFactory();
    }
}
}
【2】嵌入式的容器工厂:`EmbeddedServletContainerFactory`,用来创建嵌入式的`Servlet`容器。
public interface EmbeddedServletContainerFactory {
//获取嵌入式的Servlet容器
EmbeddedServletContainer getEmbeddedServletContainer(ServletContextInitializer… var1);
}
☛ SpringBoot 再带了三种嵌入式的容器工厂,如下:

【3】EmbeddedServletContainer:嵌入式的容器,SpringBoot 为我们提供了三种不同的嵌入式容器,与工厂相互对应,如下:
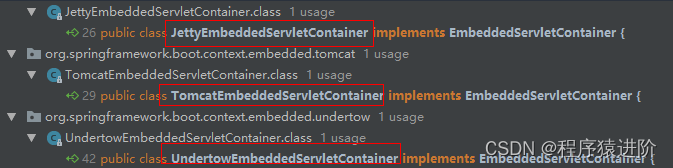
【4】我们进入工厂类 TomcatEmbeddedServletContainerFactory发现,其实也是创建一个 Tomcat并配置其基本属性。
public EmbeddedServletContainer getEmbeddedServletContainer(ServletContextInitializer… initializers) {
//创建Tomcat
Tomcat tomcat = new Tomcat();
//配置Tomcat的基本环境
File baseDir = this.baseDirectory != null?this.baseDirectory:this.createTempDir("tomcat");
tomcat.setBaseDir(baseDir.getAbsolutePath());
Connector connector = new Connector(this.protocol);
tomcat.getService().addConnector(connector);
this.customizeConnector(connector);
tomcat.setConnector(connector);
tomcat.getHost().setAutoDeploy(false);
this.configureEngine(tomcat.getEngine());
Iterator var5 = this.additionalTomcatConnectors.iterator();

while(var5.hasNext()) {
	Connector additionalConnector = (Connector)var5.next();
	tomcat.getService().addConnector(additionalConnector);
}

this.prepareContext(tomcat.getHost(), initializers);
//将配置好的Tomcat传入,并启动Tomcat,Tomcat.start()
return this.getTomcatEmbeddedServletContainer(tomcat);
}
【5】用户自定义的`Servlet`容器配置类和`SpringBoot`默认的`ServerProperties`配置类,都实现了`EmbeddedServletContainerCustomizer`接口。到底是怎么实现的哪?其实是`SpringBoot`自动配置类中引入了后置处理器,如下:
//与用户自定义的Servlet容器实现的接口名很类似,有一定的命名规则。
embeddedServletContainerCustomizerBeanPostProcessor
☛ 进入后置处理器类中,重点看如下代码:
//初始化之前执行
public Object postProcessBeforeInitialization(Object bean, String beanName) throws BeansException {
//如果当前初始化的是当前ConfigurableEmbeddedServletContainer类型的组件
if(bean instanceof ConfigurableEmbeddedServletContainer) {
this.postProcessBeforeInitialization((ConfigurableEmbeddedServletContainer)bean);
}
return bean;
}
//上面的postProcessBeforeInitialization方法:
private void postProcessBeforeInitialization(ConfigurableEmbeddedServletContainer bean) {
Iterator var2 = this.getCustomizers().iterator();
while(var2.hasNext()) {
	//获取所有的定制器,调用每一个定制器的customize方法来给servlet属性赋值。
	EmbeddedServletContainerCustomizer customizer = (EmbeddedServletContainerCustomizer)var2.next();
	customizer.customize(bean);
}
private Collection getCustomizers() {
if(this.customizers == null) {
//this.beanFactory.xx表示从容器中获取XXCustomizer自定义类型的组件
this.customizers = new ArrayList(this.beanFactory.getBeansOfType(EmbeddedServletContainerCustomizer.class, false, false).values());
Collections.sort(this.customizers, AnnotationAwareOrderComparator.INSTANCE);
this.customizers = Collections.unmodifiableList(this.customizers);
}
return this.customizers;
}
**整理下步骤:**
 【1】`SpringBoot`根据`pom.xml`中导入的依赖,给容器中添加其对应的嵌入式的服务容器工厂类,例如默认的`Tomcat`工厂:`EmbeddedServletContainerFactory`【TomcatEmbeddedServletContainerFactory】
 【2】给容器中某个组件要创建对象就会触发后置处理器`EmbeddedServletContainerCustomizerBeanPostProcessor`,只要是嵌入式的`Servlet`容器工厂,后置处理器就会工作(默认的`ServerProperties`也是实现了此类接口的,所以肯定存在相关配置类)
 【3】后置处理器从容器中获取所有的`EmbeddedServletContainerCustomizer`,调用定制器的定制方法。


### 五、嵌入式Servlet容器启动原理


根据上述的流程,我们要研究Servlet容器的启动原理。其实就是研究什么时候创建嵌入式的容器工厂和何时获取嵌入式的容器并启动Tomcat。获取嵌入式的Servlet容器工厂的过程(在new TomcatEmbeddedServletContainerFactory()时打一个断电,查看过程):
 【1】SpringBoot 应用启动运行 run() 方法。
 【2】this.refreshContext(context) 方法:用来初始化 IOC容器,既创建 IOC容器对象并初始化IOC容器中的每一个组件。
protected ConfigurableApplicationContext createApplicationContext() {
Class<?> contextClass = this.applicationContextClass;
if(contextClass == null) {
try {
//判断是不是web环境,是Web环境引入AnnotationConfigEmbeddedWebApplicationContext,否则引入AnnotationConfigApplicationContext
contextClass = Class.forName(this.webEnvironment
?“org.springframework.boot.context.embedded.AnnotationConfigEmbeddedWebApplicationContext”
:“org.springframework.context.annotation.AnnotationConfigApplicationContext”);
} catch (ClassNotFoundException var3) {
throw new IllegalStateException(“Unable create a default ApplicationContext, please specify an ApplicationContextClass”, var3);
}
}
return (ConfigurableApplicationContext)BeanUtils.instantiate(contextClass);
}
【3】`this.refresh(context)`:刷新刚才创建好的`IOC`容器。
 【4】`this.onRefresh()`:`web`的`IoC`容器重写了`onRefresh()`方法。
protected void onRefresh() {
super.onRefresh();
try {
	//重点是创建了嵌入式的Servlet容器
	this.createEmbeddedServletContainer();
} catch (Throwable var2) {
	throw new ApplicationContextException("Unable to start embedded container", var2);
}
}
【5】`this.createEmbeddedServletContainer()`:`web`的`IOC`容器会创建嵌入式的`Servlet`容器。
private void createEmbeddedServletContainer() {
EmbeddedServletContainer localContainer = this.embeddedServletContainer;
ServletContext localServletContext = this.getServletContext();
if(localContainer == null && localServletContext == null) {
// 1、获取嵌入式的Servlet嵌入式的工厂
EmbeddedServletContainerFactory containerFactory = this.getEmbeddedServletContainerFactory();
this.embeddedServletContainer = containerFactory.getEmbeddedServletContainer(
new ServletContextInitializer[]{this.getSelfInitializer()});
}
}
【6】获取嵌入式工厂后,便可从容器中获取`EmbeddedServletContainerFactory`的组件`tomcatEmbeddedServletContainerFactory`来创建`Tomcat`对象,后置处理器就会触发获取所有的定制器来确定`Servlet`容器的相关配置。
 【7】通过嵌入式工厂获取嵌入式容器,如下:
this.embeddedServletContainer = containerFactory.getEmbeddedServletContainer(
new ServletContextInitializer[]{this.getSelfInitializer()});
● 嵌入式的Servlet容器创建并启动对象:
public EmbeddedServletContainer getEmbeddedServletContainer(ServletContextInitializer… initializers) {
//创建对象
Tomcat tomcat = new Tomcat();
//启动对象
this.tomcat.start();
● 先启动嵌入式的Servlet容器,再将IOC容器中剩下没有创建的对象进行初始化,如下:
this.onRefresh();
//启动完嵌入式容器后,后续还有其他对象的初始化工作
this.registerListeners();
this.finishBeanFactoryInitialization(beanFactory);
this.finishRefresh();
} catch (BeansException var9) {
### 六、使用外置的Servlet容器
**嵌入式Servlet容器的缺点:** 默认不支持`JSP`、优化和定制比较复杂。外置`Servlet`容器:安装外部的`Tomcat`,步骤如下:
1)、必须创建一个`war`项目,需要手动创建目录(利用`Idea`快速创建)如下:
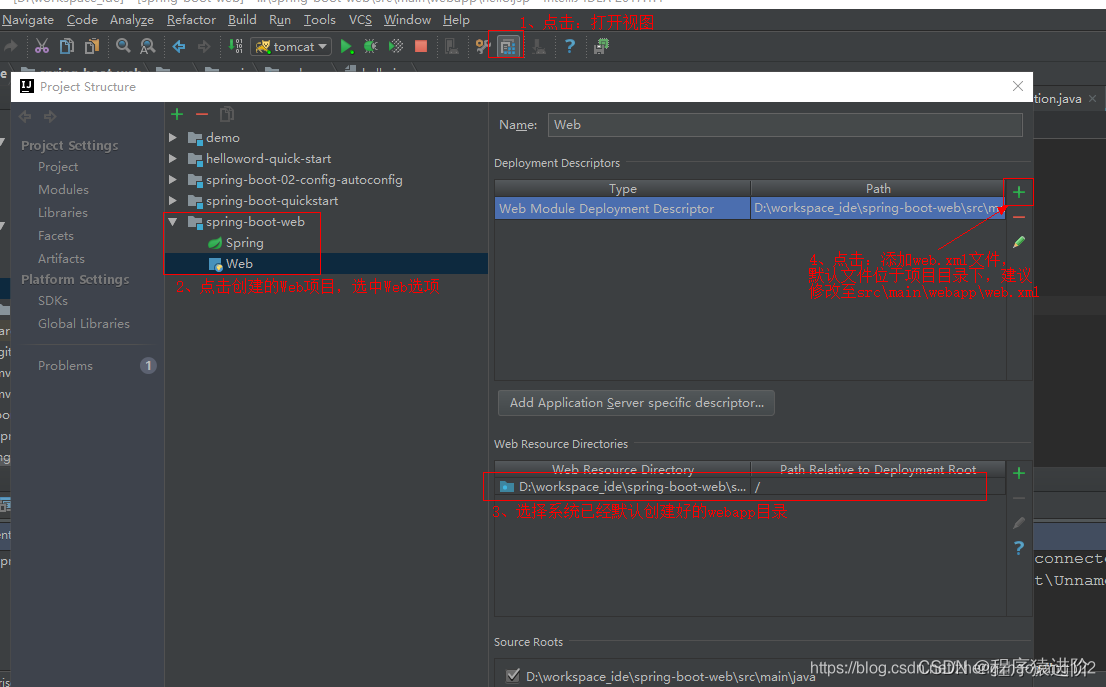
2)、将嵌入式的Tomcat指定为provide(Idea创建完后,会自动帮我们完成,但我们需要了解)
3)、需要编写一个`SpringBootServletInitializer`的子类,并调用`configure`方法:
public class ServletInitializer extends SpringBootServletInitializer {
@Override
protected SpringApplicationBuilder configure(SpringApplicationBuilder application) {
	return application.sources(SpringBootWebApplication.class);
}
}
4)、配置本地的Tomcat,并启动Tomcat即可。(此项目运行run()方法是不能启动项目的):需要设置名称和本地Tomcat的路径即可使用外部Servlet。
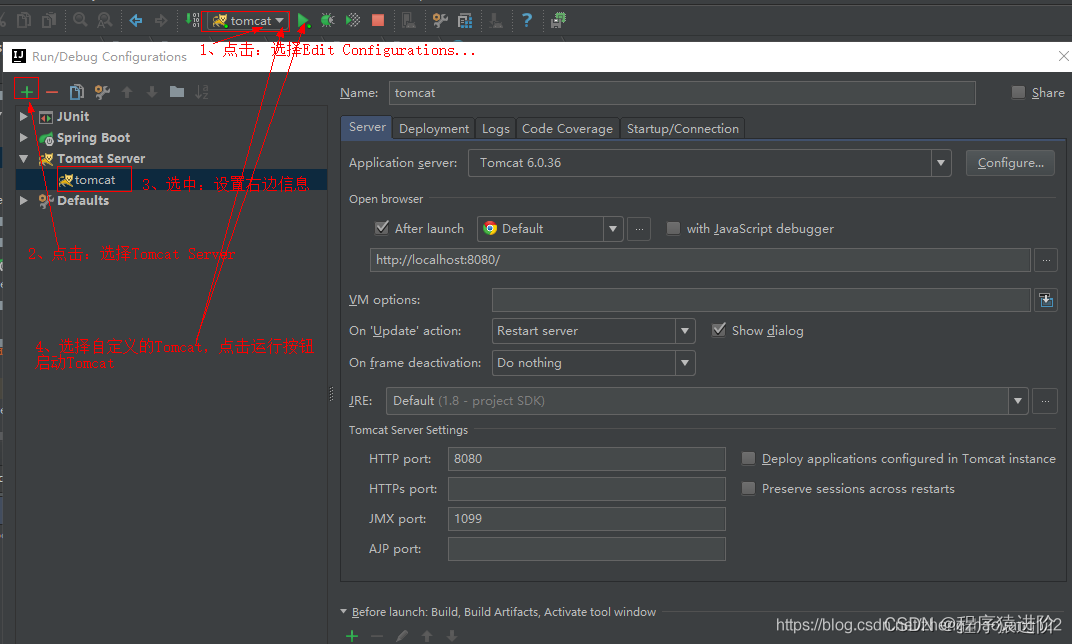
### 七、外置服务器的使用原理
☞ jar包:执行SpringBoot主类的main方法,启动并初始化IOC容器且创建嵌入式的Servlet容器。
☞ war包:启动服务器后调用SpringBootServletInitializer中的configure()方法,加载我们的SpringBoot应用并启动。
**Servlet3.0规则:**
1)、服务器启动后,会创建当前web应用中包含的每个jar内的ServletContainerInitializer实例。
2)、ServletContainerInitializer的实现放在jar包的META-INF/services文件夹下(javax.servlet.ServletContainerInitializer:内容就是ServletContainerInitializer的全类名)
3)、可以使用@handlesTypes注解,在应用启动时加载我们需要的类。
**流程:**
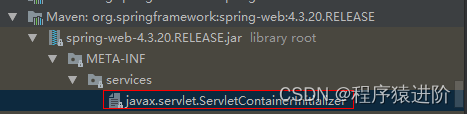
1)、启动Tomcat后,获取servlet.ServletContainerInitializer文件如下:其中的内容同下:
#文件中的内容
org.springframework.web.SpringServletContainerInitializer
2)、进入`SpringServletContainerInitializer`发现此类将`@HandlesTypes({WebApplicationInitializer.class})`标注的所有这个类型的类都传入到onStartup方法中的`Set<Class<?>>`,并为这些类创建实例。
@HandlesTypes({WebApplicationInitializer.class})
public class SpringServletContainerInitializer implements ServletContainerInitializer {
//onStartup方法,用来实例化感兴趣的对象
public void onStartup(Set<Class<?>> webAppInitializerClasses, ServletContext servletContext) throws ServletException {
if(webAppInitializerClasses != null) {
var4 = webAppInitializerClasses.iterator();
        while(var4.hasNext()) {
            Class<?> waiClass = (Class)var4.next();
            if(!waiClass.isInterface() && !Modifier.isAbstract(waiClass.getModifiers()) && WebApplicationInitializer.class.isAssignableFrom(waiClass)) {
                try {
                        //实例化
                   initializers.add((WebApplicationInitializer)waiClass.newInstance());
                } catch (Throwable var7) {
                    throw new ServletException("Failed to instantiate WebApplicationInitializer class", var7);
                }
            }
        }
    }
3)、每一个`WebApplicationInitializer`都调用自己的onStartup()方法。
while(var4.hasNext()) {
WebApplicationInitializer initializer = (WebApplicationInitializer)var4.next();
//onStartup()方法
initializer.onStartup(servletContext);
}
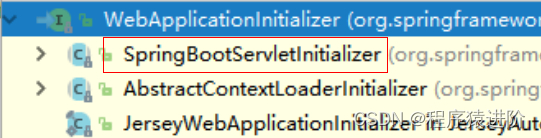
4)、`WebApplicationInitializer`只是一个接口,其实现类主要有以下三个:`SpringBootServletInitalizer`正是`SpringBoot`给我们创建好的启动类,会被创建对象,并启动自身的onStartup()方法。
5)、执行`onStartup()`方法时,会调用`createRootApplicationContext()`方法来创建容器
public void onStartup(ServletContext servletContext) throws ServletException {
this.logger = LogFactory.getLog(this.getClass());
//创建容器
WebApplicationContext rootAppContext = this.createRootApplicationContext(servletContext);
if(rootAppContext != null) {
servletContext.addListener(new ContextLoaderListener(rootAppContext) {
public void contextInitialized(ServletContextEvent event) {
}
});
//容器的具体调用实现
protected WebApplicationContext createRootApplicationContext(ServletContext servletContext) {
    //创建Spring应用的构建器
    SpringApplicationBuilder builder = this.createSpringApplicationBuilder();
    //设置主类
    builder.main(this.getClass());
    //创建一些环境
    ApplicationContext parent = this.getExistingRootWebApplicationContext(servletContext);
    if(parent != null) {
        this.logger.info("Root context already created (using as parent).");
        servletContext.setAttribute(WebApplicationContext.ROOT\_WEB\_APPLICATION\_CONTEXT\_ATTRIBUTE, (Object)null);
        builder.initializers(new ApplicationContextInitializer[]{new ParentContextApplicationContextInitializer(parent)});
    }

    builder.initializers(new ApplicationContextInitializer[]{new ServletContextApplicationContextInitializer(servletContext)});
    builder.contextClass(AnnotationConfigServletWebServerApplicationContext.class);

    //重要:子类中重写了此方法,子类出入了应用的主程序类
    builder = this.configure(builder);
    builder.listeners(new ApplicationListener[]{new SpringBootServletInitializer.WebEnvironmentPropertySourceInitializer(servletContext, null)});
    //使用build()创建一个Spring应用
    SpringApplication application = builder.build();
    if(application.getAllSources().isEmpty() && AnnotationUtils.findAnnotation(this.getClass(), Configuration.class) != null) {
        application.addPrimarySources(Collections.singleton(this.getClass()));
    }

    Assert.state(!application.getAllSources().isEmpty(), "No SpringApplication sources have been defined. Either override the configure method or add an @Configuration annotation");
    if(this.registerErrorPageFilter) {
        application.addPrimarySources(Collections.singleton(ErrorPageFilterConfiguration.class));
    }
    //启动应用
    return this.run(application);
}
6)、执行应用的`run()`方法,来启动`Spring`应用并创建IOC容器。
public ConfigurableApplicationContext run(String… args) {
StopWatch stopWatch = new StopWatch();
stopWatch.start();
ConfigurableApplicationContext context = null;
Collection exceptionReporters = new ArrayList();
this.configureHeadlessProperty();
SpringApplicationRunListeners listeners = this.getRunListeners(args);
listeners.starting();
Collection exceptionReporters;
try {
	ApplicationArguments applicationArguments = new DefaultApplicationArguments(args);
	ConfigurableEnvironment environment = this.prepareEnvironment(listeners, applicationArguments);
	this.configureIgnoreBeanInfo(environment);
	Banner printedBanner = this.printBanner(environment);
	context = this.createApplicationContext();
	exceptionReporters = this.getSpringFactoriesInstances(SpringBootExceptionReporter.class, new Class[]{ConfigurableApplicationContext.class}, new Object[]{context});
	this.prepareContext(context, environment, listeners, applicationArguments, printedBanner);

	//刷新IOC容器
	this.refreshContext(context);
	this.afterRefresh(context, applicationArguments);
	stopWatch.stop();
	if(this.logStartupInfo) {
		(new StartupInfoLogger(this.mainApplicationClass)).logStarted(this.getApplicationLog(), stopWatch);
	}

	listeners.started(context);
	this.callRunners(context, applicationArguments);
} catch (Throwable var10) {
	this.handleRunFailure(context, var10, exceptionReporters, listeners);
	throw new IllegalStateException(var10);
}

try {
	listeners.running(context);
	return context;
} catch (Throwable var9) {
	this.handleRunFailure(context, var9, exceptionReporters, (SpringApplicationRunListeners)null);
	throw new IllegalStateException(var9);
}
}

openvela 操作系统专为 AIoT 领域量身定制,以轻量化、标准兼容、安全性和高度可扩展性为核心特点。openvela 以其卓越的技术优势,已成为众多物联网设备和 AI 硬件的技术首选,涵盖了智能手表、运动手环、智能音箱、耳机、智能家居设备以及机器人等多个领域。
更多推荐

 9
9 0
0- 0


 已为社区贡献1条内容

所有评论(0)